Jenkins 企业微信对接
目录
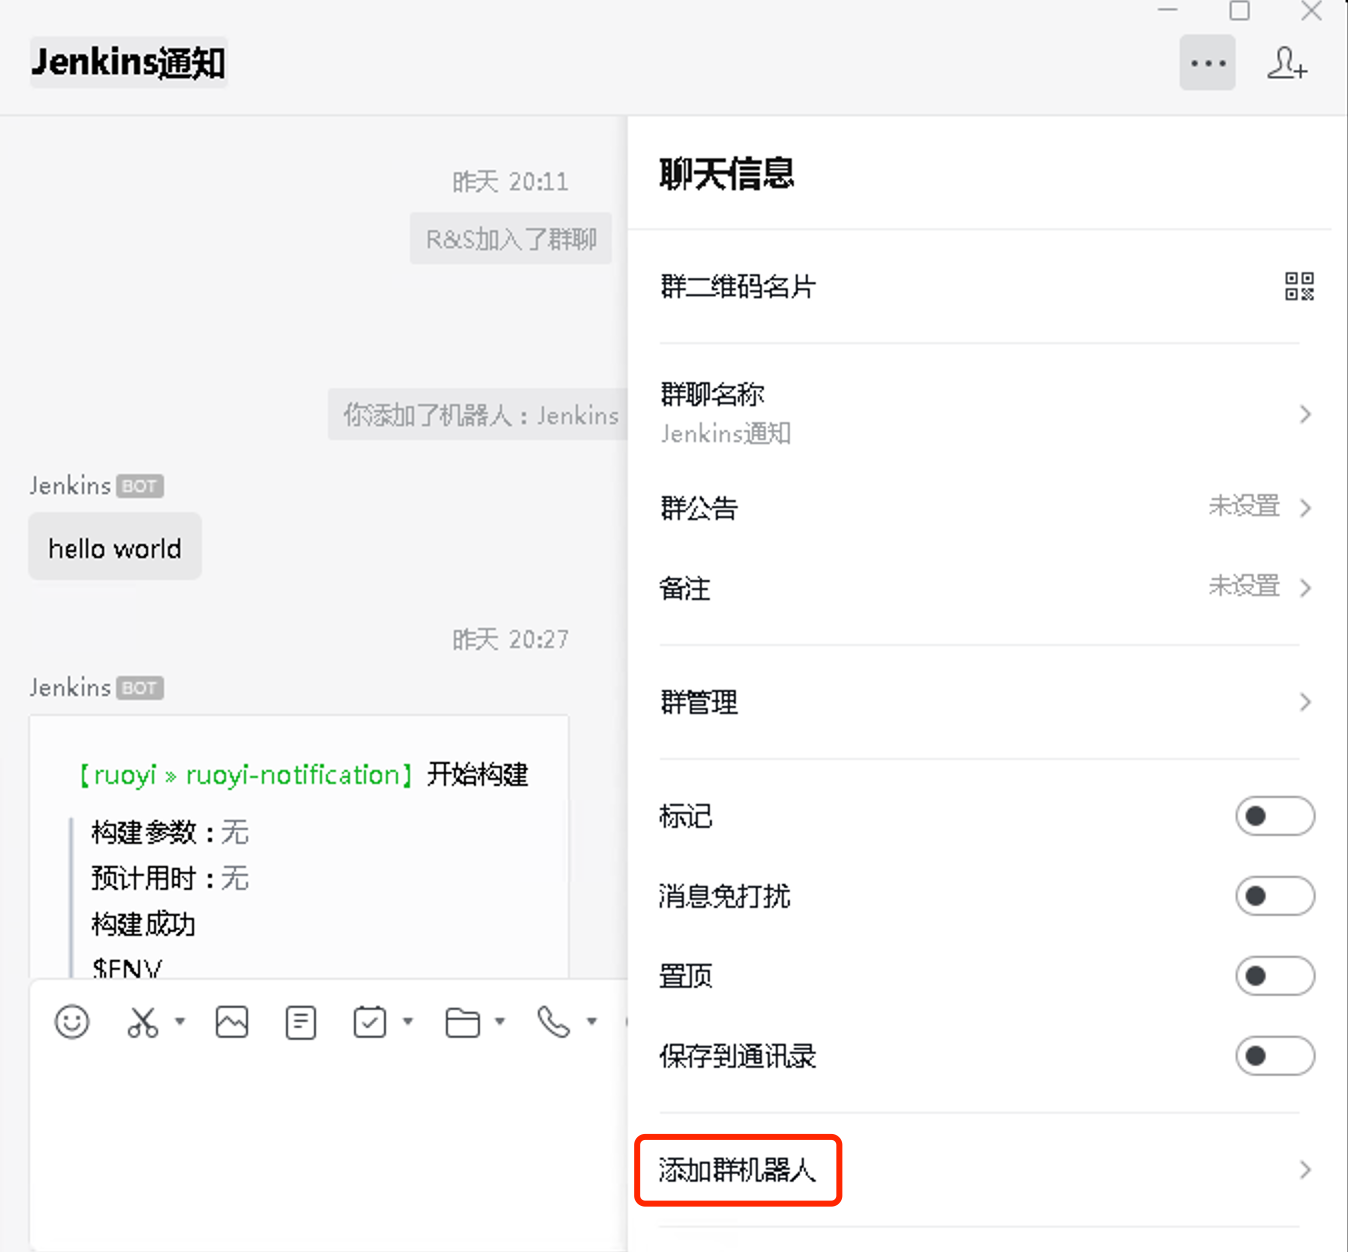
基础准备:为群聊开启机器人
在群聊的下列位置添加群机器人(电脑或手机端均支持此功能):
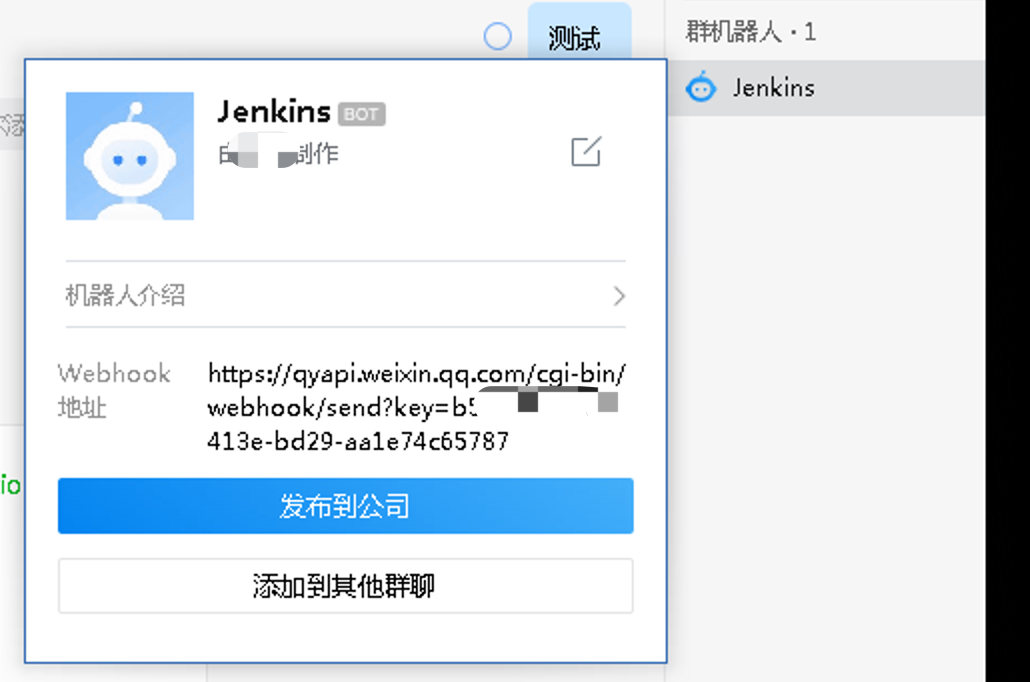
添加完成后记录 webhook 地址(注意此地址千万不要外泄):
初阶:通过企业微信插件来实现通知
安装企业微信对接插件
在 Jenkins 插件管理>Available 中搜索 wechat,安装 Qy Wechat Notification Plugin:

在流水线的最后添加下列内容:
// 前面是完整的 podtemplate,在所有 } 结束之后添加下面的内容
// 流水线脚本详见[ https://blog.halfcoffee.com/docs/cloudnative/k8s/jenkins]

pipeline {
    agent any

    stages {
        stage('post') {
            steps {
            echo 'post'
            }
        }
    }
    post{
        success{
                qyWechatNotification failNotify: true, webhookUrl: 'https://qyapi.weixin.qq.com/cgi-bin/webhook/send?key=b13e-bd29-aa1e74c65787', moreInfo:'成功'
        }
        failure{
                qyWechatNotification failNotify: true, webhookUrl: 'https://qyapi.weixin.qq.com/cgi-bin/webhook/send?key=b13e-bd29-aa1e74c65787', moreInfo:'失败'
        }
    }
}
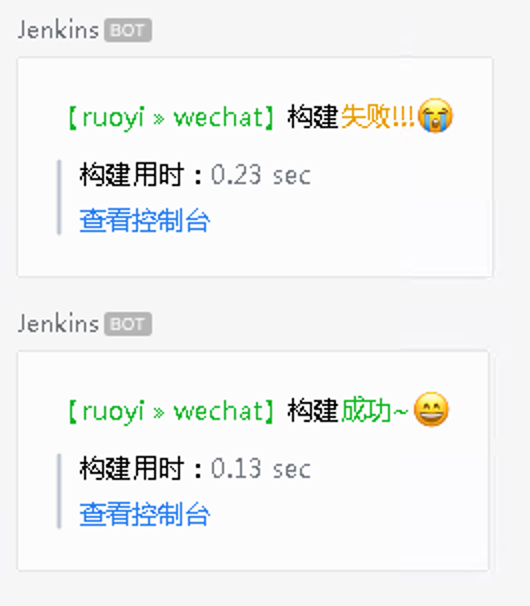
测试结果如下,在企业微信中可以收到项目构建成功或者失败的基本消息:
高阶:通过 curl 自定义发送的内容
Jenkins 企业微信对接插件能发送的功能很有限,于是自己尝试用 curl 来调用 webhook 来发送消息,只需在流水线的最后添加下列内容,将 webhook 地址更改为自己的地址即可:
// 前面是完整的 podtemplate,在所有 } 结束之后添加下面的内容
// 流水线脚本详见[ https://blog.halfcoffee.com/docs/cloudnative/k8s/jenkins]

pipeline {
    agent any

    stages {
        stage('post') {
            steps {
            echo 'post'
            }
        }
    }
    post{
        success{
        script {
        def duration = currentBuild.durationString
def splitDuration = duration.split("and counting")[0]
        def message ="<font color='green'>【 ${env.JOB_NAME} 】构建成功~😄</font> \n > 构建号码: ${env.BUILD_NUMBER} \n > 持续时间: ${splitDuration} \n > 执行人: ${currentBuild.buildCauses.shortDescription} \n > [查看控制台](${env.BUILD_URL})"
      sh "curl -X POST -H 'Content-Type: application/json' -d '{\"msgtype\": \"markdown\", \"markdown\": {\"content\": \"${message}\"}}' https://qyapi.weixin.qq.com/cgi-bin/webhook/send?key=b13e-bd29-aa1e74c65787"
        }

        }
        failure{
        script {
        def duration = currentBuild.durationString
def splitDuration = duration.split("and counting")[0]
        def message ="<font color='red'>【 ${env.JOB_NAME} 】构建失败!😭</font> \n > 构建号码: ${env.BUILD_NUMBER} \n > 持续时间: ${splitDuration} \n > 执行人: ${currentBuild.buildCauses.shortDescription} \n > [查看控制台](${env.BUILD_URL})"
      sh "curl -X POST -H 'Content-Type: application/json' -d '{\"msgtype\": \"markdown\", \"markdown\": {\"content\": \"${message}\"}}' https://qyapi.weixin.qq.com/cgi-bin/webhook/send?key=b13e-bd29-aa1e74c65787"
        }
        }
    }
}
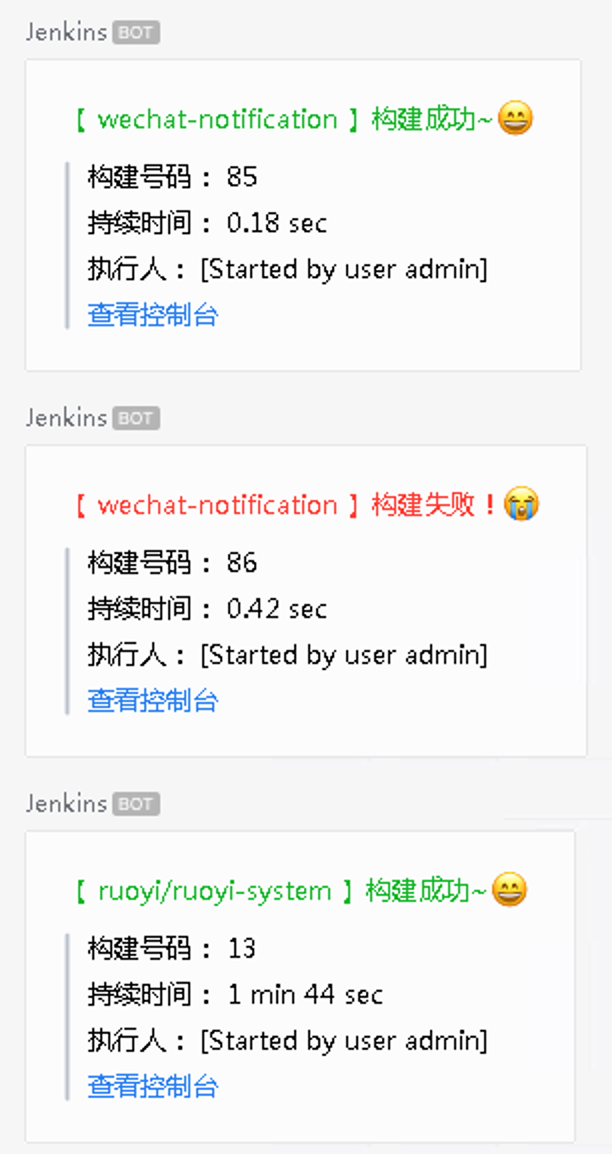
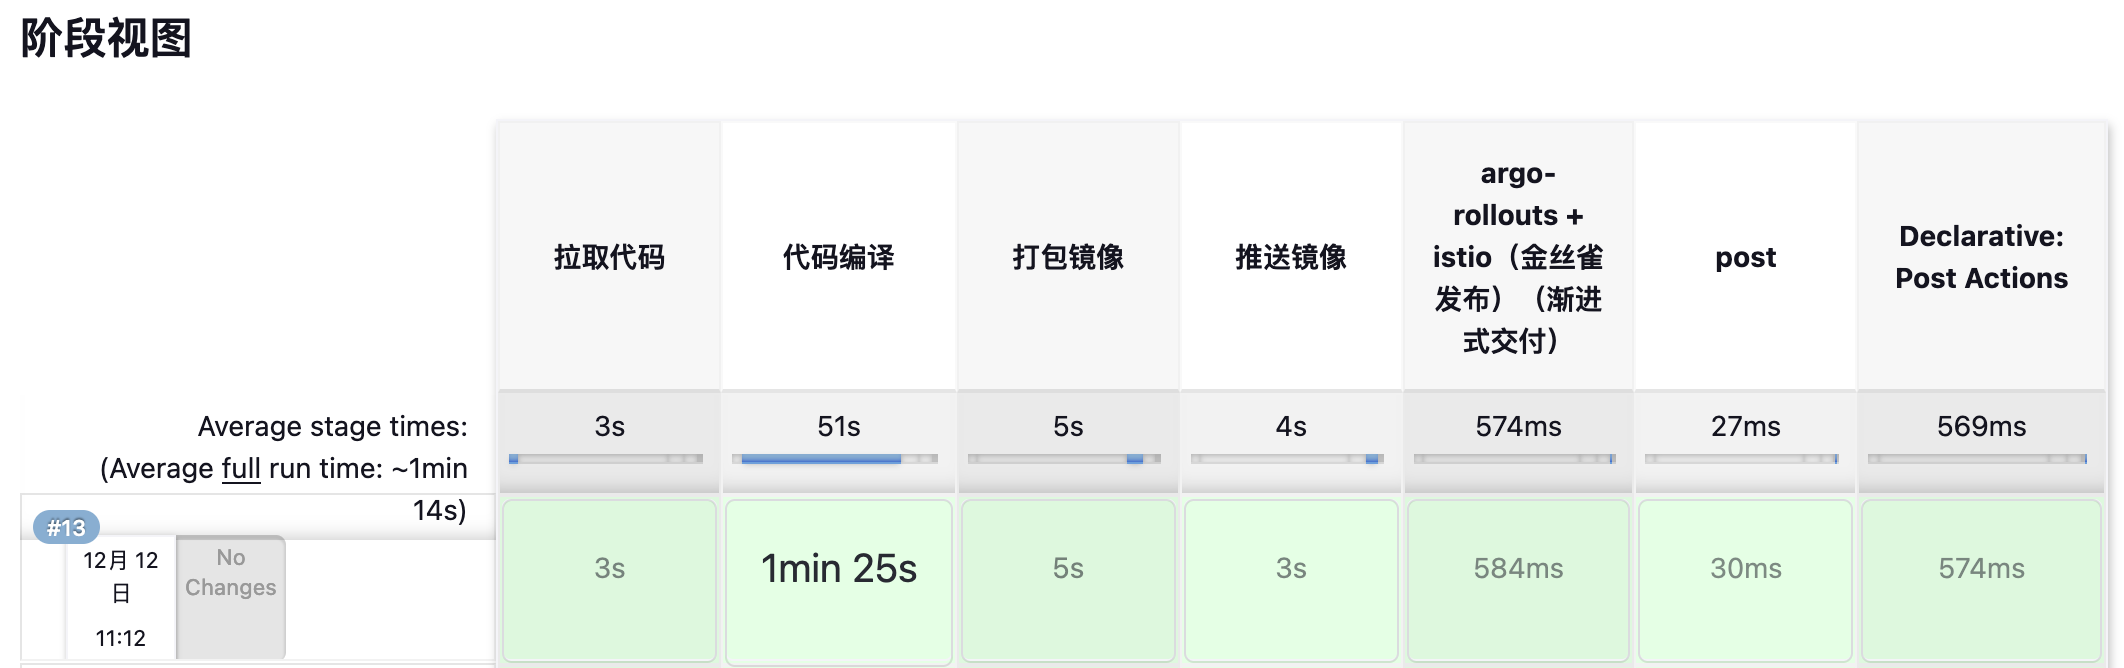
效果如下:
最后一个通告对应的阶段视图如下,前面 5 个阶段均为 podtemplate 的 stage,最后两个是发送成功或失败消息的 stage:
如何与 Podtemplate 联动
在测试时发现,如果将 pipeline 内容放在 podtemplate,只有前面的 podtemplate 执行成功才会执行后面的 pipeline,这会导致实际上只有成功的警告才会发送到企业微信,解法有两种:
- 全部使用 pipeline,不使用 podtemplate
- 在原始流水线中通过 pipeline 加入成功的告警,再新建一个流水线,进行失败的告警
下面使用第二种进行演示:
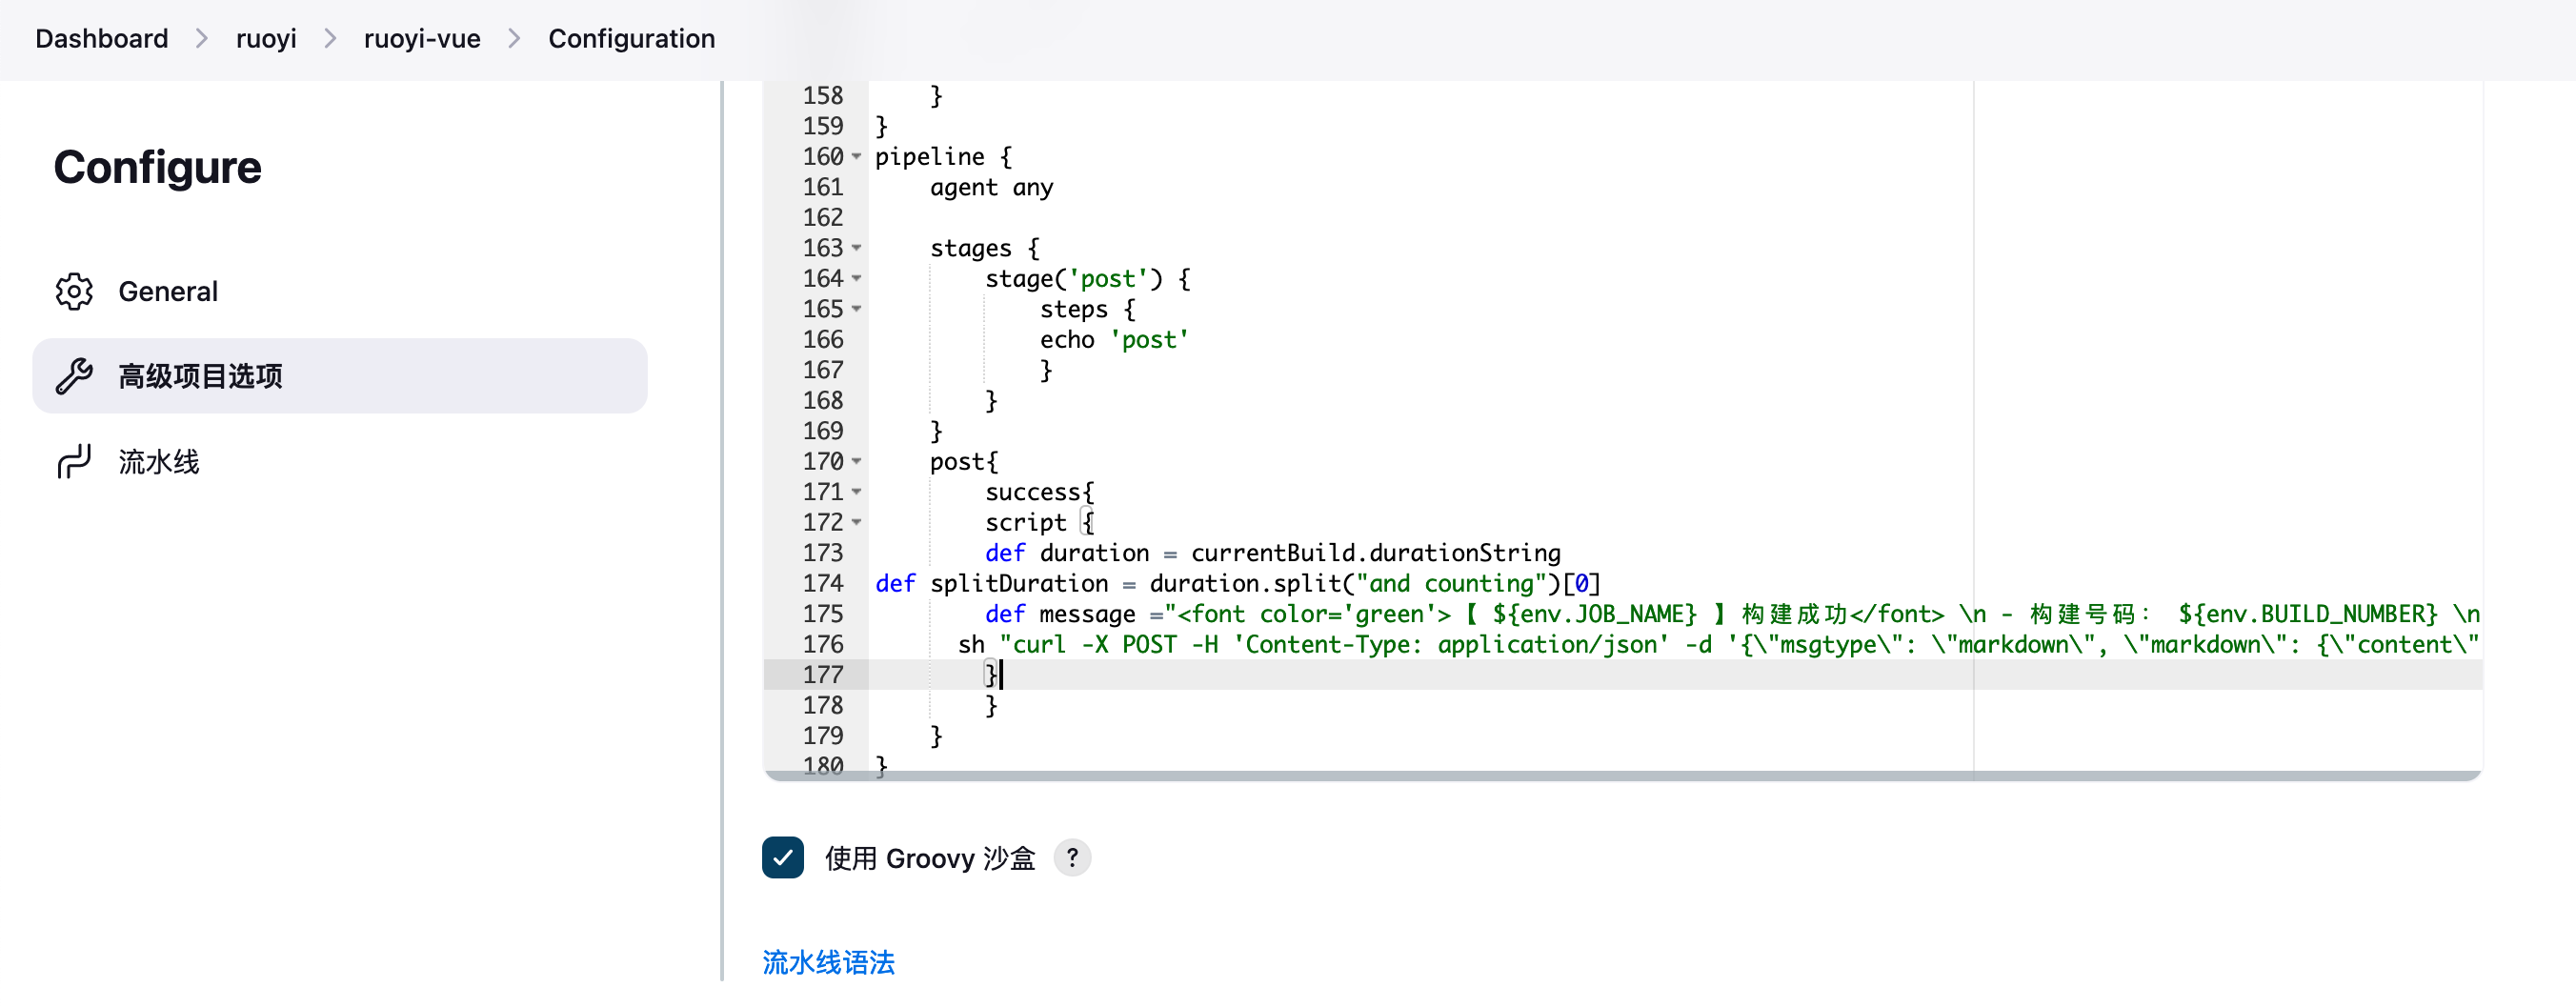
主流水线内容如下,添加了 pipeline,仅在成功时告警:
新建一个流水线,设置在上面的流水线执行完后触发:
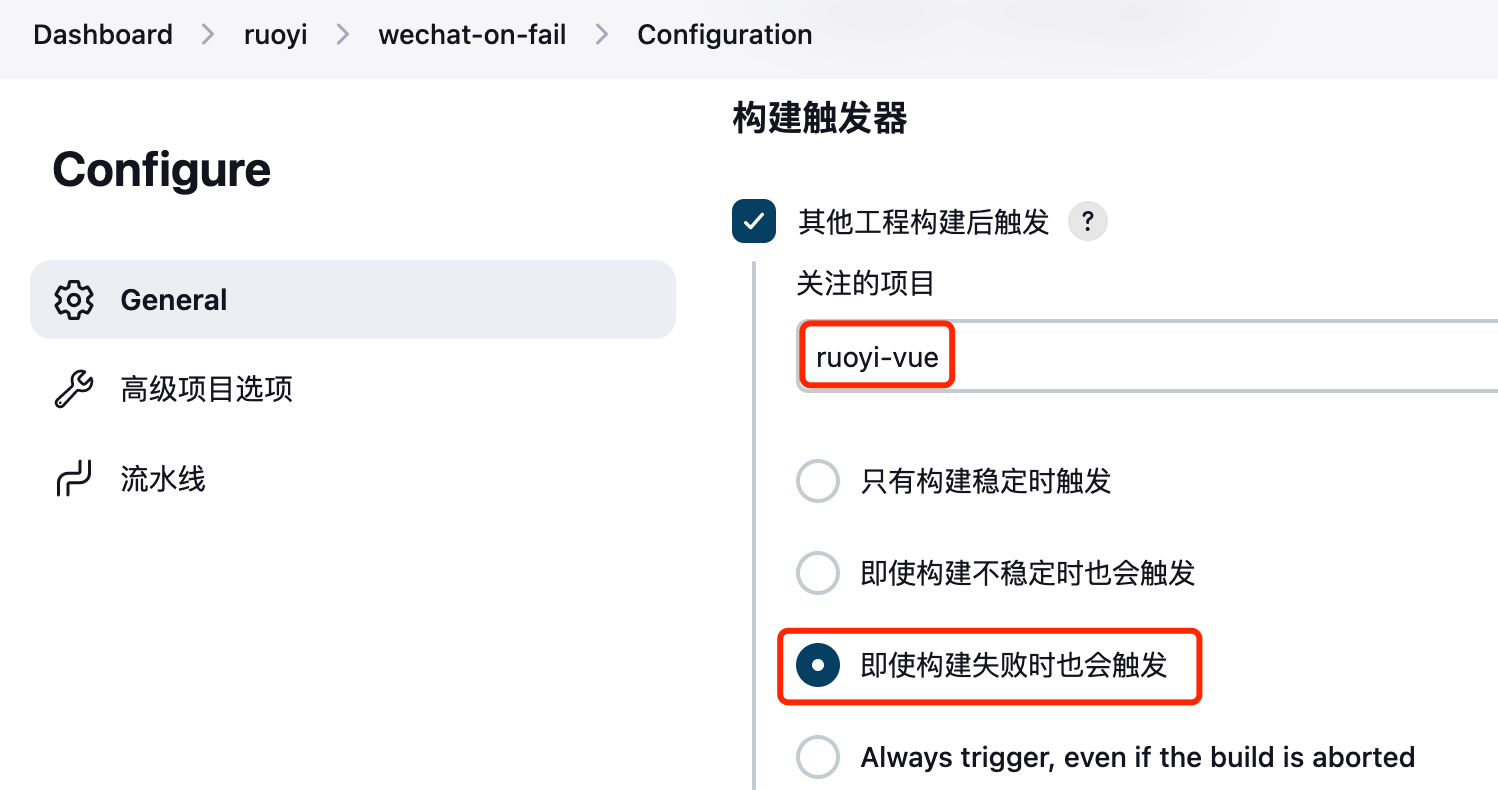
Pipeline 使用下面的脚本,脚本会获取 ruoiy-vue 上一次构建的状态,如果查找到 FAILURE 则退出,然后后面的 post 再发送构建失败的警告。
pipeline {
    agent any

    stages {
        stage('post') {
            steps {
            sh '''
            curl https://jenkins.halfcoffee.com/job/ruoyi/job/ruoyi-vue/lastBuild/api/json | grep '"result":"FAILURE"' && exit 1
            '''
            }
        }
    }
    post{
        failure{
        script {
        def duration = currentBuild.durationString
def splitDuration = duration.split("and counting")[0]
        def message ="<font color='red'>【ruoyi-vue】构建失败!😭</font> \n  > [查看控制台](https://jenkins.halfcoffee.com/job/ruoyi/job/ruoyi-vue/lastBuild/)"
      sh "curl -X POST -H 'Content-Type: application/json' -d '{\"msgtype\": \"markdown\", \"markdown\": {\"content\": \"${message}\"}}' https://qyapi.weixin.qq.com/cgi-bin/webhook/send?key=b13e-bd29-aa1e74c65787"
        }
        }
    }
}
脚本化
上面的用例中,webhook 地址会直接卸载脚本中,这存在一些安全隐患,因此可以把脚本放在外部,然后再 pipeline 中调用执行。
下面是测试通过的配置:
在 Jenkins 中添加自定义文件,名称设置为 wechatpush.sh
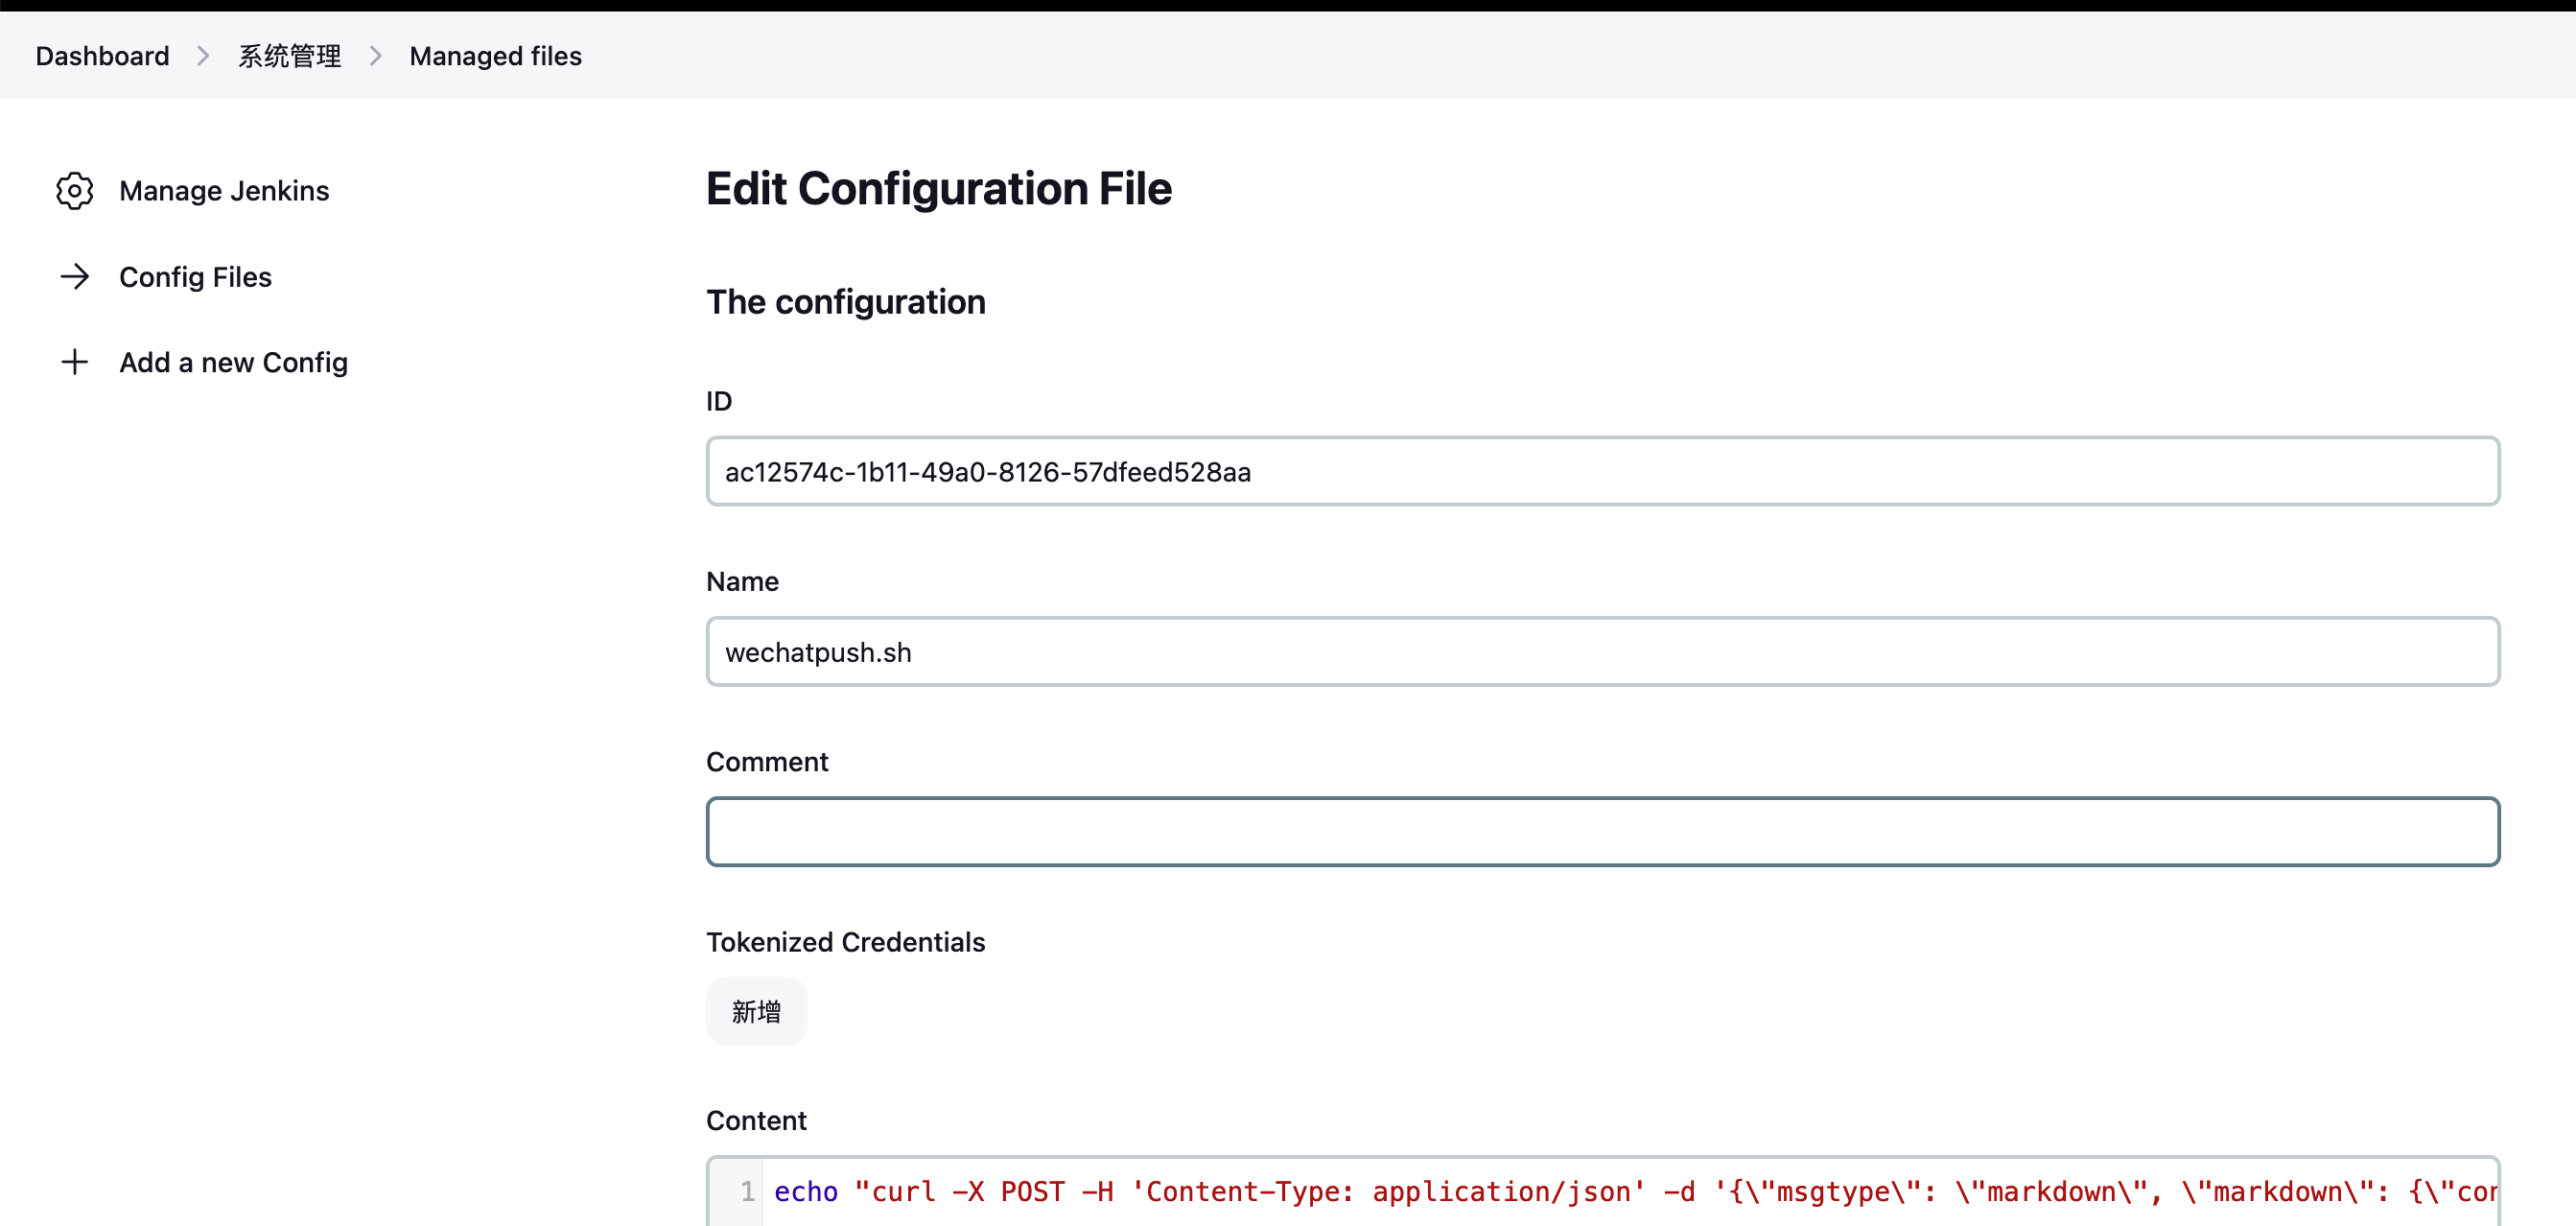
在 content 中填写下利内容,该内容会将 pipeline 中的变量(下面的 $1)传递到 content 中进行替换,然后通过 sh 执行:
echo "curl -X POST -H 'Content-Type: application/json' -d '{\"msgtype\": \"markdown\", \"markdown\": {\"content\": \"$1\"}}' https://qyapi.weixin.qq.com/cgi-bin/webhook/send?key=b13e-bd29-aa1e74c65787" | sh
相关的 pipeline 内容如下:
pipeline {
    agent any

    stages {
        stage('post') {
            steps {
            echo 'post'
            }
        }
    }
    post{
        success{

        configFileProvider([configFile(fileId: 'ac12574c-1b11-49a0-8126-57dfeed528aa', targetLocation: '/home/jenkins/wechatpush.sh')]){
        script {
        def duration = currentBuild.durationString
        def splitDuration = duration.split("and counting")[0]
        def message ="<font color='green'>【 ${env.JOB_NAME} 】构建成功~😄</font> \n > 构建号码: ${env.BUILD_NUMBER} \n > 持续时间: ${splitDuration} \n > 执行人: ${currentBuild.buildCauses.shortDescription} \n > [查看控制台](${env.BUILD_URL})"
        sh "sh /home/jenkins/wechatpush.sh \"${message}\" "
              }

        }

        }
       failure{

 configFileProvider([configFile(fileId: 'ac12574c-1b11-49a0-8126-57dfeed528aa', targetLocation: '/home/jenkins/wechatpush.sh')]){
        script {
        def duration = currentBuild.durationString
        def splitDuration = duration.split("and counting")[0]
        def message ="<font color='red'>【 ${env.JOB_NAME} 】构建失败!😭</font> \n > 构建号码: ${env.BUILD_NUMBER} \n > 持续时间: ${splitDuration} \n > 执行人: ${currentBuild.buildCauses.shortDescription} \n > [查看控制台](${env.BUILD_URL})"
        sh "sh /home/jenkins/wechatpush.sh \"${message}\" "

        }

        }
        }

    }
}
如果大家有更好的方式,欢迎补充。