centos 在线扩盘的几种方式
目录
扩展已有磁盘大小
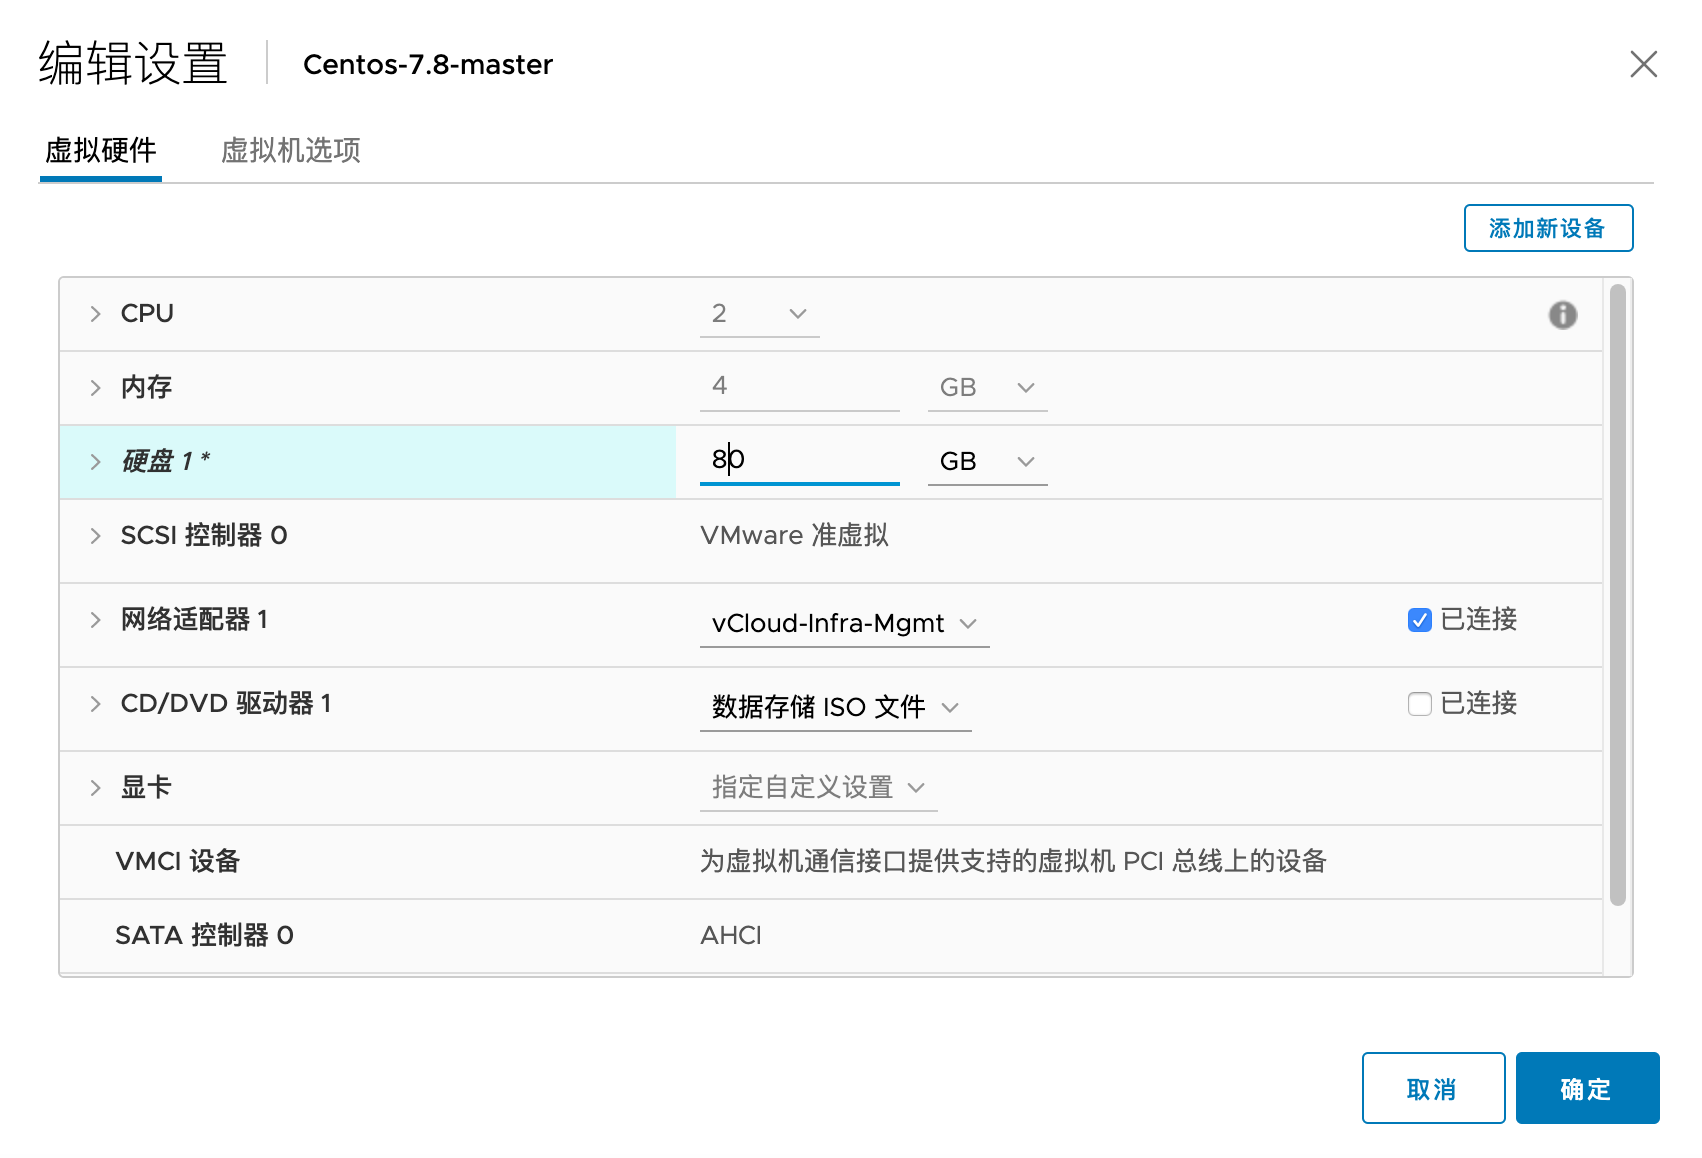
这种方式一般适用于虚拟化环境,在虚拟化环境中可以直接编辑虚拟机已有 vmdk 的大小,之后可以将磁盘新增的空间加到已有分区或者 lvm。
重新扫描磁盘
#扩展前分区只有 32G 左右
[root@centos1 ~]# fdisk -l

Disk /dev/sda: 32.2 GB, 32212254720 bytes, 62914560 sectors
在虚拟化环境中扩大原有磁盘的大小:
运行下列命令查看有哪些 SCSI 设备,下图中 scsi0 为硬盘,scsi2 为 CD rom
cat /proc/scsi/scsi | egrep -i 'Host:'
Host: scsi0 Channel: 00 Id: 00 Lun: 00
Host: scsi2 Channel: 00 Id: 00 Lun: 00
可以运行下列命令进一步确认 scsi 号和设备的关联关系
#查看所有 scsi
ls /sys/class/scsi_device/
0:0:0:0/ 2:0:0:0/

cat /sys/class/scsi_device/0\:0\:0\:0/device/model
Virtual disk

cat /sys/class/scsi_device/2\:0\:0\:0/device/model
VMware SATA CD00
运行下列命令扫描
echo "- - -" > /sys/class/scsi_host/host0/scan
echo 1 > /sys/class/scsi_device/0\:0\:0\:0/device/rescan
三个横杠(“- - -“) 表示扫描所有,实际三个参数分别为:Channel、 SCSI target ID、LUN。
echo "c t l" > /sys/class/scsi_host/host0/scan
host0表示 HBA numberc表示 HBA 的 channelt表示 SCSI target IDl表示 LUN.
#扫描后,检测到 sda 已经为 75G
[root@centos1 ~]# fdisk -l

Disk /dev/sda: 75.2 GB, 75161927680 bytes, 146800640 sectors
扩展方式1:扩展已有分区大小
这种方式的步骤大致是:
- 删除root分区的分区表
- 新建并扩展root分区
- (如有LVM时)将新分区加到 LVM
删除并扩展root分区
[root@centos1 ~]# fdisk /dev/sda
Welcome to fdisk (util-linux 2.23.2).

Changes will remain in memory only, until you decide to write them.
Be careful before using the write command.

#按p查看当前的配置,可以看到/dev/sda2的End sector为62914559.
Command (m for help): p

Disk /dev/sda: 75.2 GB, 75161927680 bytes, 146800640 sectors
Units = sectors of 1 * 512 = 512 bytes
Sector size (logical/physical): 512 bytes / 512 bytes
I/O size (minimum/optimal): 512 bytes / 512 bytes
Disk label type: dos
Disk identifier: 0x000a6d05

   Device Boot      Start         End      Blocks   Id  System
/dev/sda1   *        2048     2099199     1048576   83  Linux
/dev/sda2         2099200    62914559    30407680   8e  Linux LVM

#删除分区2,即删除root分区
Command (m for help): d
Partition number (1,2, default 2): 2
Partition 2 is deleted

#再次输入p查看到root分区已被删除
Command (m for help): p

Disk /dev/sda: 75.2 GB, 75161927680 bytes, 146800640 sectors
Units = sectors of 1 * 512 = 512 bytes
Sector size (logical/physical): 512 bytes / 512 bytes
I/O size (minimum/optimal): 512 bytes / 512 bytes
Disk label type: dos
Disk identifier: 0x000a6d05

   Device Boot      Start         End      Blocks   Id  System
/dev/sda1   *        2048     2099199     1048576   83  Linux

#新建root分区
Command (m for help): n
Partition type:
   p   primary (1 primary, 0 extended, 3 free)
   e   extended
#分区为主分区(p)
Select (default p): p
#分区号码,使用2(和之前一样)
Partition number (2-4, default 2): 2
First sector (2099200-146800639, default 2099200):
Using default value 2099200
Last sector, +sectors or +size{K,M,G} (2099200-146800639, default 146800639):
#这里默认会使用最大,保持默认即可。如果想增加一定的容量,可以使用“+10G”来表示
Using default value 146800639
Partition 2 of type Linux and of size 69 GiB is set
#查看设置正确
Command (m for help): p

Disk /dev/sda: 75.2 GB, 75161927680 bytes, 146800640 sectors
Units = sectors of 1 * 512 = 512 bytes
Sector size (logical/physical): 512 bytes / 512 bytes
I/O size (minimum/optimal): 512 bytes / 512 bytes
Disk label type: dos
Disk identifier: 0x000a6d05

   Device Boot      Start         End      Blocks   Id  System
/dev/sda1   *        2048     2099199     1048576   83  Linux
/dev/sda2         2099200   146800639    72350720   83  Linux
#输入w保存配置
Command (m for help): w
The partition table has been altered!

Calling ioctl() to re-read partition table.

WARNING: Re-reading the partition table failed with error 16: Device or resource busy.
The kernel still uses the old table. The new table will be used at
the next reboot or after you run partprobe(8) or kpartx(8)
Syncing disks.
以上配置仅更改了分区表,但kernel还不知道变化,输入下列命令更新。
partprobe /dev/sda
将新的分区加入 LVM
如果系统也配置了LVM,可以将扩展后的分区直接加到 LVM。
注:如果有 LVM,则其实可以直接用扩展方式2来加到 LVM,此处只是为了验证能够将已扩容的分区加到 LVM。
查看当前 LVM 的 PV:
#看到当前大小为29G
[root@centos1 ~]# vgdisplay
  --- Volume group ---
  VG Name               centos
  System ID
  Format                lvm2
  Metadata Areas        1
  Metadata Sequence No  3
  VG Access             read/write
  VG Status             resizable
  MAX LV                0
  Cur LV                2
  Open LV               2
  Max PV                0
  Cur PV                1
  Act PV                1
  VG Size               <29.00 GiB
  PE Size               4.00 MiB
  Total PE              7423
  Alloc PE / Size       7423 / <29.00 GiB
  Free  PE / Size       0 / 0
  VG UUID               BApJNK-AIO9-yDpp-t2Vw-wipP-3tOE-JNl19W
通过 pvresize 扩大 pv
[root@centos1 ~]# pvresize /dev/sda2
  Physical volume "/dev/sda2" changed
  1 physical volume(s) resized or updated / 0 physical volume(s) not resized

[root@centos1 ~]# pvdisplay
  --- Physical volume ---
  PV Name               /dev/sda2
  VG Name               centos
  PV Size               <69.00 GiB / not usable 2.00 MiB
  Allocatable           yes
  PE Size               4.00 MiB
  Total PE              17663
  Free PE               10240
  Allocated PE          7423
  PV UUID               hZ9peQ-vZ1n-MB4s-yX8Q-7wJU-Ige4-vREydQ
查看当前 lv 大小
[root@centos1 ~]# lvdisplay
  --- Logical volume ---
  LV Path                /dev/centos/root
  LV Name                root
  VG Name                centos
  LV UUID                8SF0dP-erOz-kjb2-Nb8P-YhvB-4CWk-IcsYdd
  LV Write Access        read/write
  LV Creation host, time centos1, 2020-04-15 02:58:58 -0400
  LV Status              available
  # open                 1
  LV Size                <26.00 GiB
  Current LE             6655
  Segments               1
  Allocation             inherit
  Read ahead sectors     auto
  - currently set to     8192
  Block device           253:0
通过 lvextend 扩展 lv大小,命令格式为:lvextend LV-name PV-name
[root@centos1 ~]# lvextend /dev/centos/root /dev/sda2
  Size of logical volume centos/root changed from <26.00 GiB (6655 extents) to <66.00 GiB (16895 extents).
  Logical volume centos/root successfully resized.

#也可以通过lvresize调整lv大小
lvresize /dev/centos/root /dev/sda2
运行 xfs_growfs /dev/mapper/centos-root扩展 xfs 分区
[root@centos1 ~]# xfs_growfs /dev/mapper/centos-root
meta-data=/dev/mapper/centos-root isize=512    agcount=4, agsize=1703680 blks
         =                       sectsz=512   attr=2, projid32bit=1
         =                       crc=1        finobt=0 spinodes=0
data     =                       bsize=4096   blocks=6814720, imaxpct=25
         =                       sunit=0      swidth=0 blks
naming   =version 2              bsize=4096   ascii-ci=0 ftype=1
log      =internal               bsize=4096   blocks=3327, version=2
         =                       sectsz=512   sunit=0 blks, lazy-count=1
realtime =none                   extsz=4096   blocks=0, rtextents=0
data blocks changed from 6814720 to 17300480

#df -h 看到 root 分区已成功扩展
[root@centos1 ~]# df -h
Filesystem               Size  Used Avail Use% Mounted on
/dev/mapper/centos-root   66G   14G   53G  20% /
扩展方式2:新建分区并加入lvm
步骤:
- fdisk 新建分区
- 创建新的 pv
- 通过 vgextend 将 PV 添加到 LV
- 通过 lvextend /dev/centos/root /dev/sdb1 扩展 LV
- 通过 xfs_growfs 扩展分区
通过 fdisk 来新建分区,步骤略。
使用下列命令让 kernel 获取新的分区信息。
partprobe /dev/sda
使用 pvcreate 创建新的 pv。
[root@localhost ~]# pvcreate /dev/sda3

[root@localhost ~]# pvdisplay
  --- Physical volume ---
  PV Name               /dev/sda2
  VG Name               centos
  PV Size               39.51 GiB / not usable 3.00 MiB
  Allocatable           yes (but full)
  PE Size               4.00 MiB
  Total PE              10114
  Free PE               0
  Allocated PE          10114
  PV UUID               xJdFEK-6xzI-sZtX-q2YU-hqf4-BrvO-SOPWEh

  "/dev/sda3" is a new physical volume of "1.00 GiB"
  --- NEW Physical volume ---
  PV Name               /dev/sda3
  VG Name
  PV Size               1.00 GiB
  Allocatable           NO
  PE Size               0
  Total PE              0
  Free PE               0
  Allocated PE          0
  PV UUID               ZKlIdm-xKKr-mWTA-alN3-xgck-EPim-nKMrbU
通过 vgextend 将 /dev/sda3 pv 添加到 vg centos,命令格式为:vgextend VG-name PV-name,其中 VG-name 可以通过 vgdisplay 查看。
[root@localhost ~]# vgextend centos /dev/sda3
  Volume group "centos" successfully extended
通过 lvresize 将 pv 加到 lv。命令格式为lvextend LV-name PV-name
[root@localhost ~]# lvresize /dev/centos/root /dev/sda3
  Extending logical volume root to 38.47 GiB
  Logical volume root successfully resized
运行 xfs_growfs /dev/mapper/centos-root扩展 xfs 分区
[root@centos1 ~]# xfs_growfs /dev/mapper/centos-root
新增磁盘并将其添加到 LVM
这种方式相当于给 Linux 添加了一块新的物理硬盘,物理环境或者虚拟化环境均支持。
需要使用 LVM 才能扩展已有的挂载点。
1.我们测试为虚拟机直接新增一块硬盘。

扫描磁盘
[root@localhost ~]# echo "- - -" > /sys/class/scsi_host/host30/scan
#扫描到新的磁盘 /dev/sdb
[root@localhost ~]# fdisk -l
Disk /dev/sdb: 1073 MB, 1073741824 bytes, 2097152 sectors
Units = sectors of 1 * 512 = 512 bytes
Sector size (logical/physical): 512 bytes / 512 bytes
I/O size (minimum/optimal): 512 bytes / 512 bytes
创建新分区
使用 fdisk 创建新分区 /dev/sdb1,命令描述见上文其他案例
[root@localhost ~]# fdisk /dev/sdb
Welcome to fdisk (util-linux 2.23.2).

Changes will remain in memory only, until you decide to write them.
Be careful before using the write command.

Device does not contain a recognized partition table
Building a new DOS disklabel with disk identifier 0xe4495073.

Command (m for help): n
Partition type:
   p   primary (0 primary, 0 extended, 4 free)
   e   extended
Select (default p): p
Partition number (1-4, default 1):
First sector (2048-2097151, default 2048):
Using default value 2048
Last sector, +sectors or +size{K,M,G} (2048-2097151, default 2097151):
Using default value 2097151
Partition 1 of type Linux and of size 1023 MiB is set

Command (m for help): w
The partition table has been altered!

Calling ioctl() to re-read partition table.
Syncing disks.
扫描新的分区表
[root@localhost ~]# partprobe /dev/sdb
将分区添加到 lv
[root@localhost ~]# pvcreate /dev/sdb1
  Physical volume "/dev/sdb1" successfully created
[root@localhost ~]# vgextend centos /dev/sdb1
  Volume group "centos" successfully extended
[root@localhost ~]# lvresize /dev/centos/root /dev/sdb1
  Extending logical volume root to 39.47 GiB
  Logical volume root successfully resized
扩展文件系统
运行 xfs_growfs /dev/mapper/centos-root扩展 xfs 分区
[root@localhost ~]# xfs_growfs /dev/mapper/centos-root
meta-data=/dev/mapper/centos-root isize=256    agcount=5, agsize=2456064 blks
         =                       sectsz=512   attr=2, projid32bit=1
         =                       crc=0
data     =                       bsize=4096   blocks=10346496, imaxpct=25
         =                       sunit=0      swidth=0 blks
naming   =version 2              bsize=4096   ascii-ci=0 ftype=0
log      =internal               bsize=4096   blocks=4797, version=2
         =                       sectsz=512   sunit=0 blks, lazy-count=1
realtime =none                   extsz=4096   blocks=0, rtextents=0
[root@localhost ~]# df -h
Filesystem               Size  Used Avail Use% Mounted on
/dev/mapper/centos-root   40G  1.4G   39G   4% /
ext4 扩展
如果 Linux 直接将一个磁盘挂在了某路径,没有对磁盘进行分区,例如 :
[root@Docker-host ~]# cat /etc/fstab

#
# /etc/fstab
# Created by anaconda on Tue Jul 21 11:22:37 2020
#
# Accessible filesystems, by reference, are maintained under '/dev/disk'
# See man pages fstab(5), findfs(8), mount(8) and/or blkid(8) for more info
#
/dev/mapper/centos-root /                       xfs     defaults        0 0
/dev/sdd /nextcloud                      ext4     defaults        0 0
此时只需要扩容磁盘,然后运行下列命令即可:
resize2fs /dev/sdd
参考资料
https://linoxide.com/linux-how-to/add-new-disk-centos-7-without-rebooting/
https://www.golinuxcloud.com/extend-resize-primary-partition-non-lvm-linux/