Avi 部署使用指南(5):Avi VS 常见配置
目录
- Avi 部署使用指南(5):Avi VS 常见配置
1. HTTP 到 HTTPS 重定向
需求描述:
- 网站需要挂载证书以保证连接安全,当用户访问 80 端口时,系统自动重定向到 443 端口,使用 TLS 连接。
配置步骤:
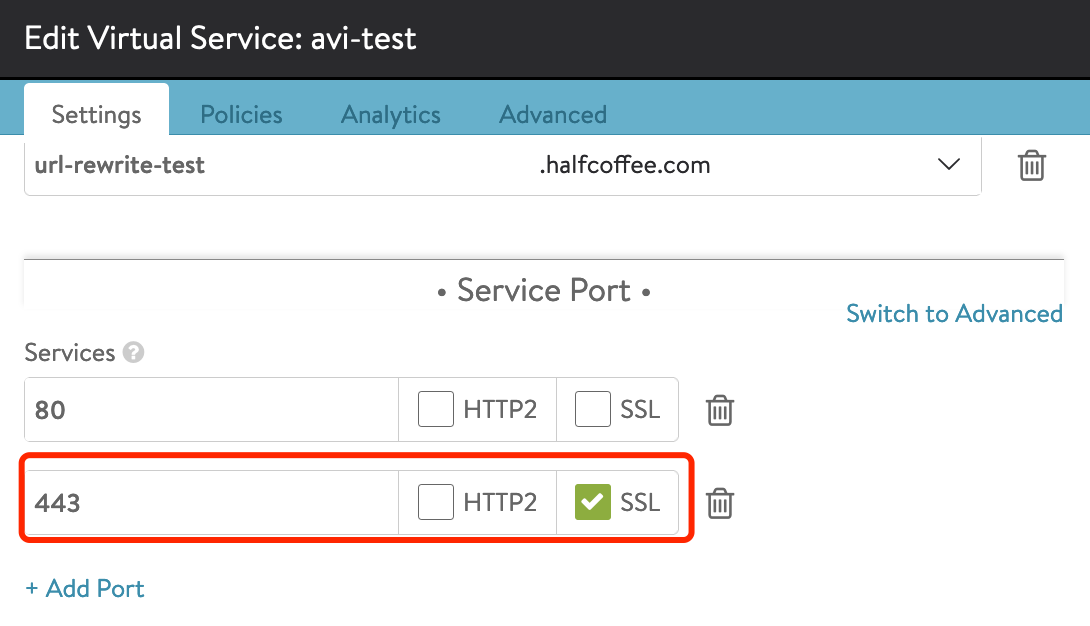
1、创建 Virtual Service,设置 80 和 443 两个端口,其中 443 勾选 SSL:
2、在 “Application Profile” 中勾选 “System-Secure-HTTP”:
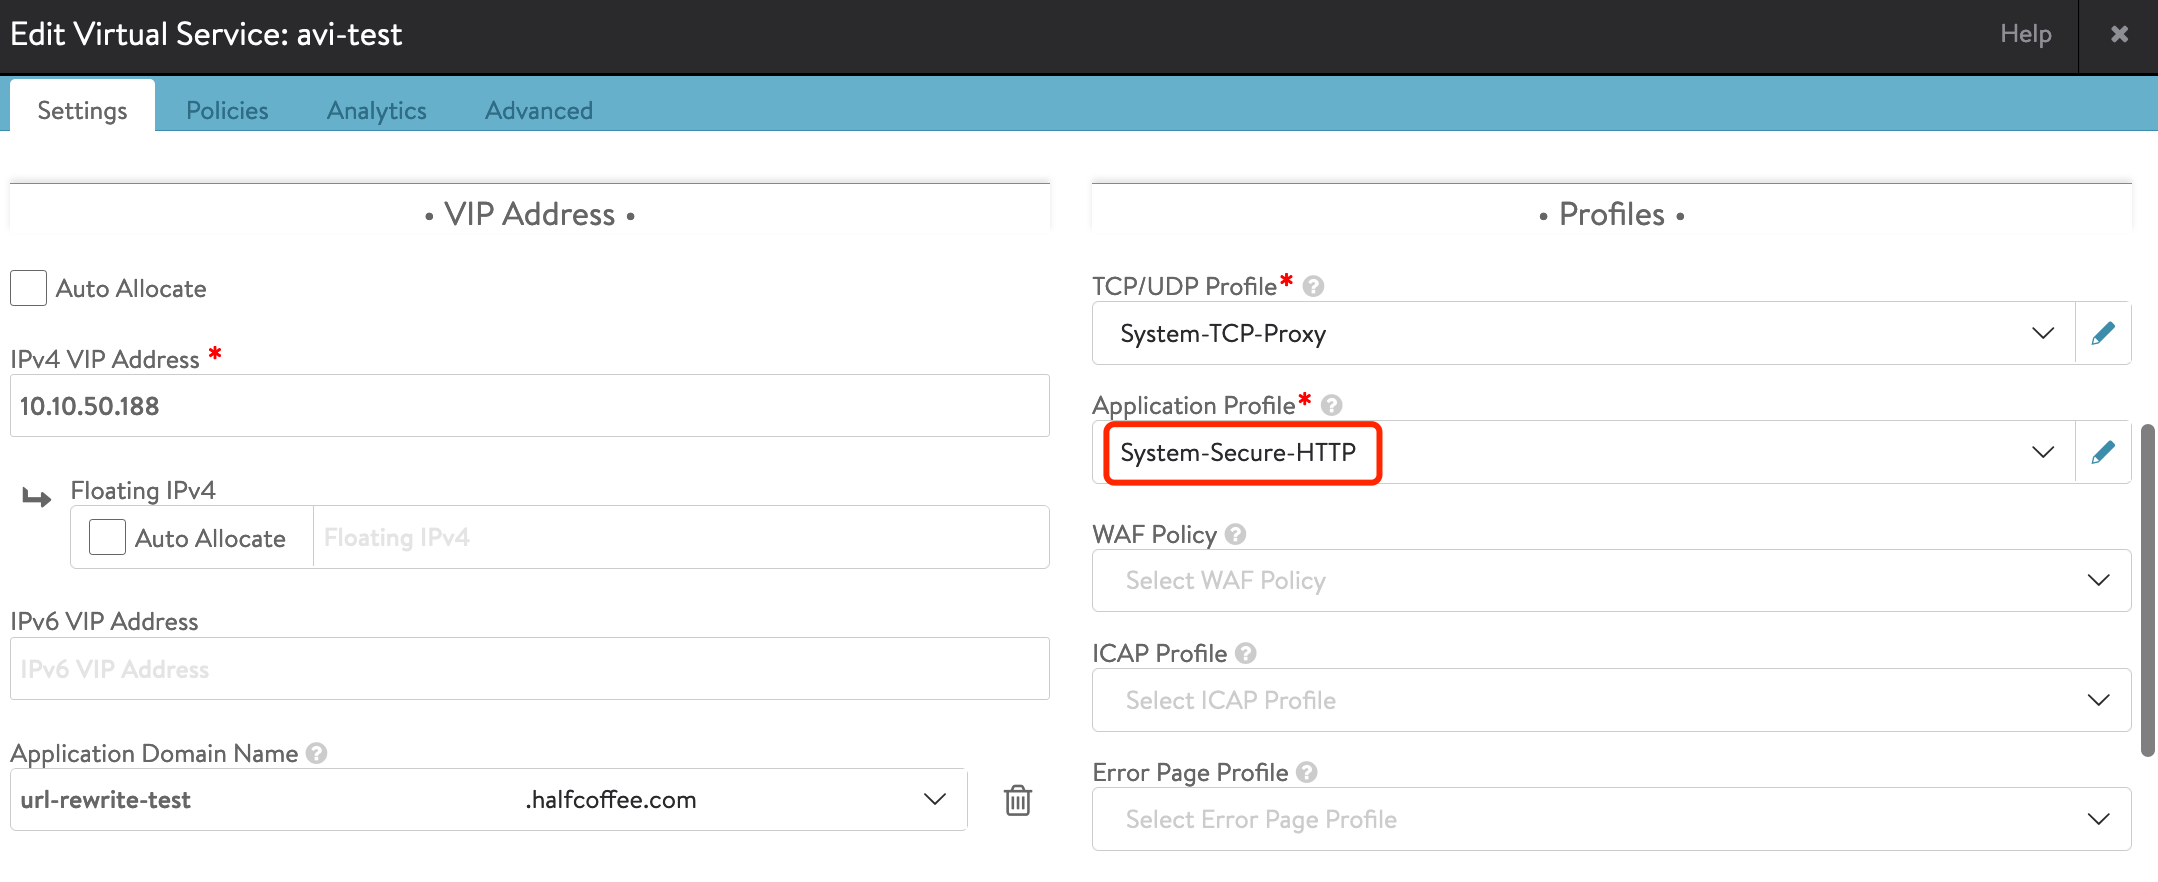
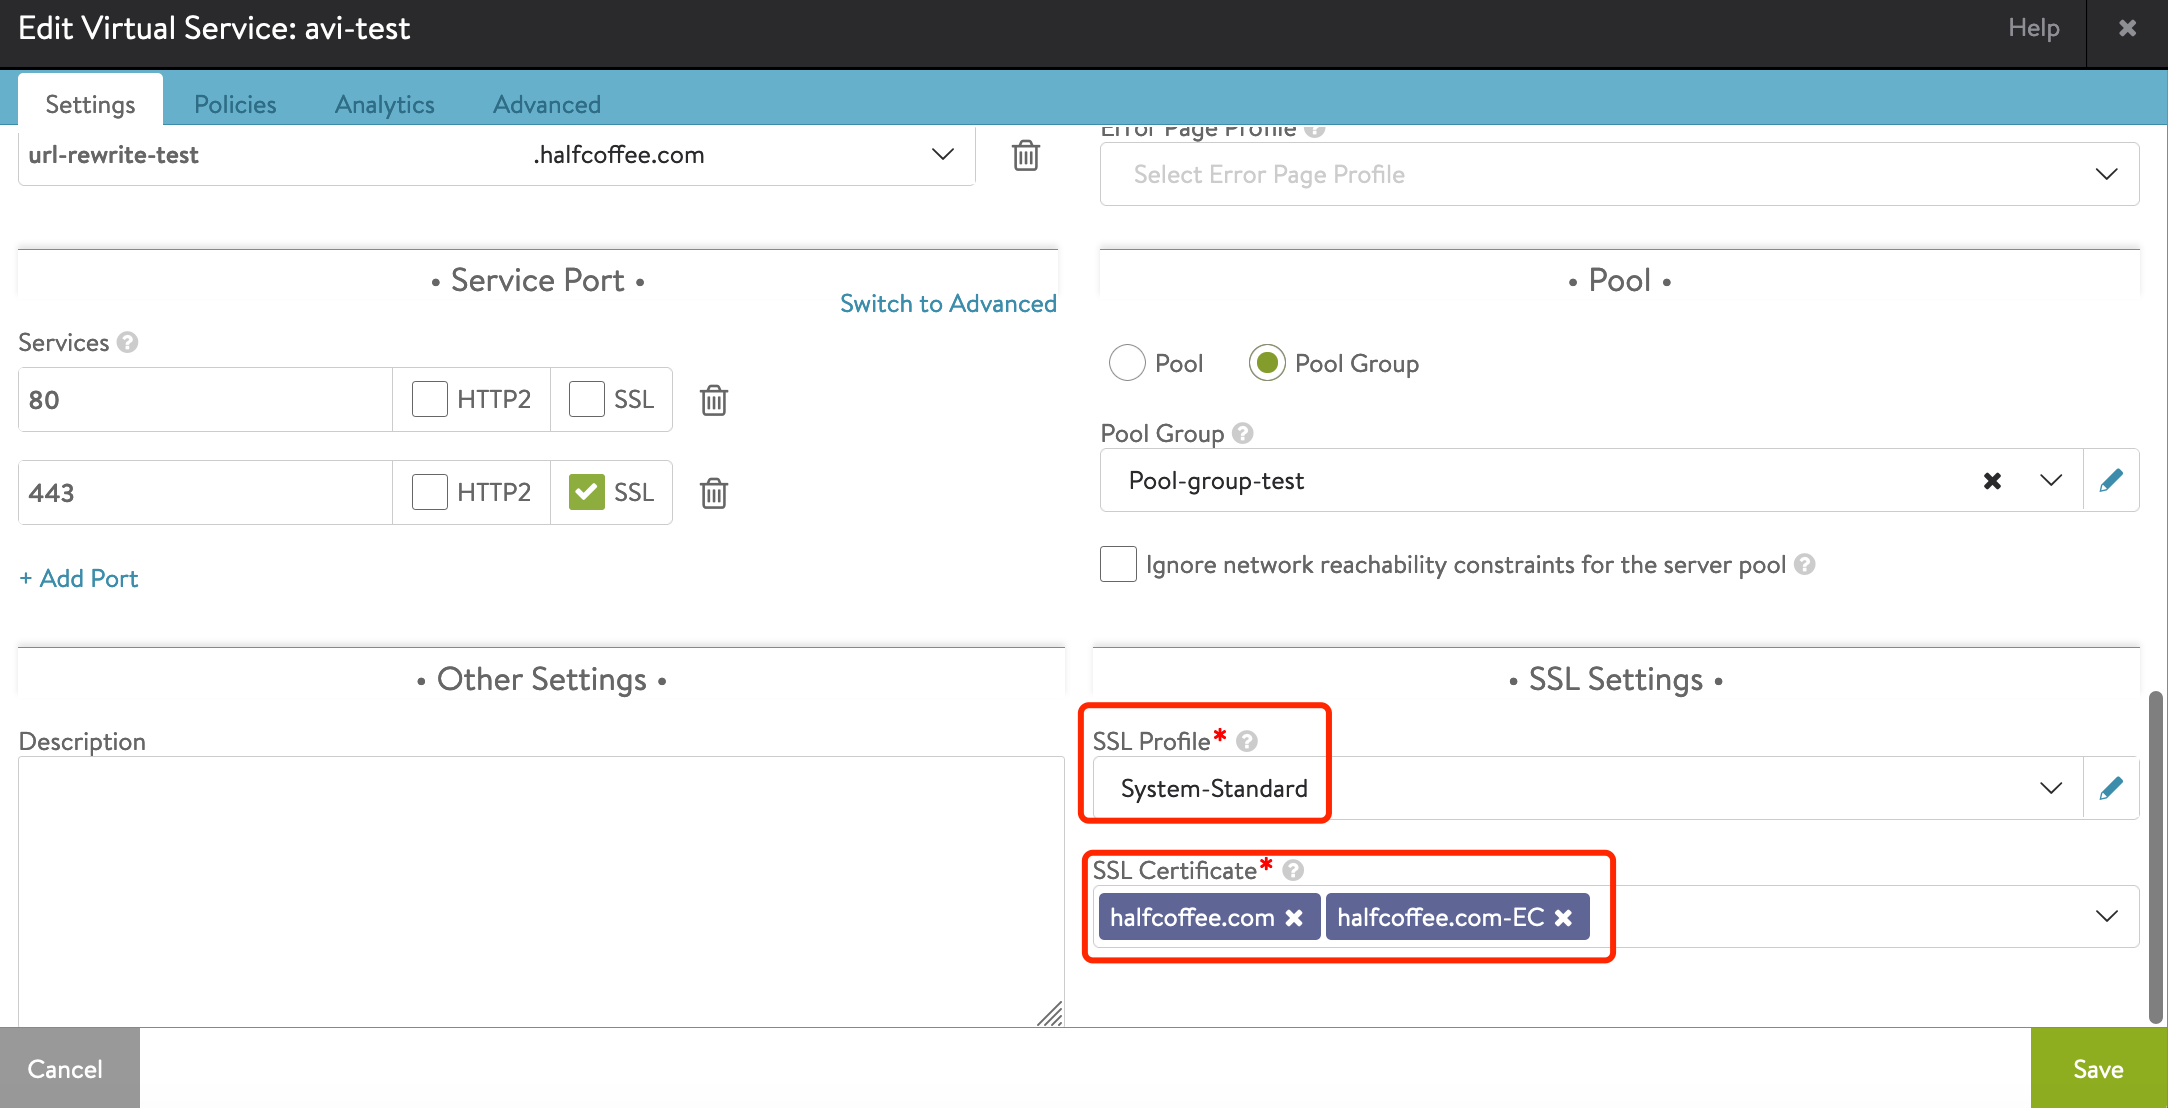
3、为 Virtual Service 关联 SSL profile 和证书:
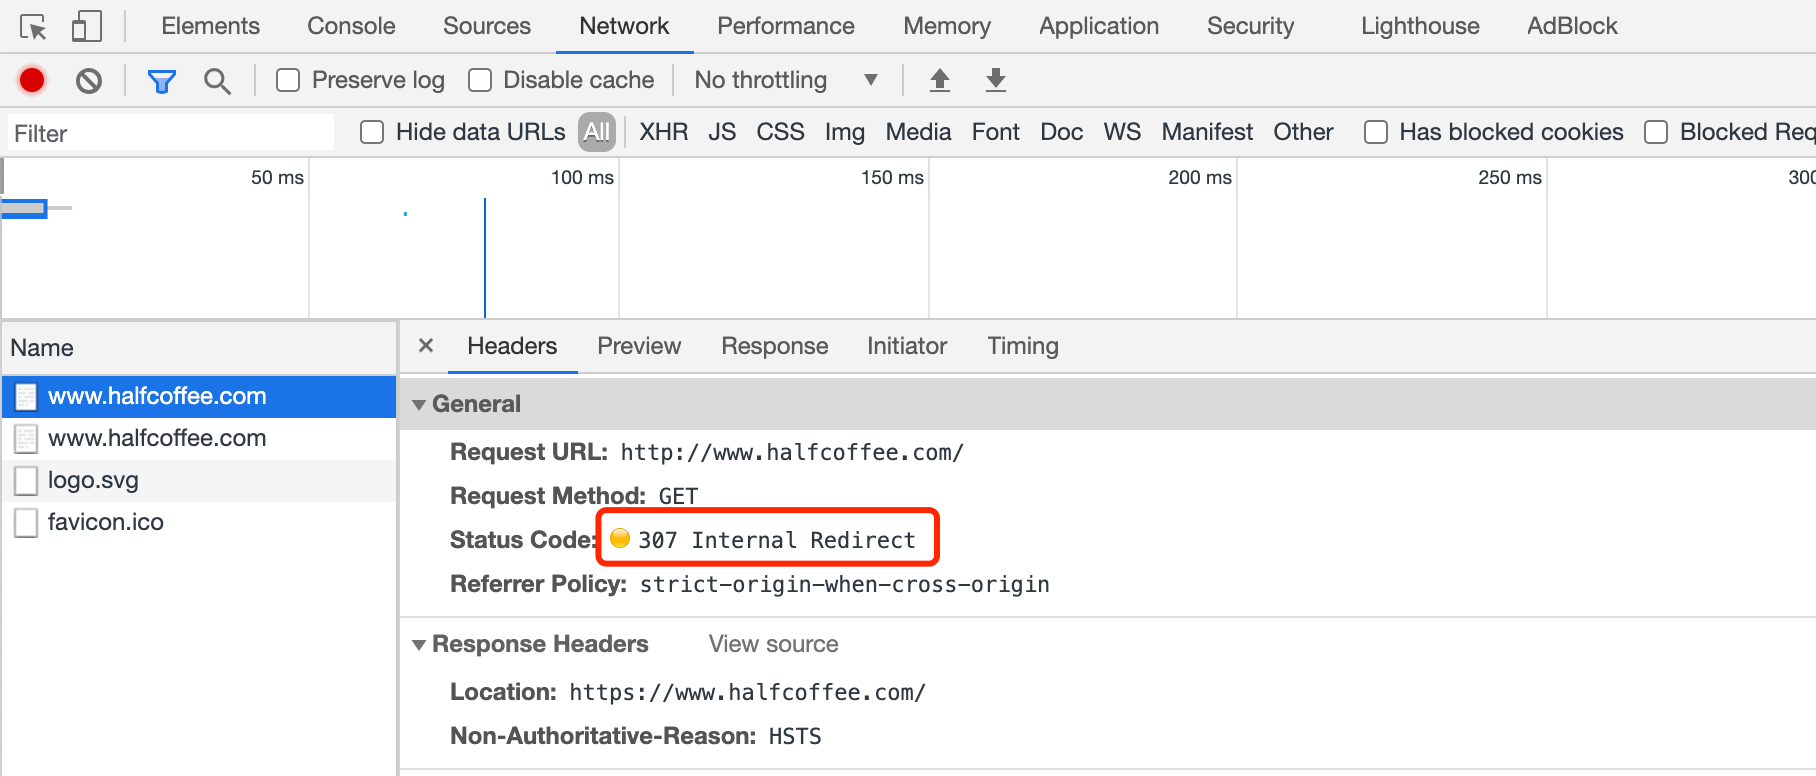
4、访问测试:
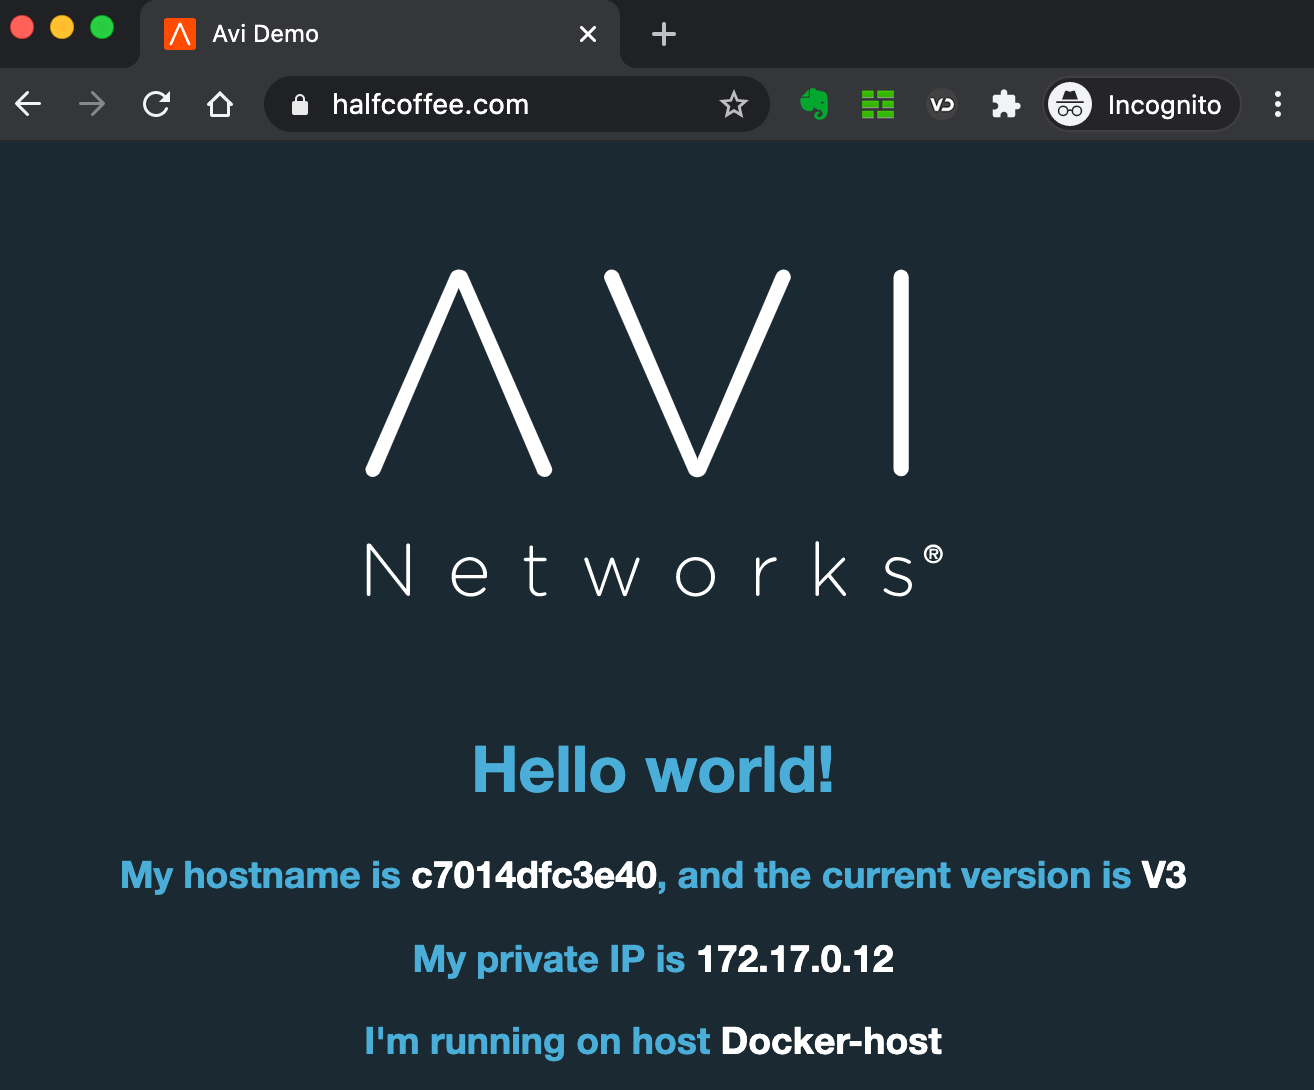
在 Client 的浏览器中 inspect 请求,发现 HTTP 被重定向到 HTTPS:
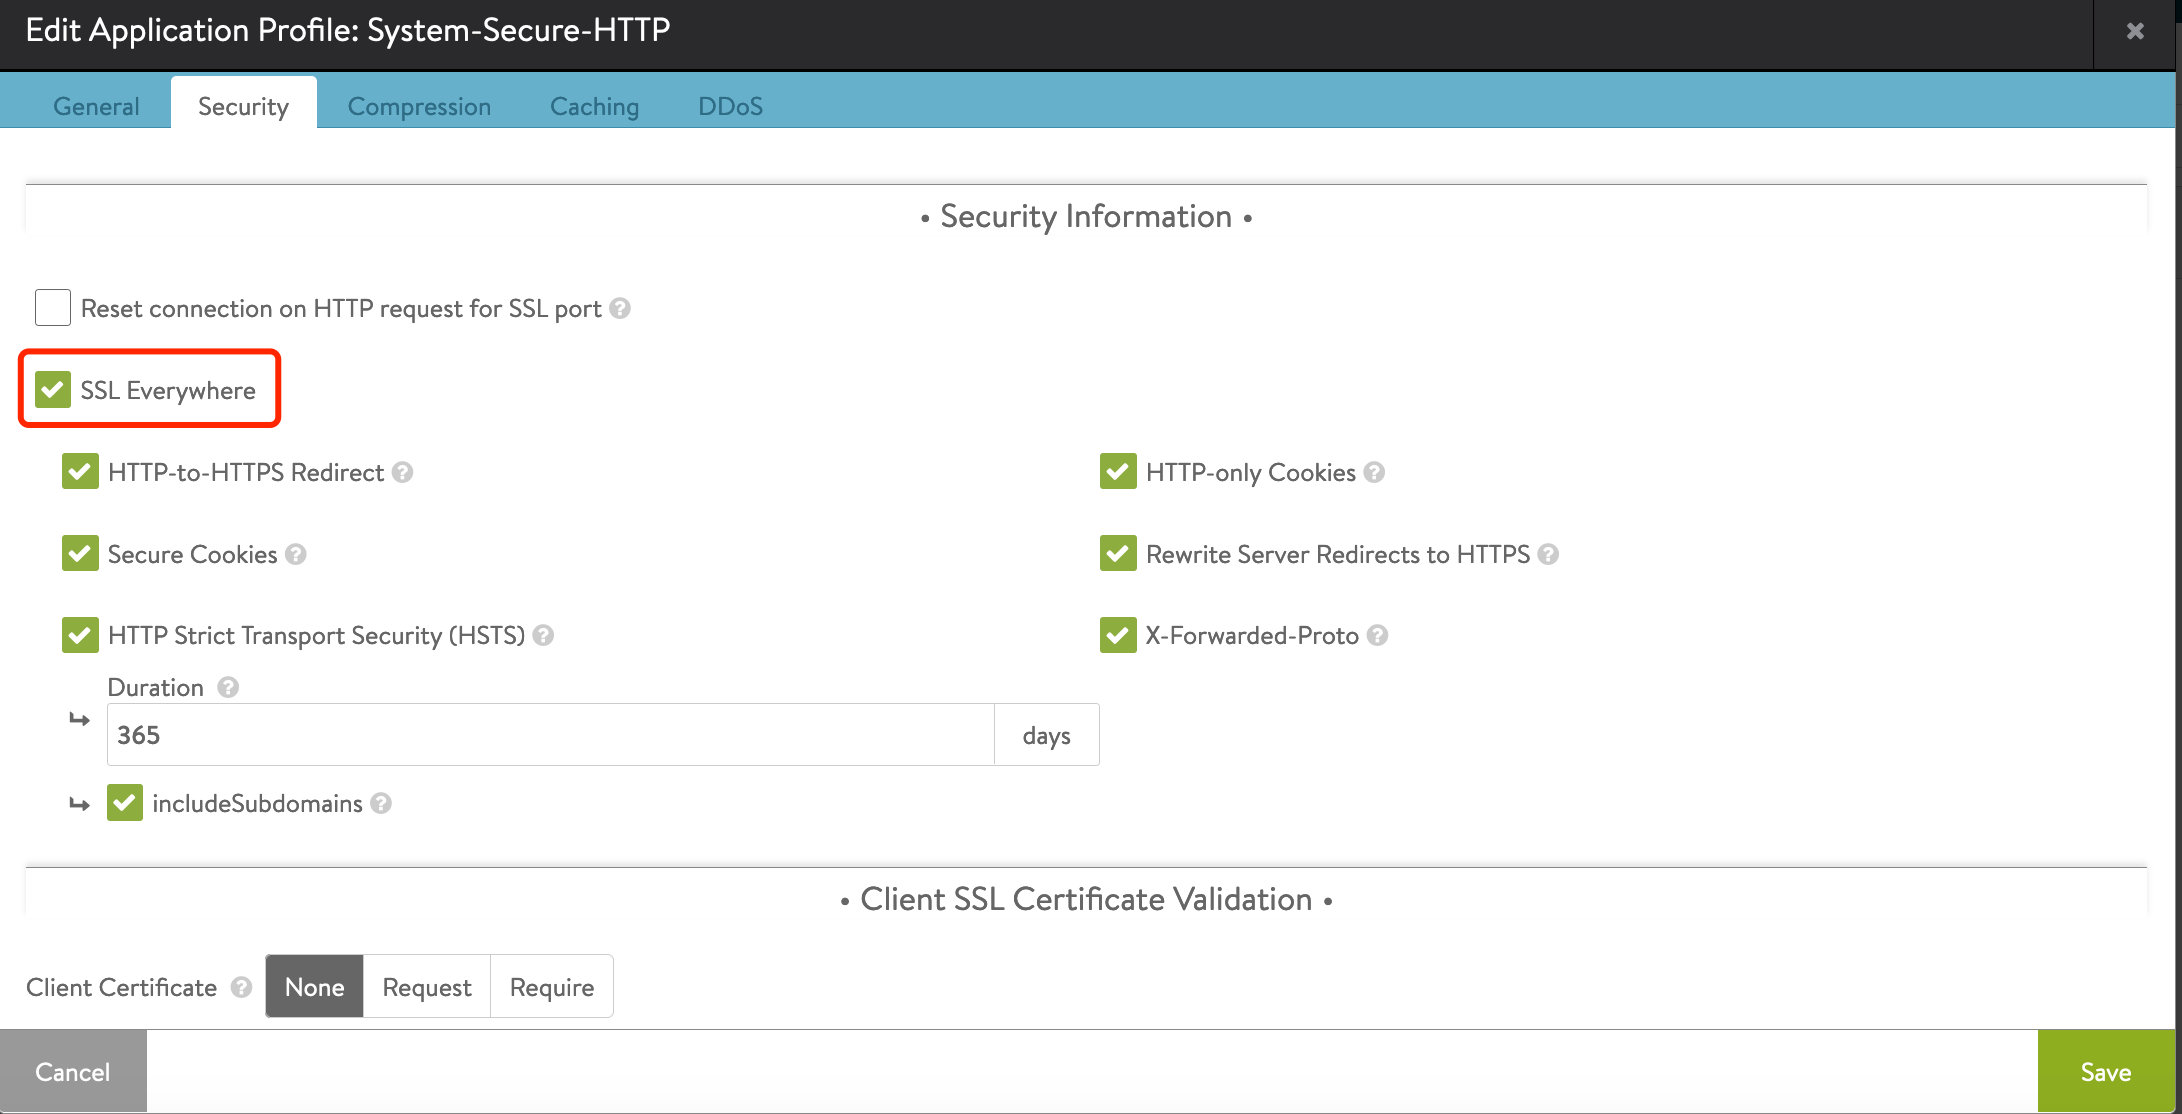
注意:如果不想使用默认的 System-Secure-HTTP profile,可以新建一个 Profile,然后开启下列选项,即可实现重定向:
2. 导入公信证书
需求描述:
- 默认 Avi 会为启用 SSL 的 VS 生成自签名证书,但一般生产环境下会使用内部 CA 签发的证书或者购买的公信证书,需要在 Avi 中导入这些证书。
步骤:
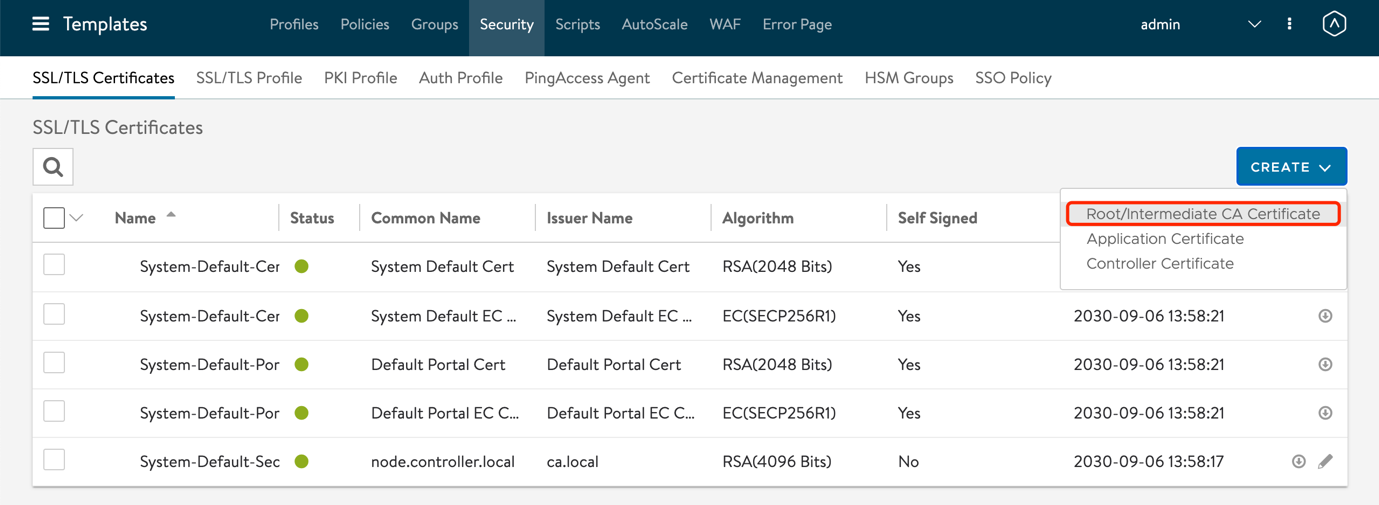
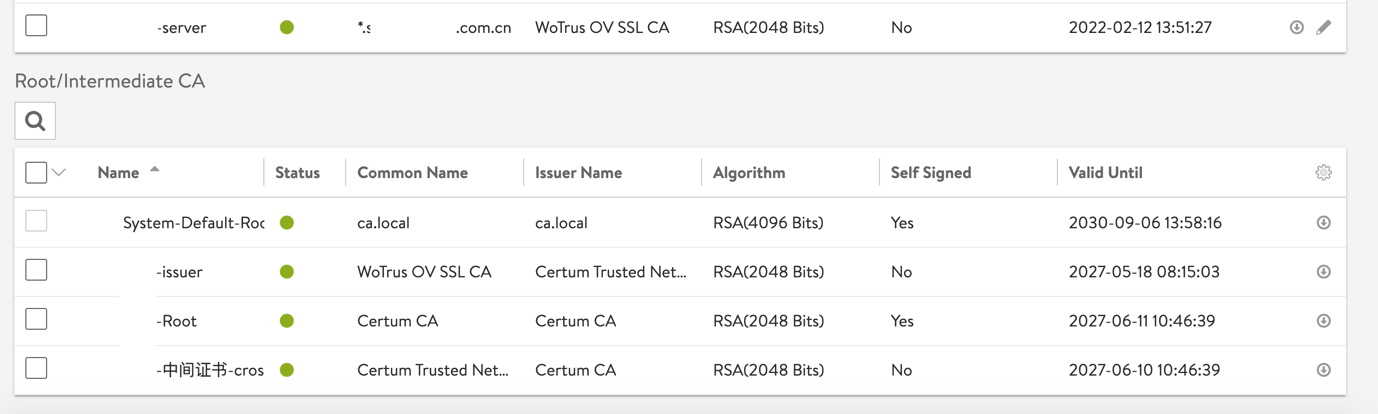
1、准备 CA 根证书/中间证书、服务器证书和证书密钥:
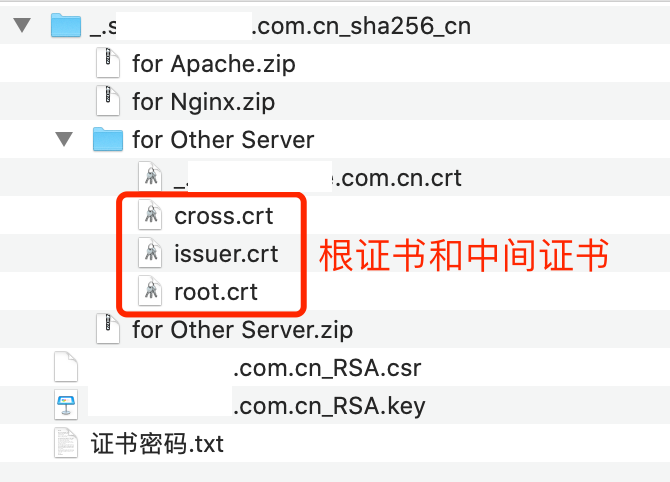

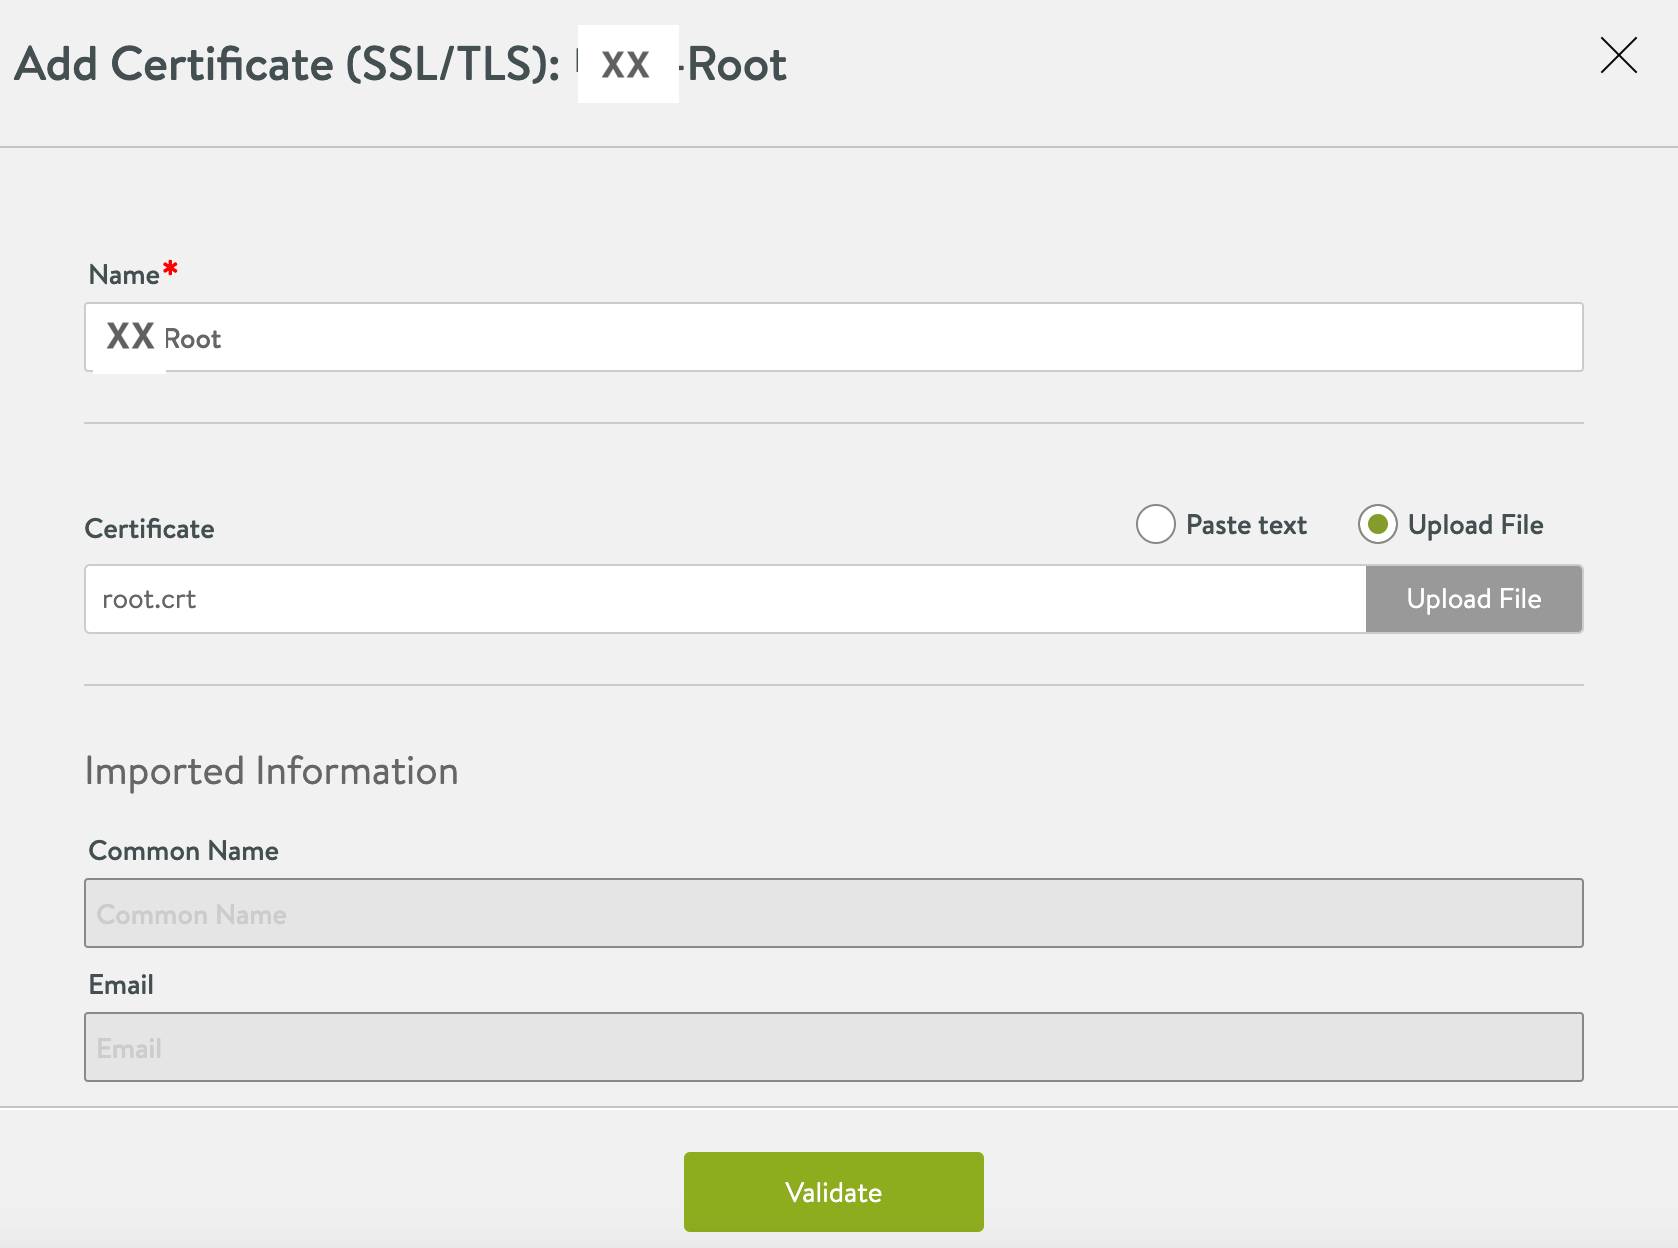
2、导入根证书和中间证书(此步骤可选,根证书和中间证书只是为了方便 Avi 来验证服务器证书,实际上 VS 并不会用到)


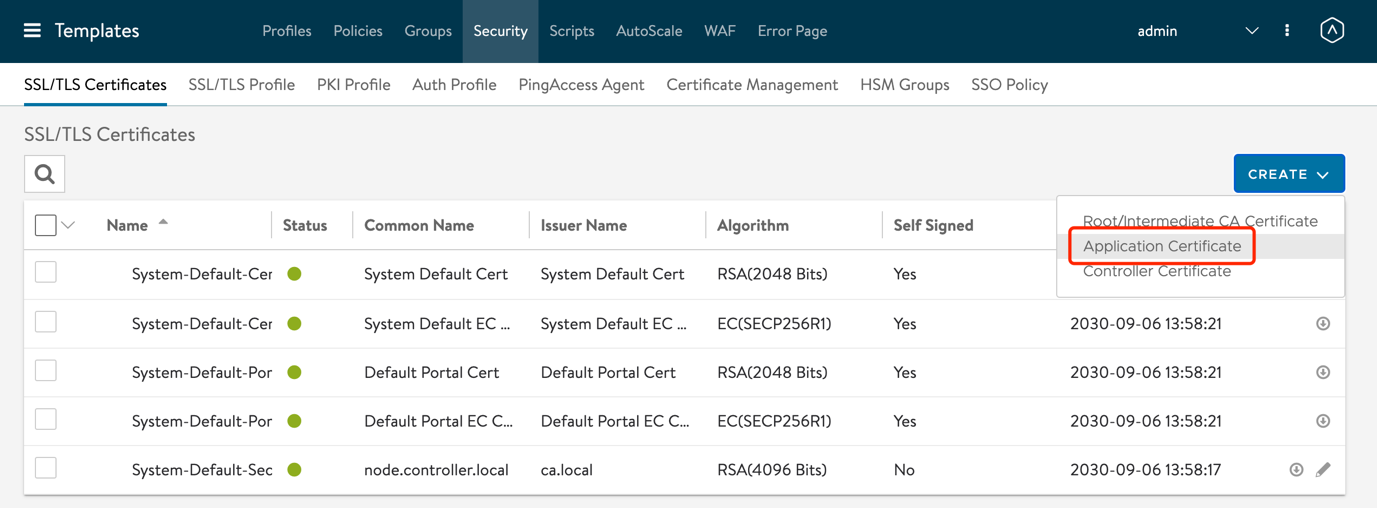
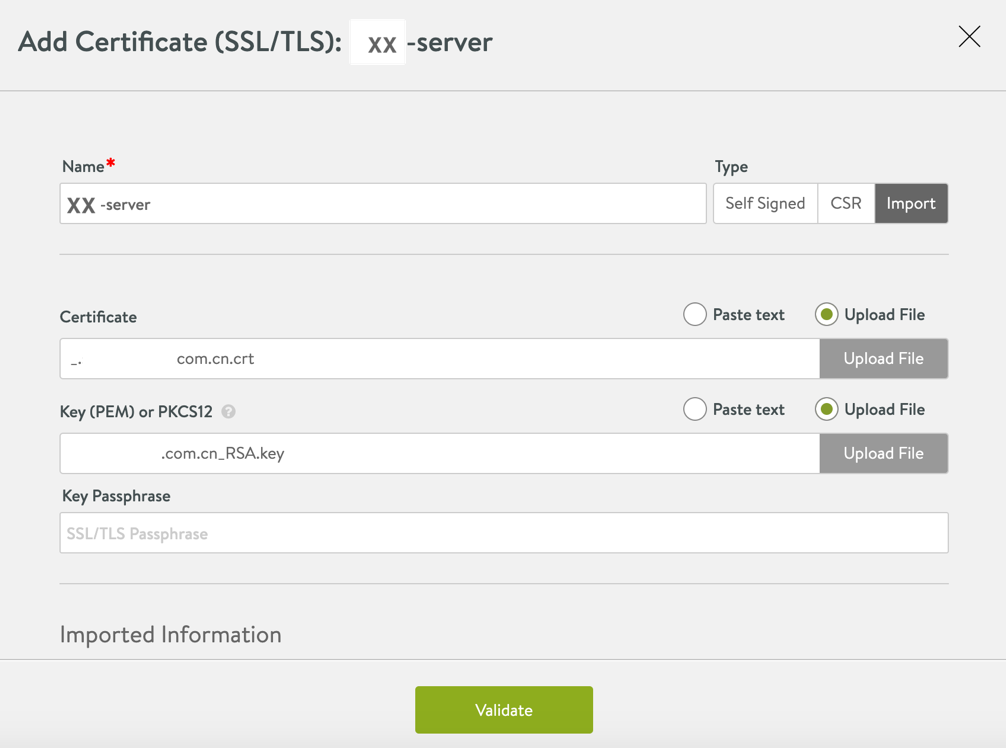
3、导入 Server 证书和 key(一般证书的起始行内容为—–BEGIN CERTIFICATE—–,而 key 的起始行内容为—–BEGIN PRIVATE KEY—–,上传不正确会导致证书验证失败)
4、导入完成后:
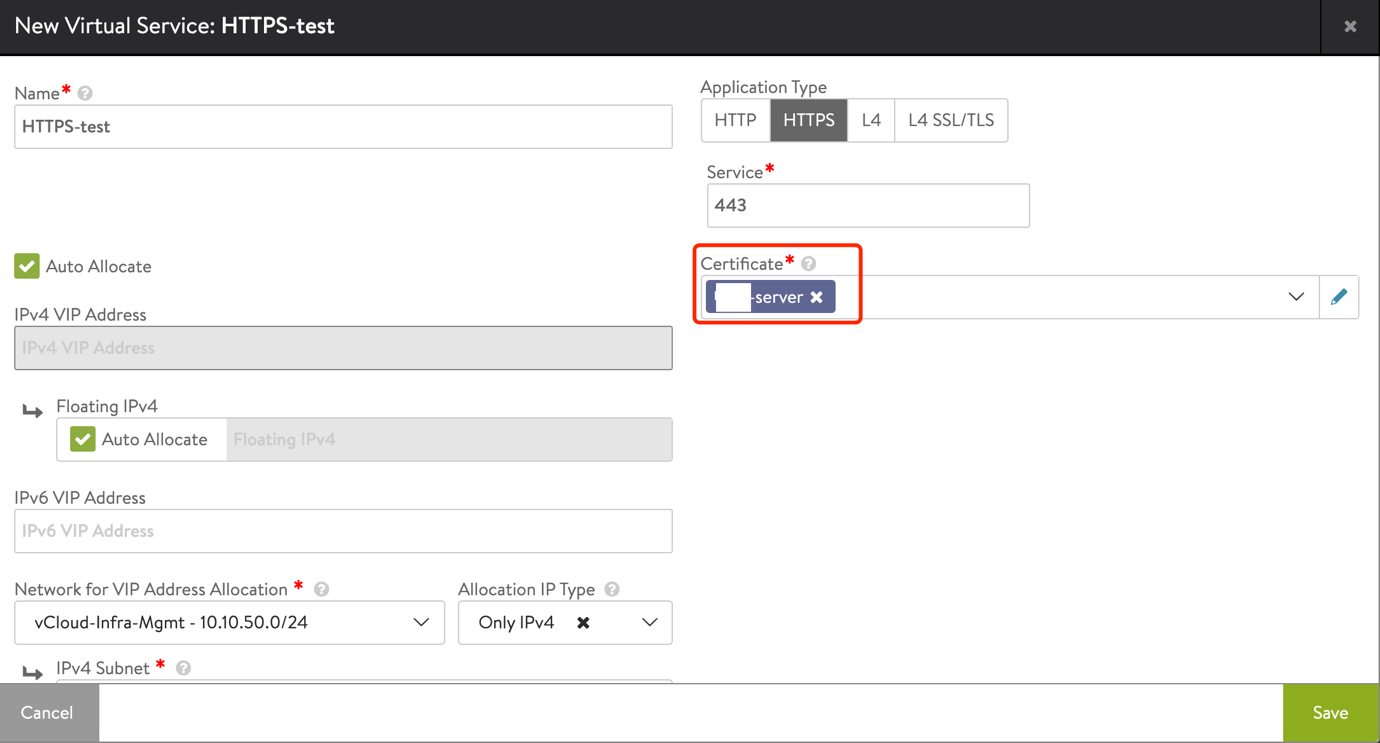
5、创建 HTTPS 应用,关联刚才导入的 Server 证书:
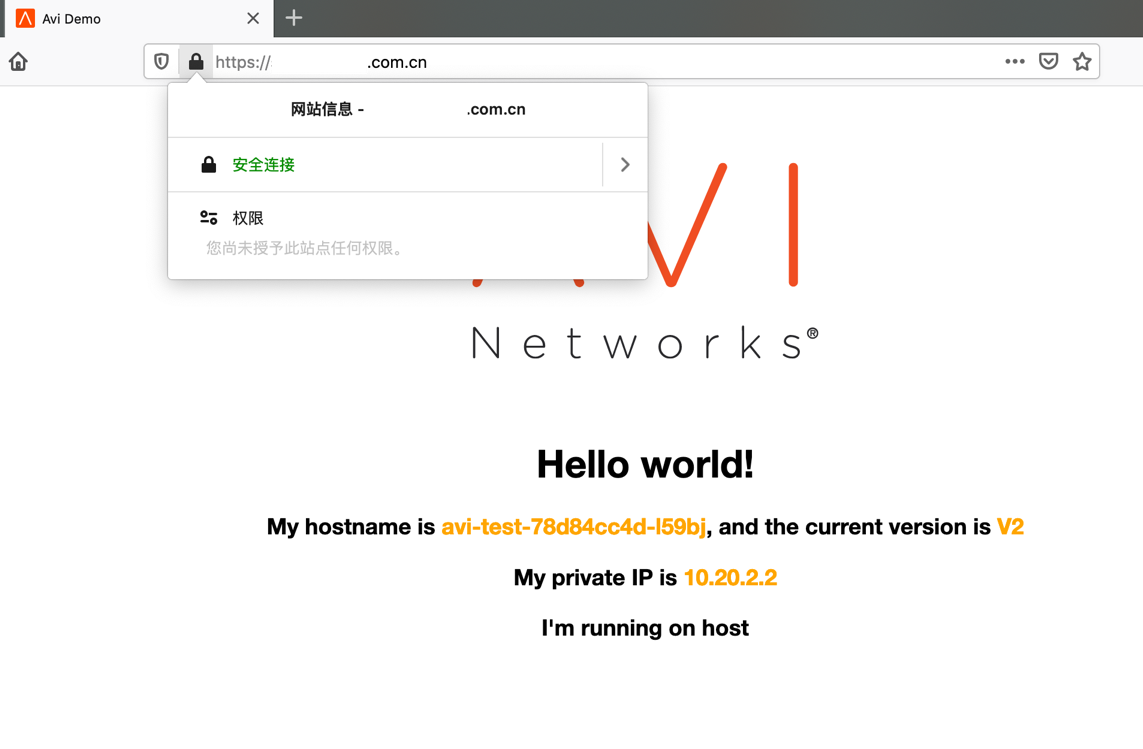
6、服务创建后通过域名访问应用进行测试:
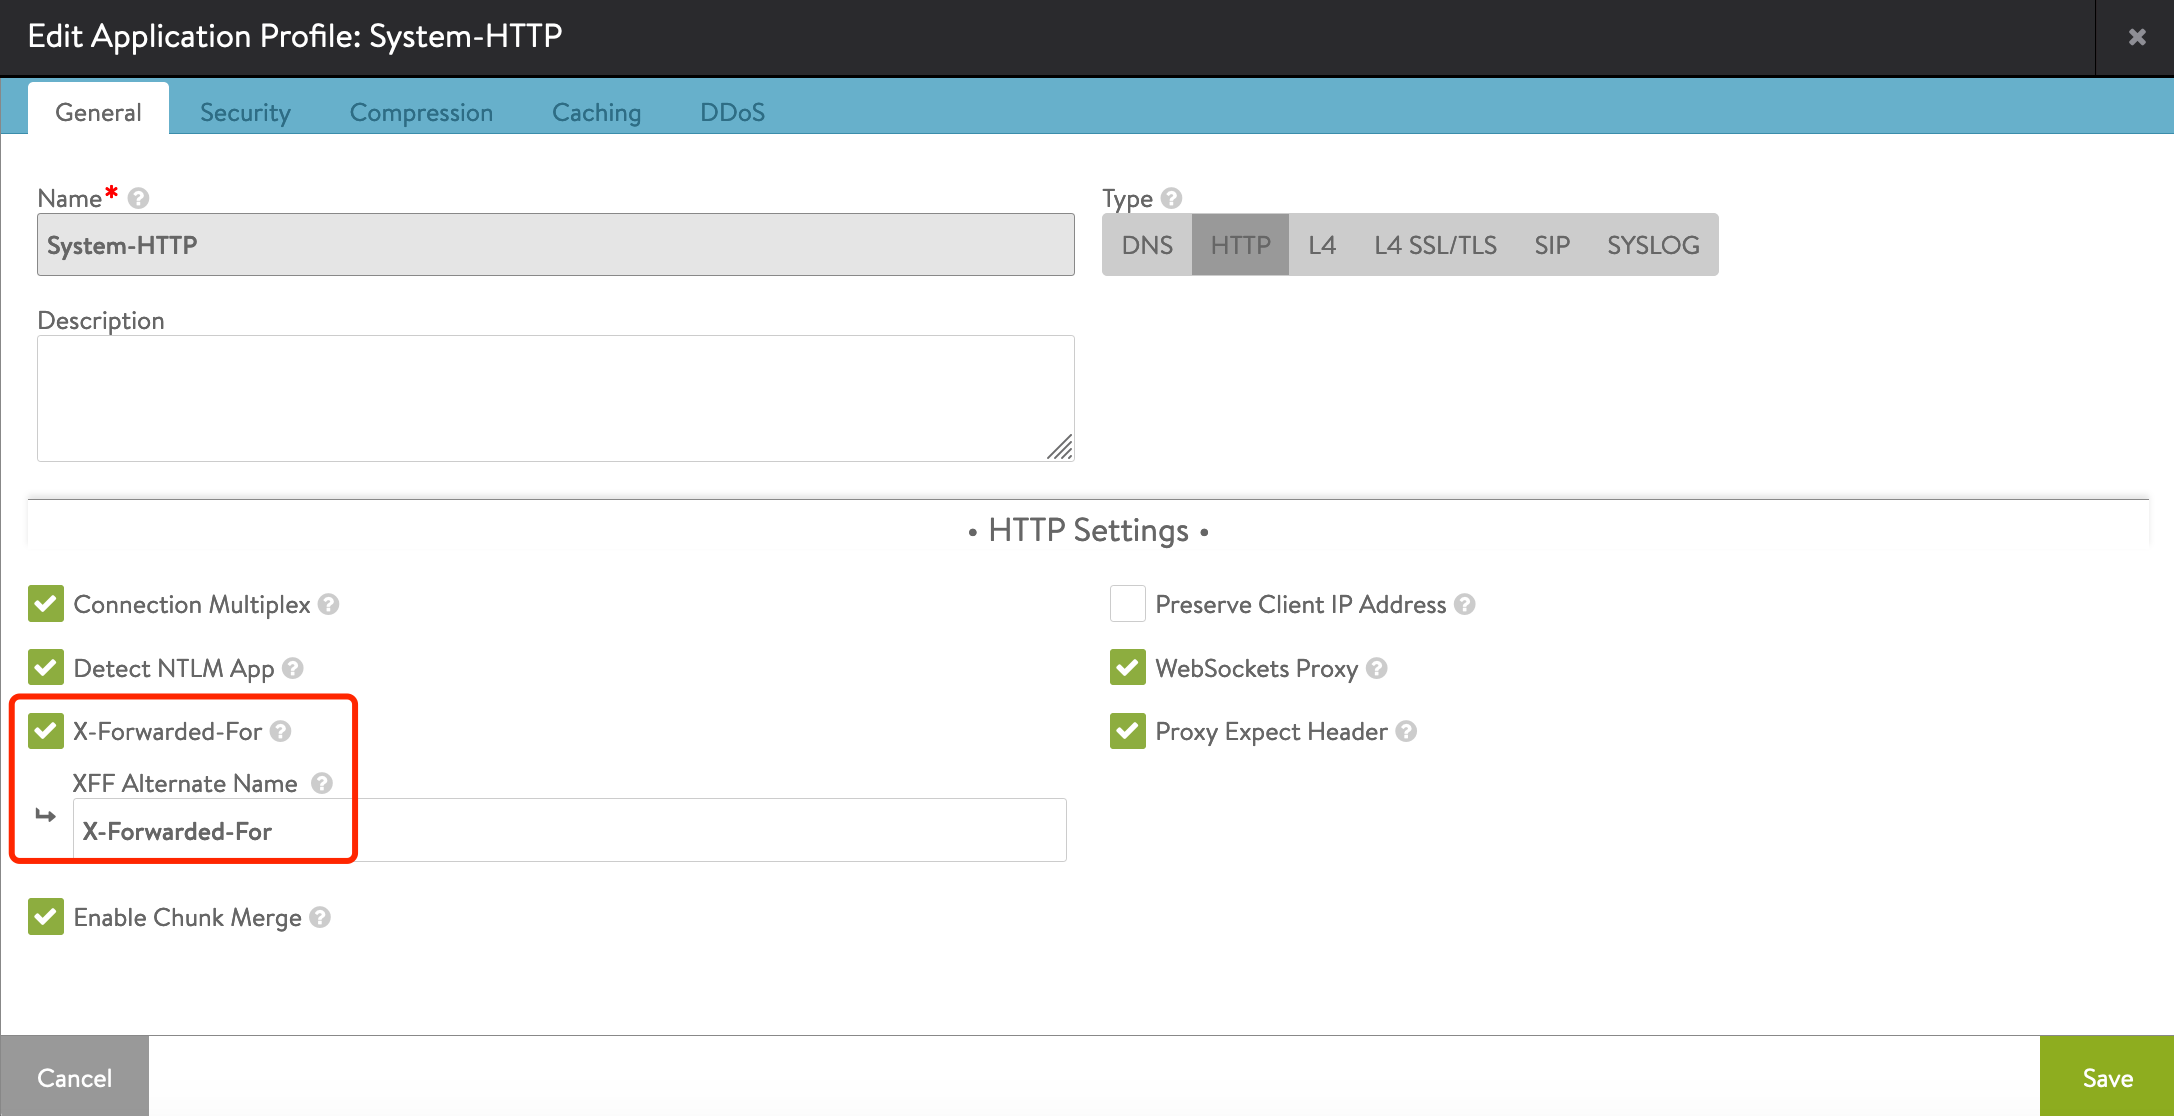
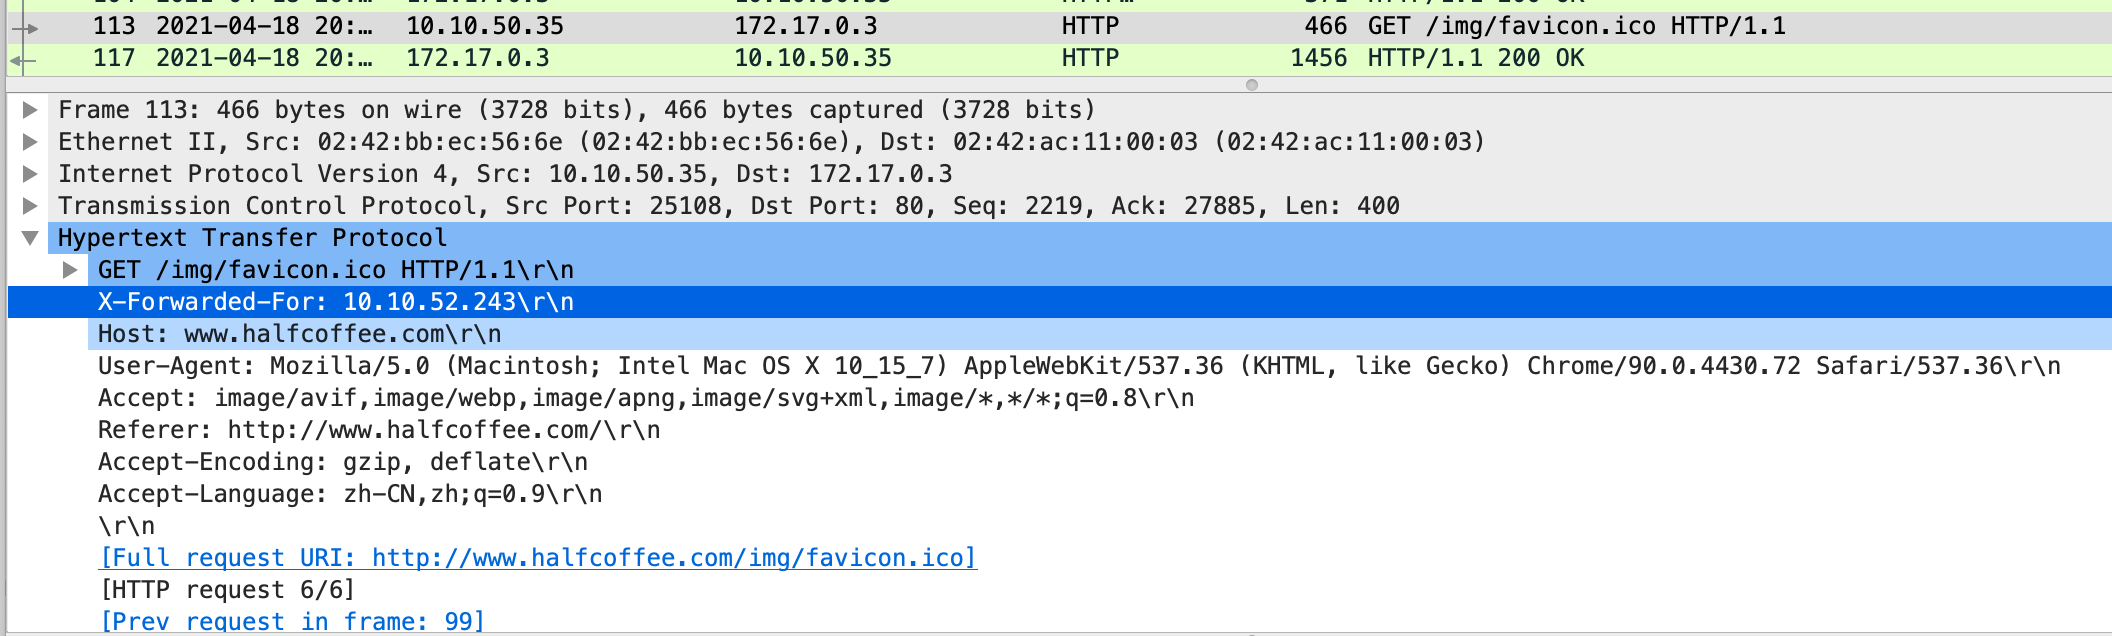
3. 访问请求中插入X-Forwarded-For
需求描述:
- 服务器需要记录 Client 的 IP 地址以进行分析或者自定义转发;
- 默认负载均衡器使用全代理模式,此模式下服务器只能“看到”负载均衡的地址,无法看到 Client 的真实 IP 地址,因此需要负载均衡器在 HTTP Header 中插入 X-Forwarded-For 字段来记录 Client IP 地址,Server 通过读取此字段来获得 Client 真实 IP 地址。
在 Avi 下默认 System-HTTP Application profile 会开启此功能,直接在 Virtual Service 调用即可:
在 Server 端抓包结果:
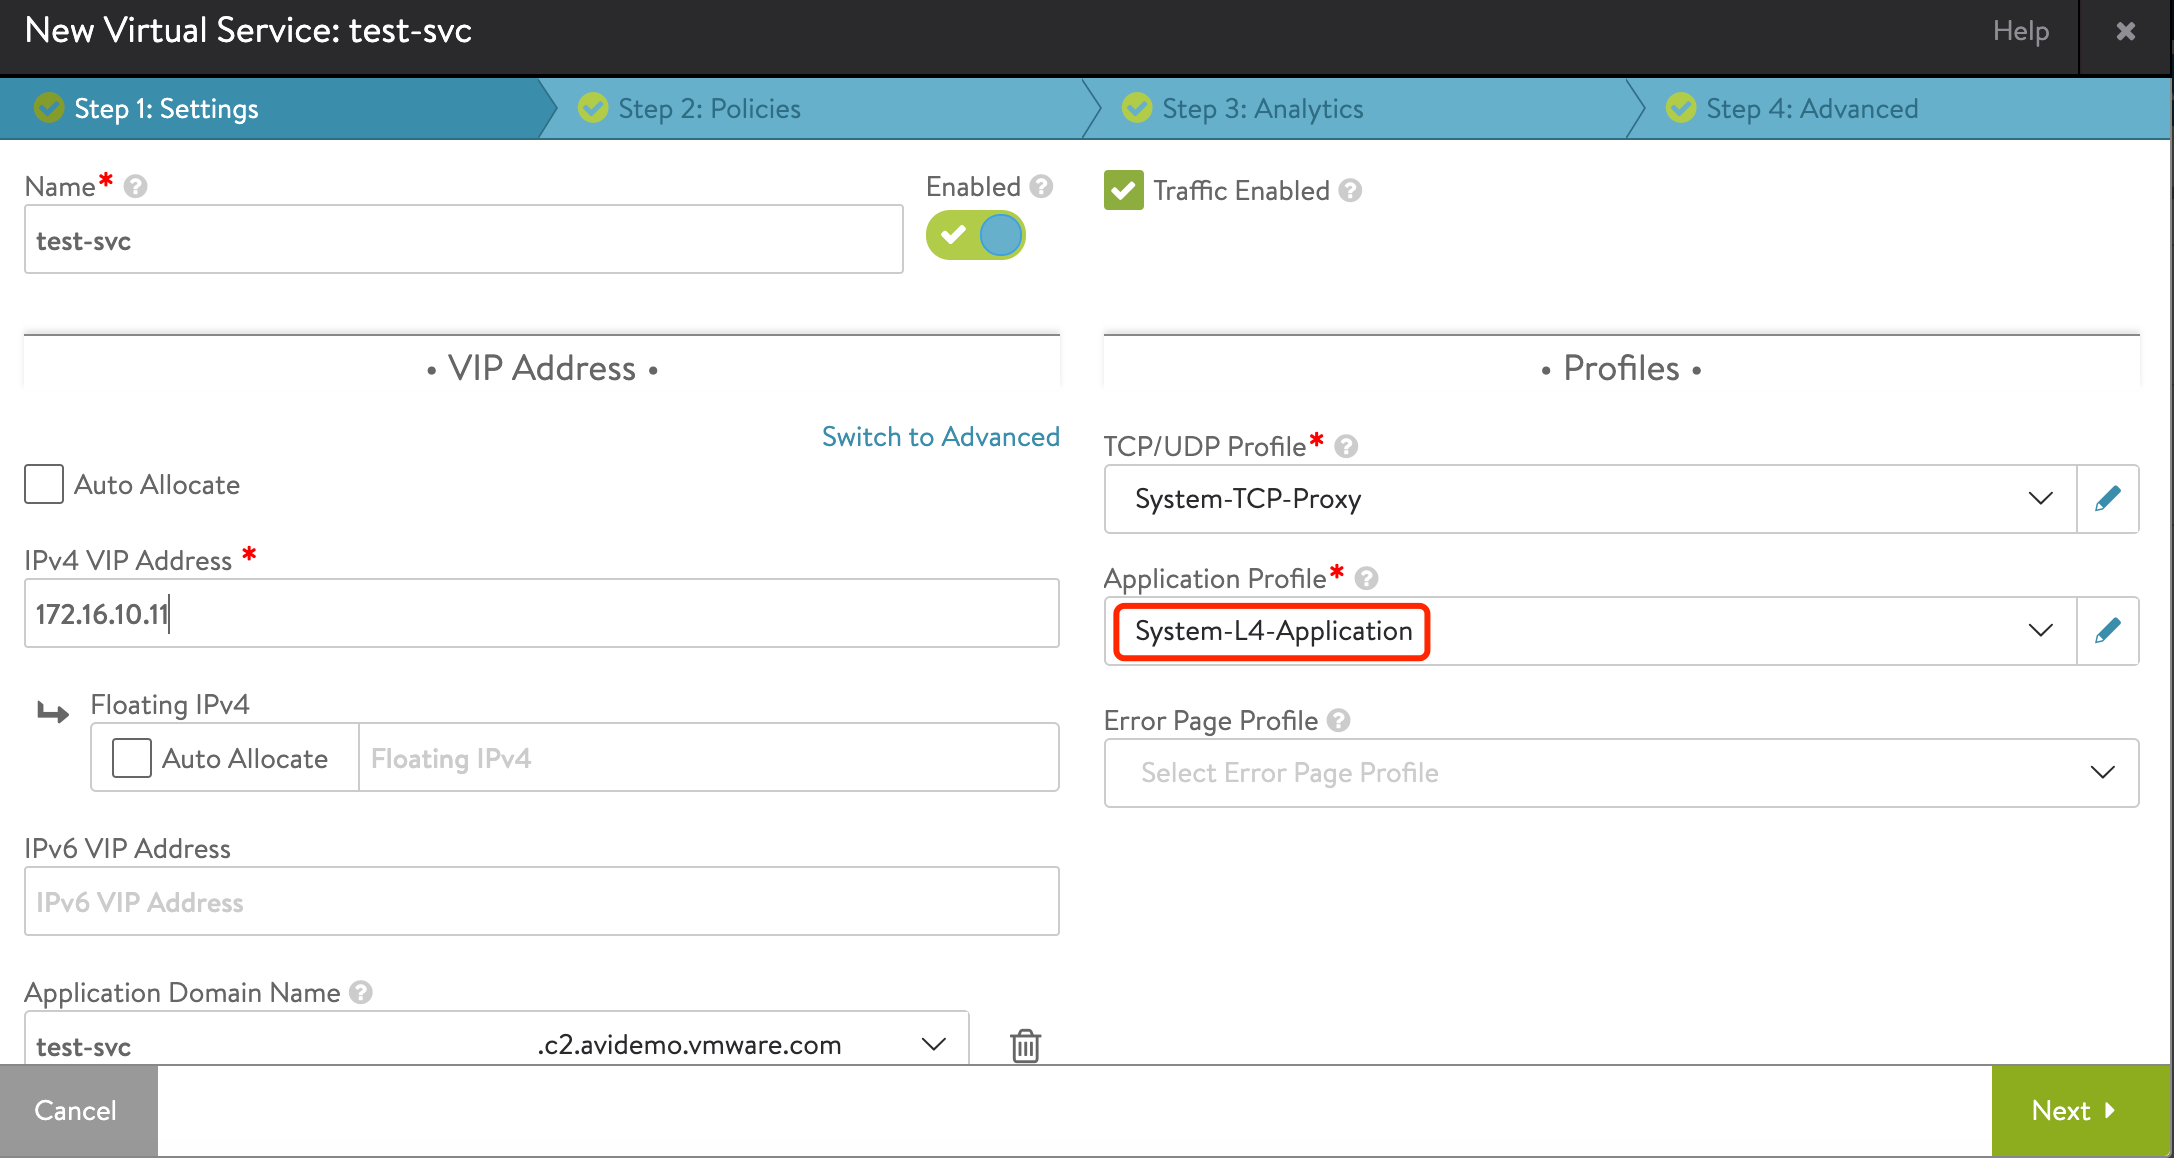
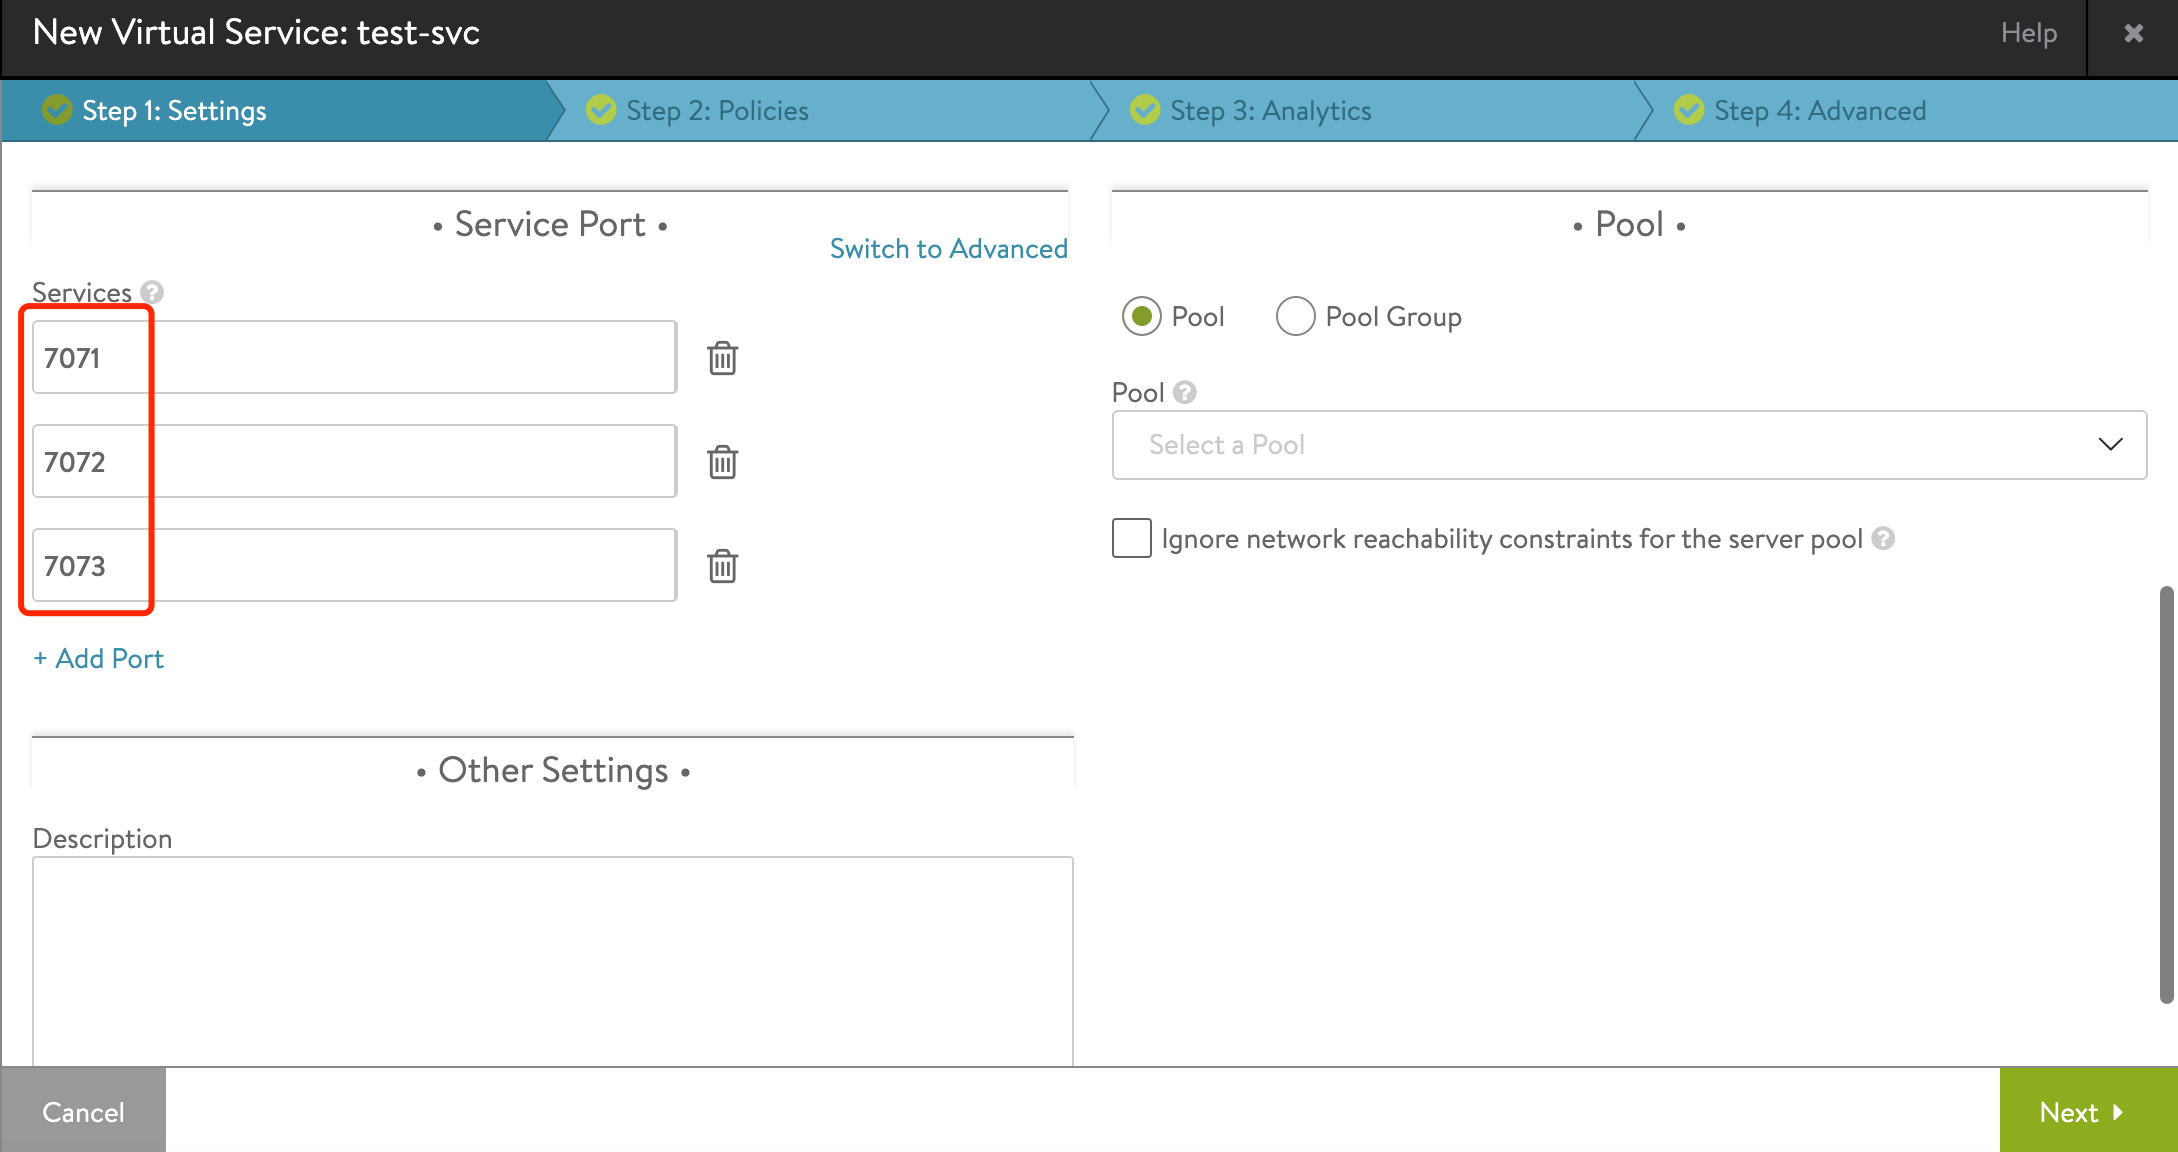
4. 为同一个 Virtual Service 设置多个端口
需求描述:
- 在某些情况下,单个 Virtual Service 需要使用多个端口,并连接到后端服务器的相应端口,例如:Virtual Service 同时使用 7071,7072,7073 三个端口,分别转发给后端 Server 的 7071,7072,7073 三个端口。
配置步骤:
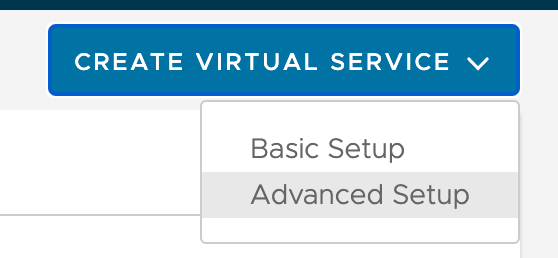
1、创建 Virtual Service 时使用高级向导创建新的服务:
2、应用类型选择 “System-L4-Application”:
3、在 Service Port 中添加三个端口:
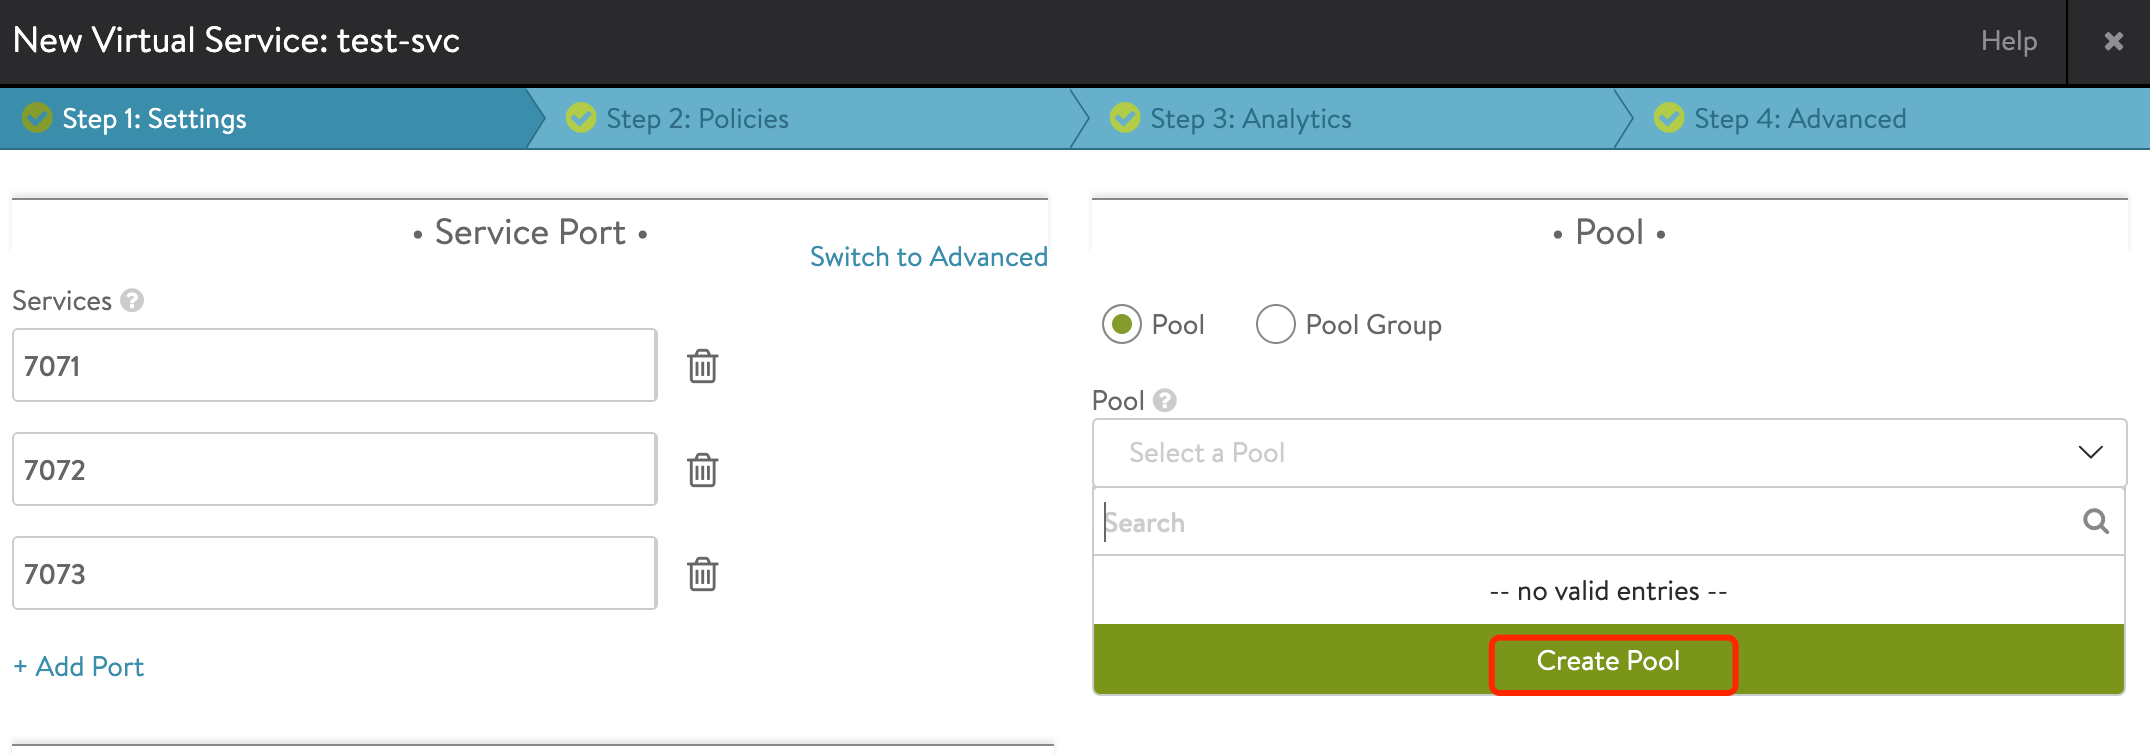
4、为 Virtual Service 添加 Pool,Pool 的默认端口保持为 80,无需修改:
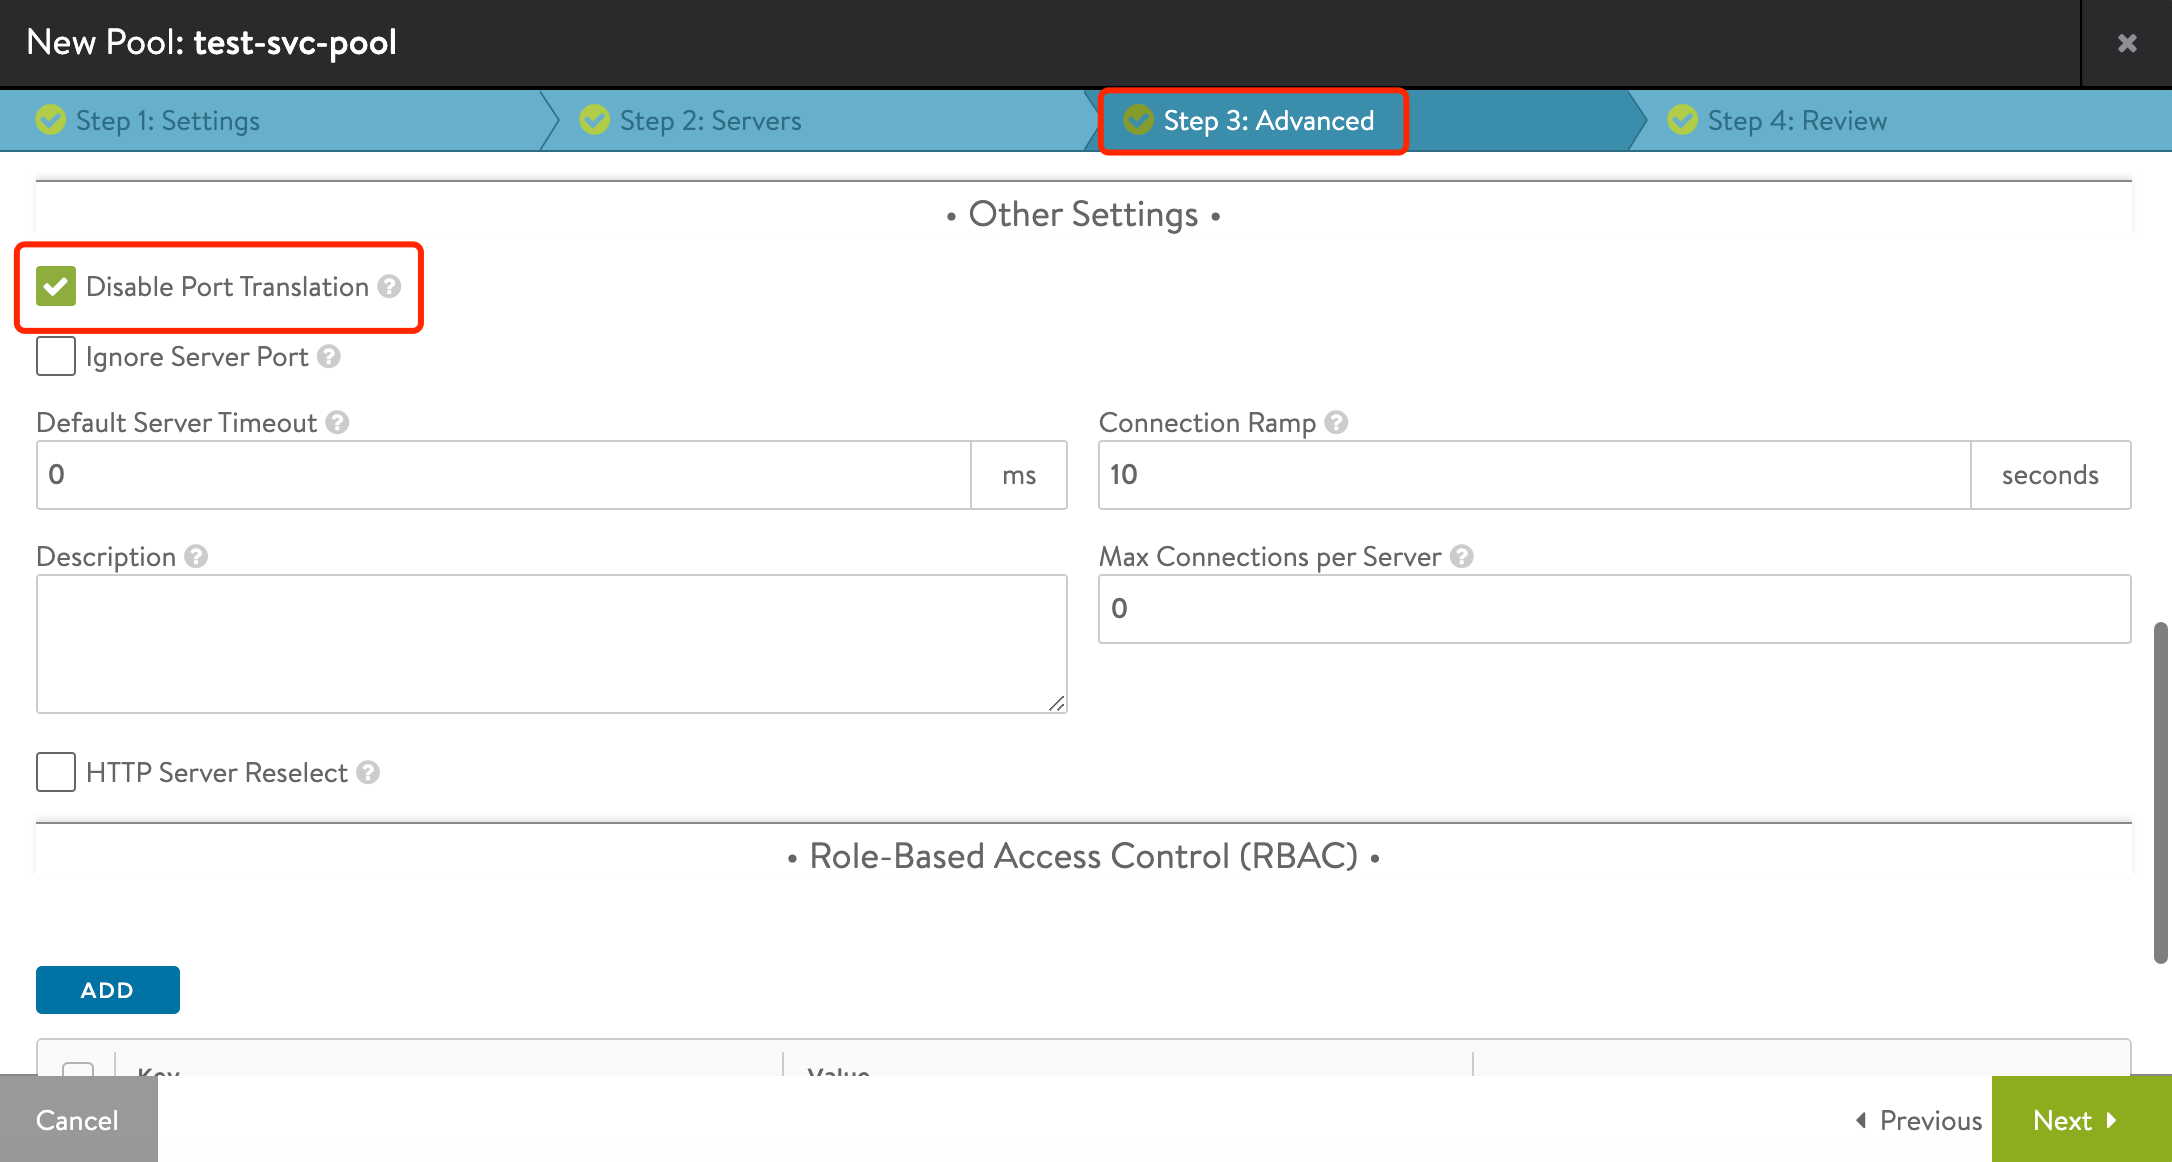
5、在向导的第三步中,勾选 “Disable Port Translation”。此功能将禁用端口转换,使得前后端端口保持一致(即 VS 端口到后端 Server 端口一一对应):
5. 内容交换
需求描述:
- 按照访问的路径不同,将请求转发给后端不同的 Server,例如将图片发送给专门的图片缓存服务器等,此需求可以由 Avi 的内容交换(Content Switching)功能实现。
Avi 支持两种内容交换配置:HTTP Request policy 和 Datascript,一般建议使用 HTTP Request policy。
配置步骤:
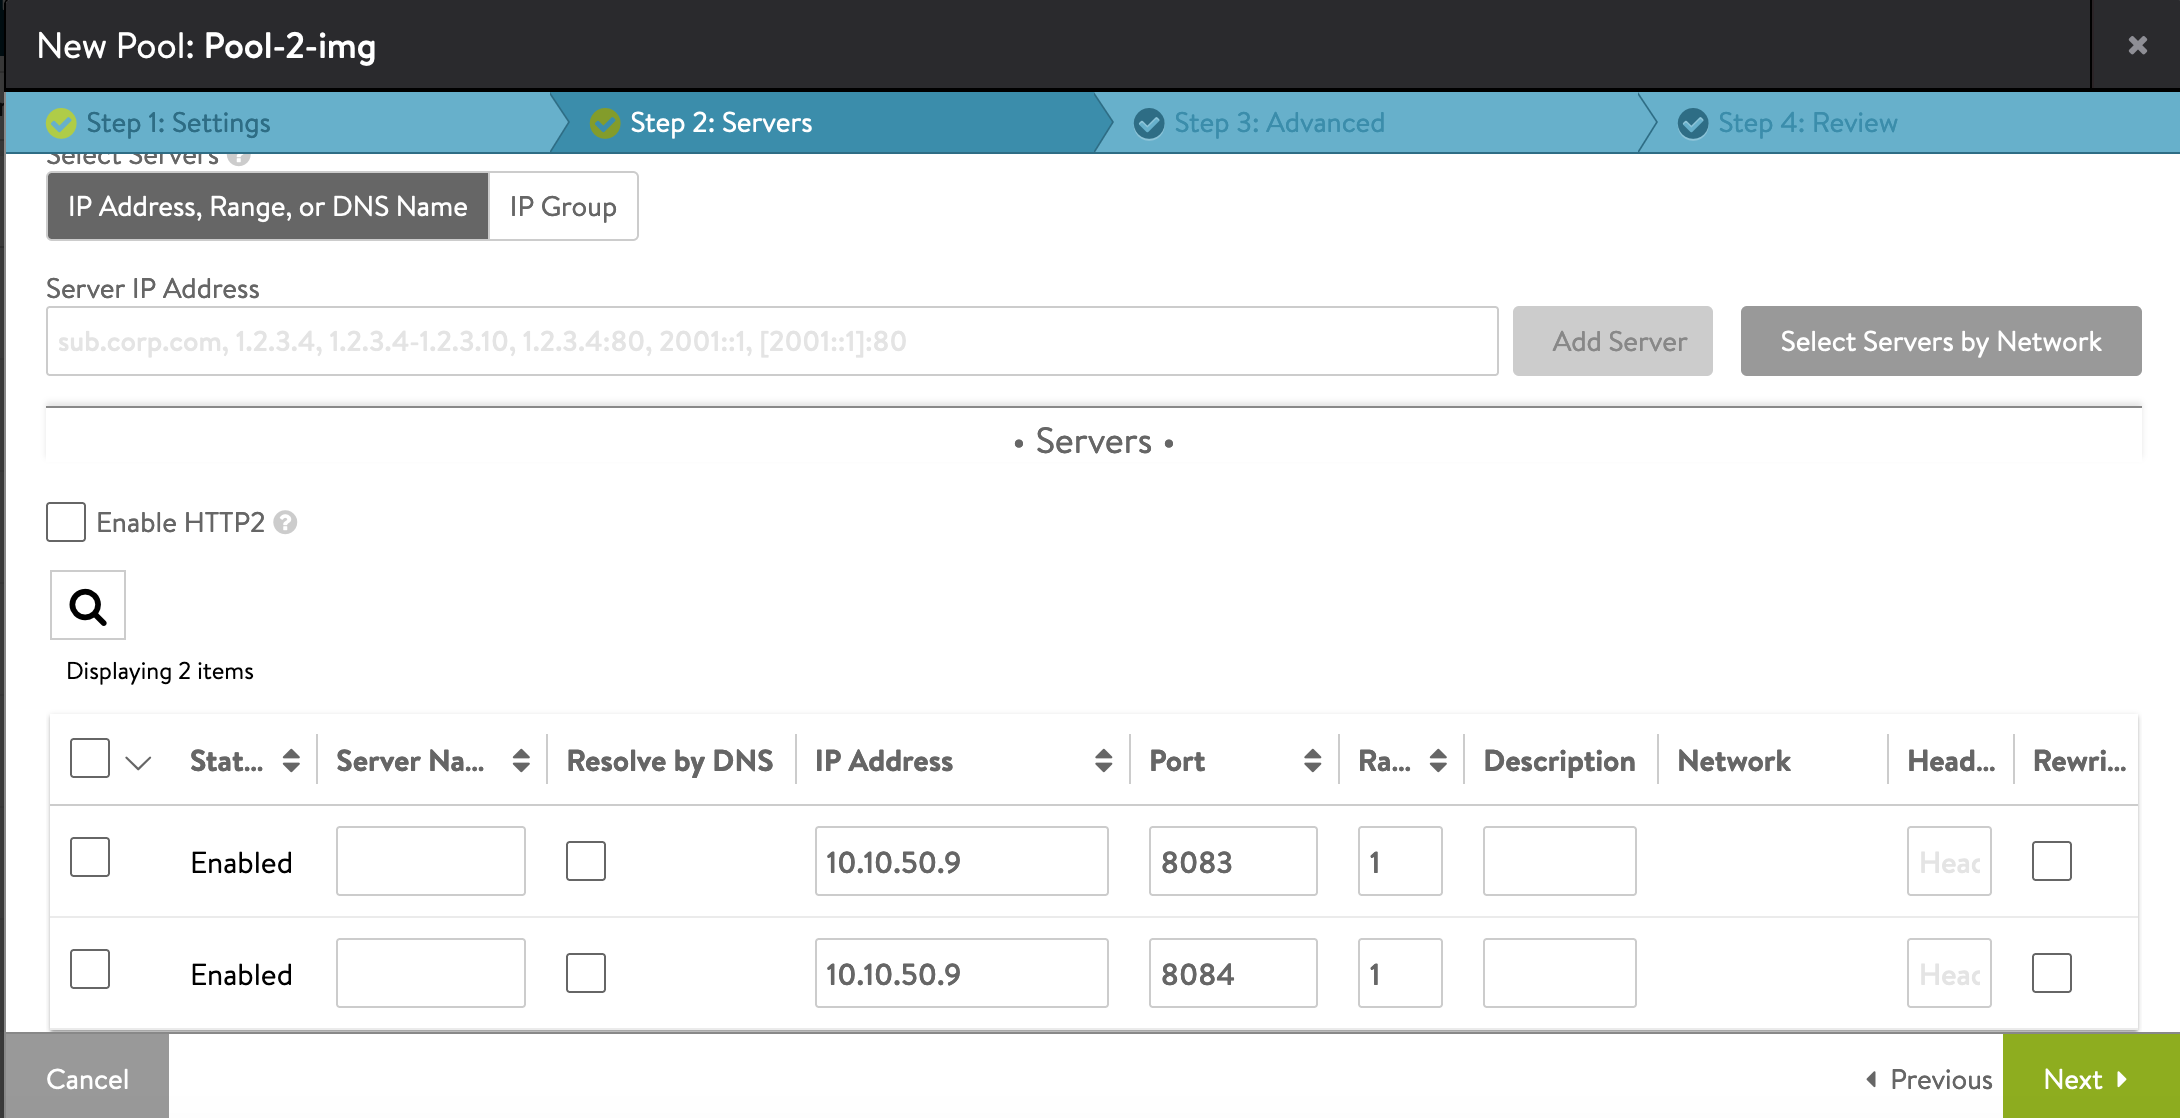
1、创建两个 Pool,第一个 Pool 中的 Server 提供普通的服务,第二个 Pool 中的 Server 提供图片服务:
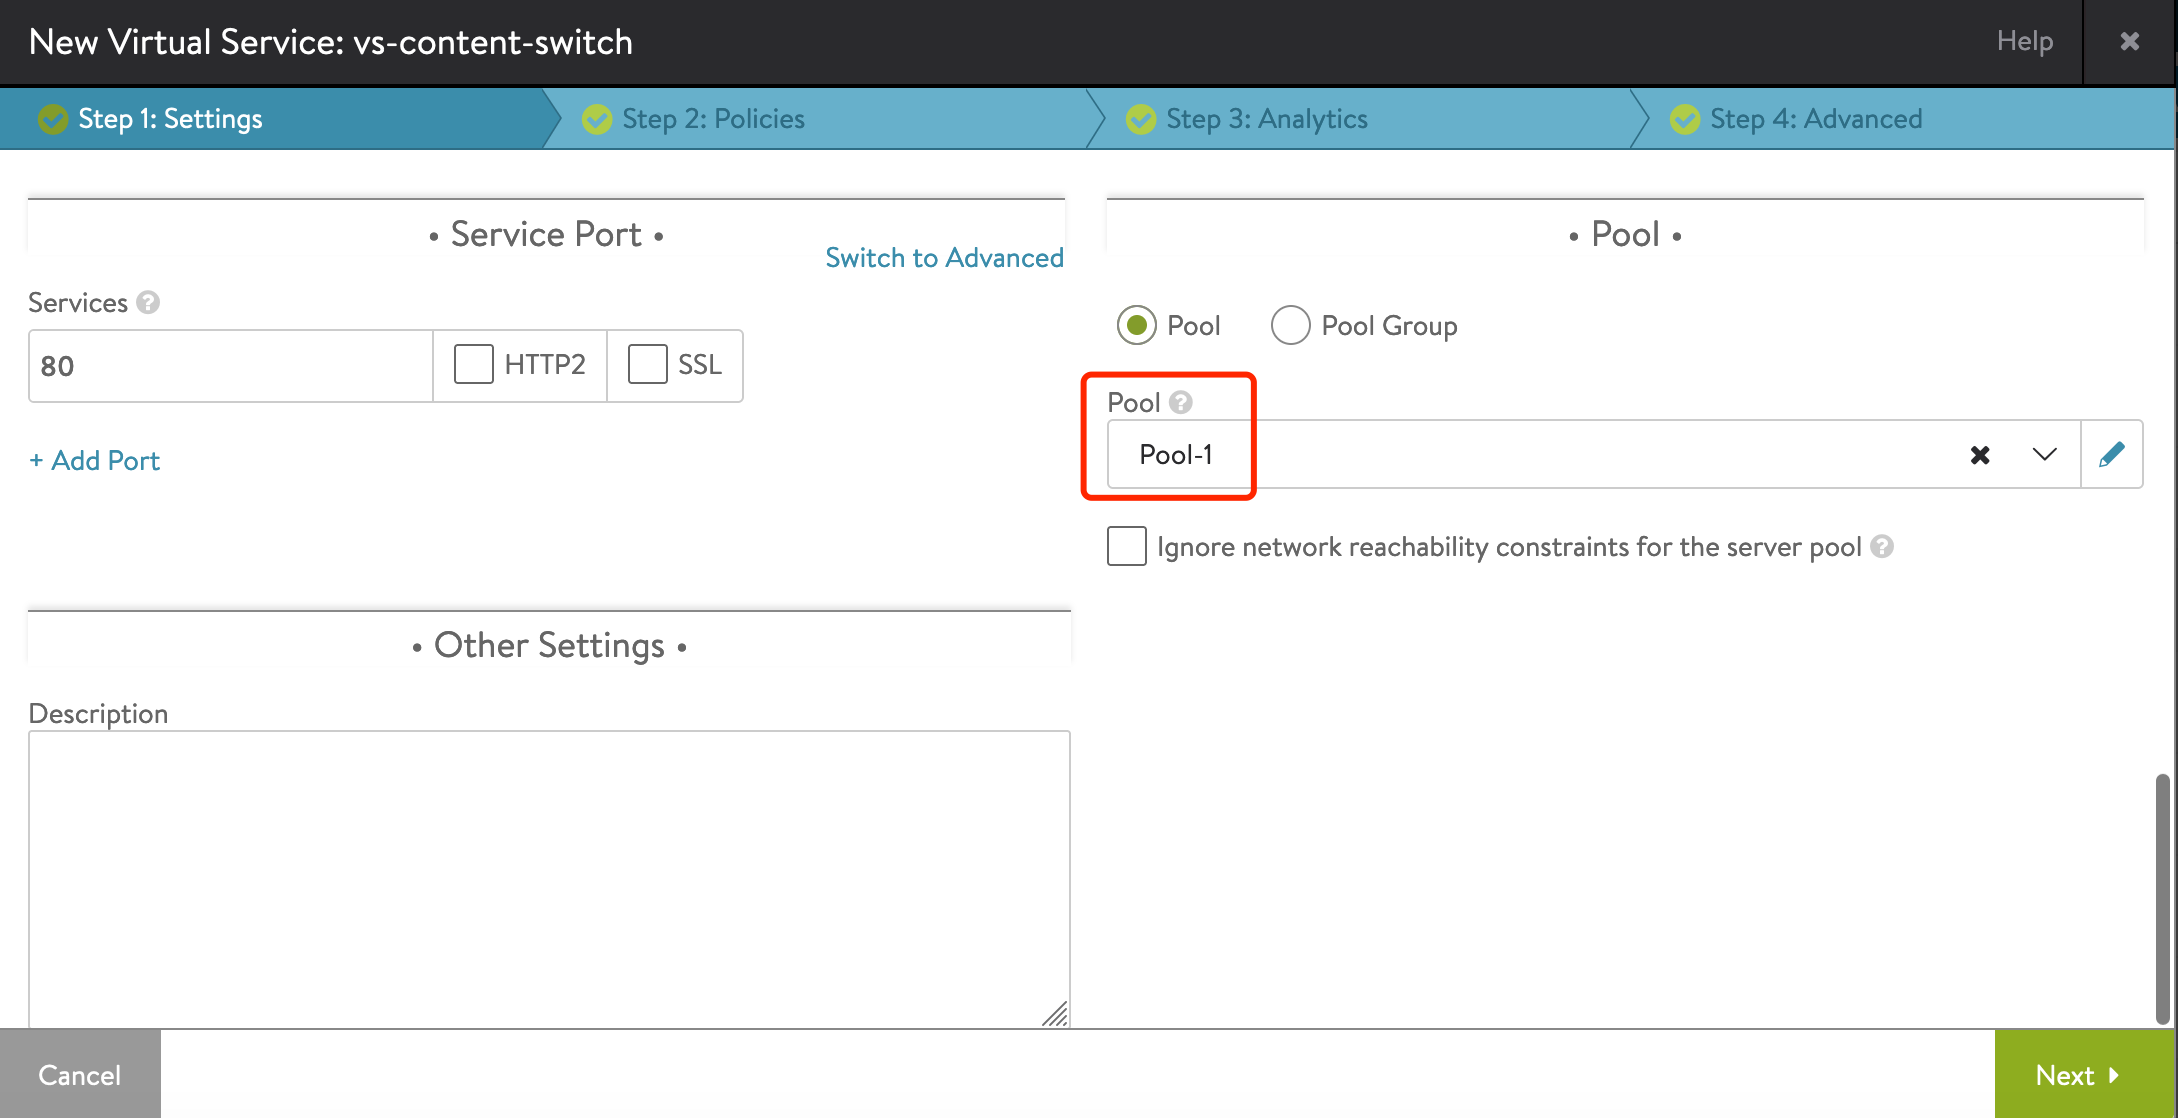
2、通过 Advanced 向导创建 Virtual Service,在 Pool 中选择 Pool-1 作为主要 Pool:
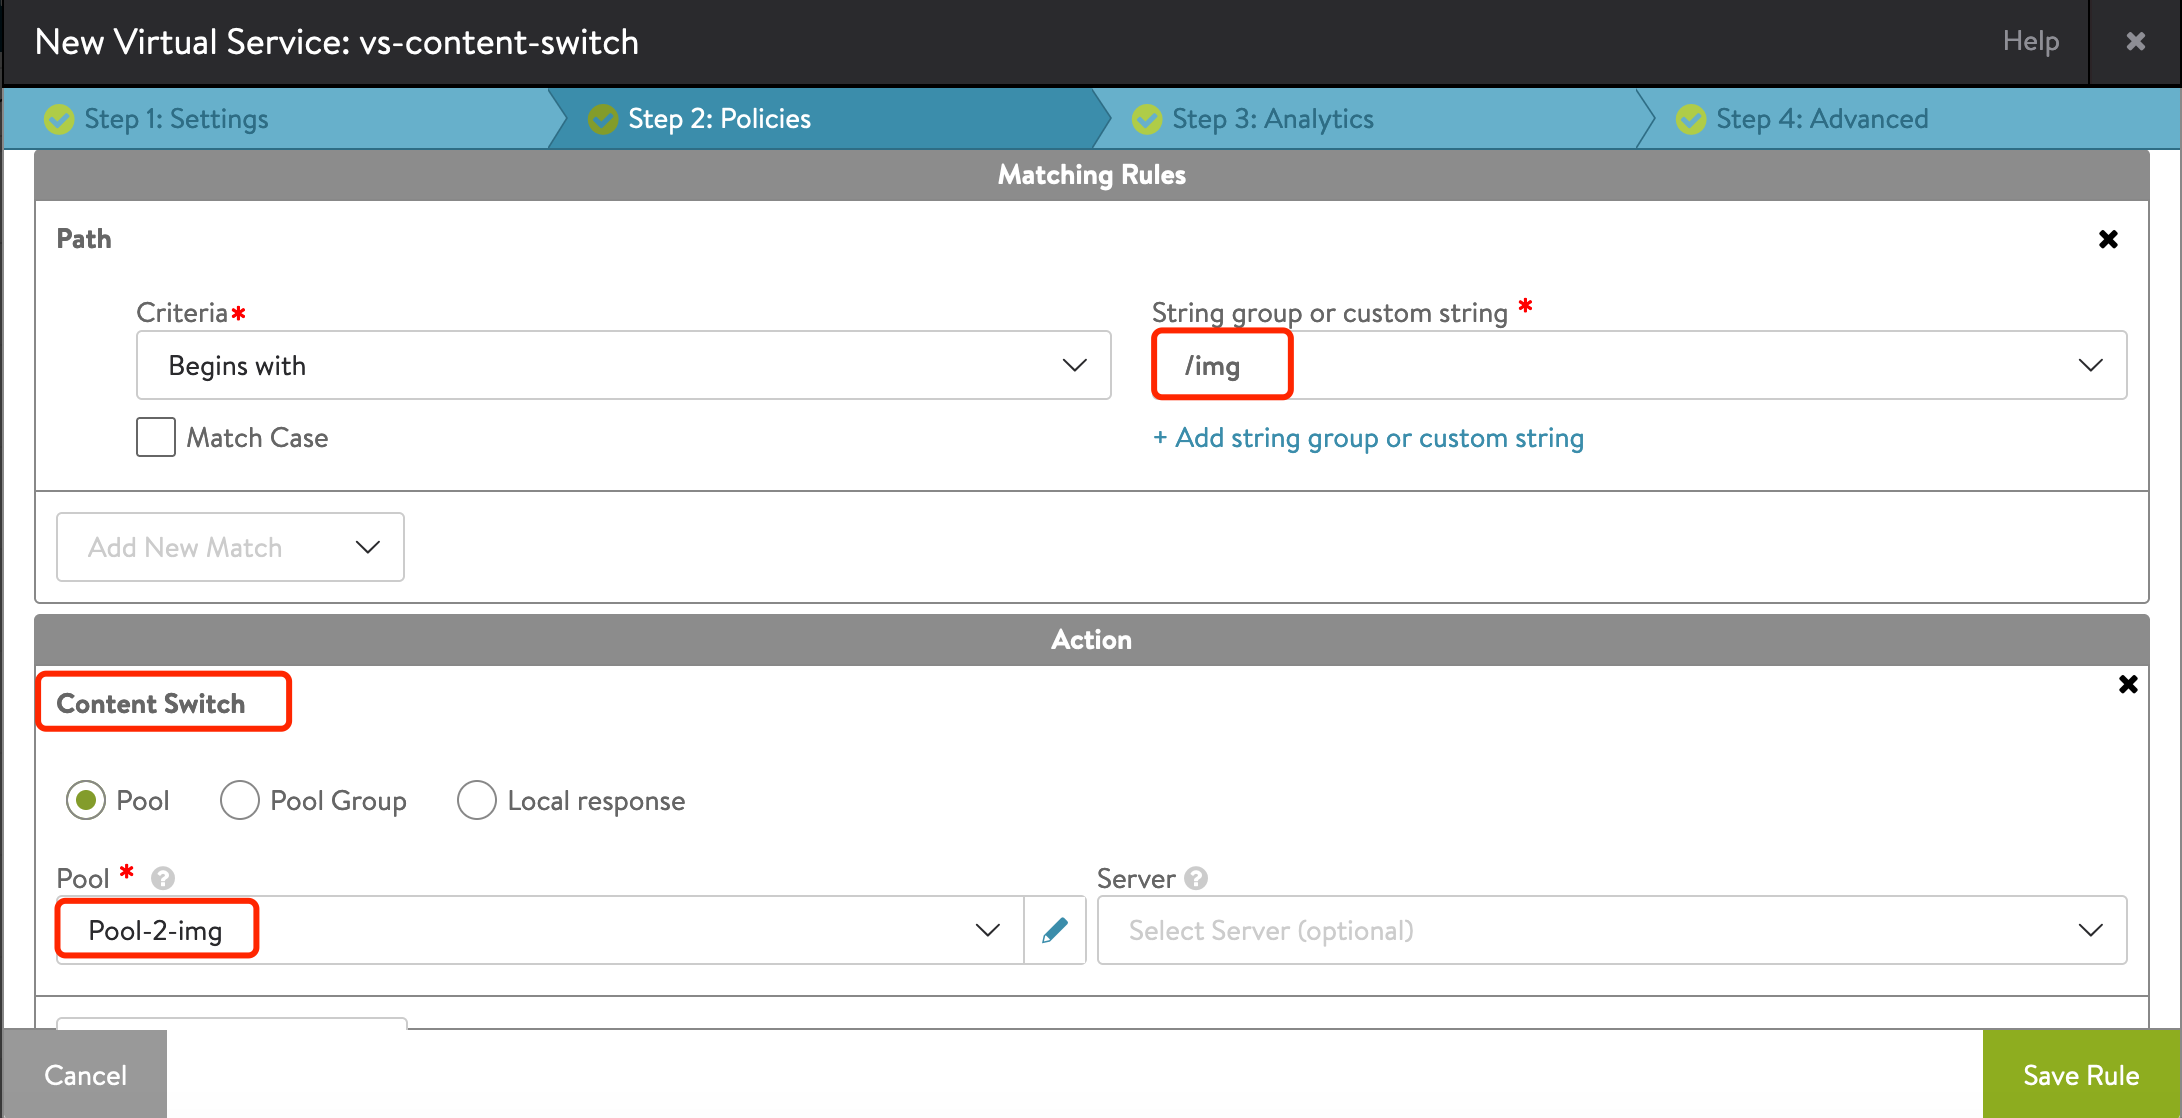
3、在 Step2:Policies 中添加 HTTP Request Policy,设置 Content Switch 规则:

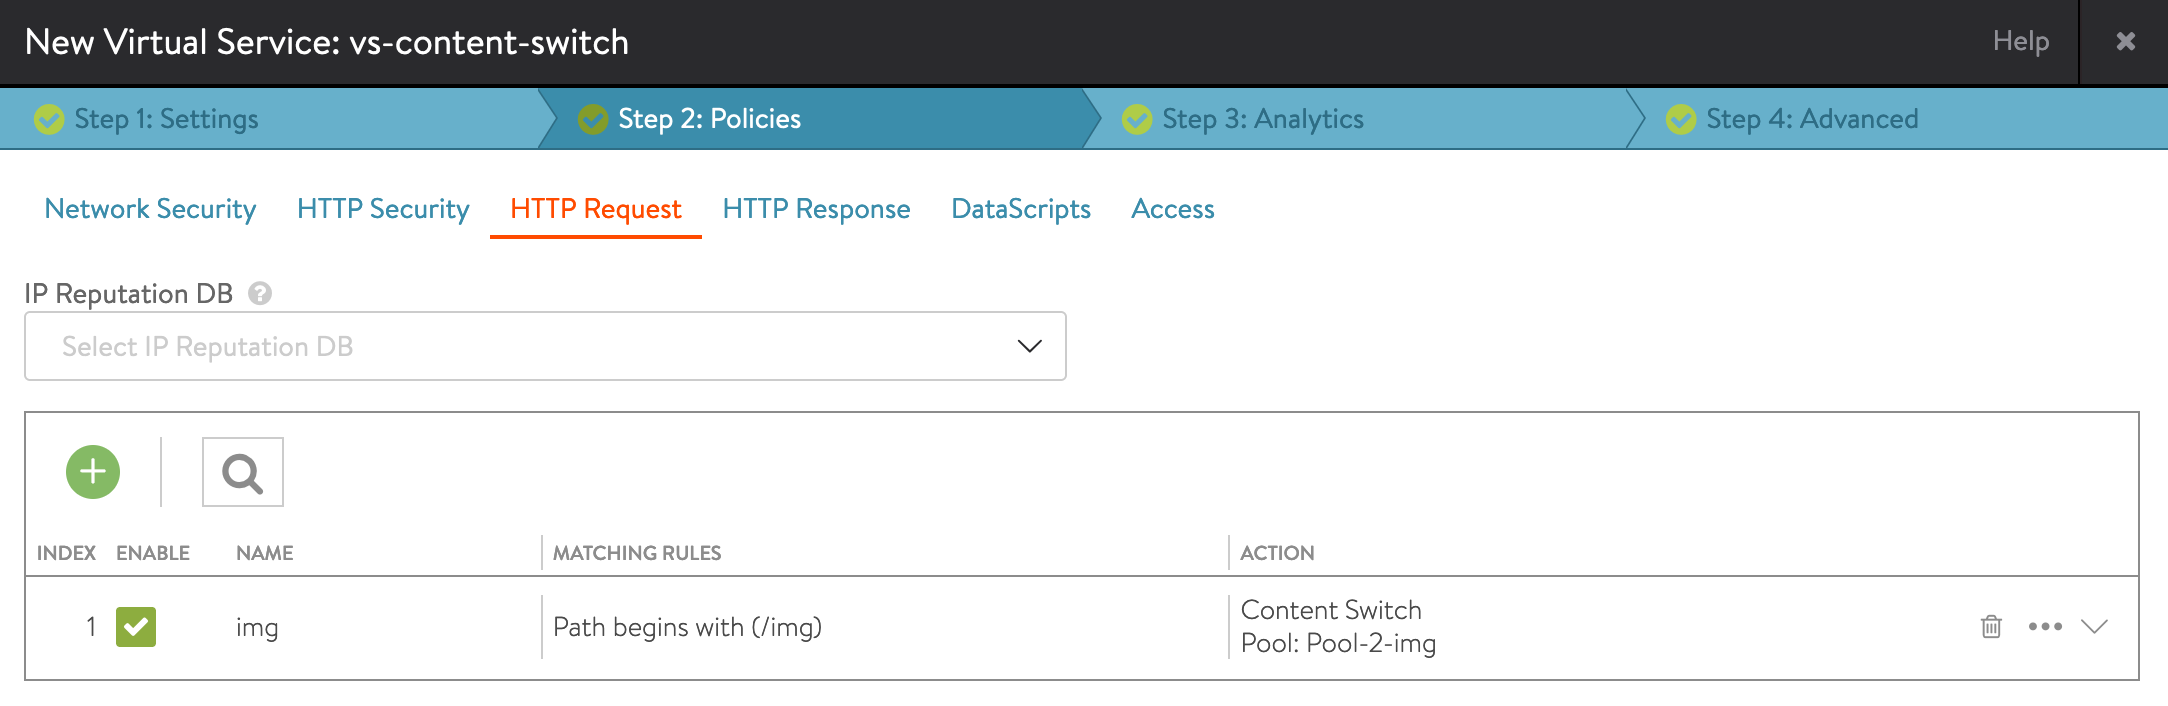
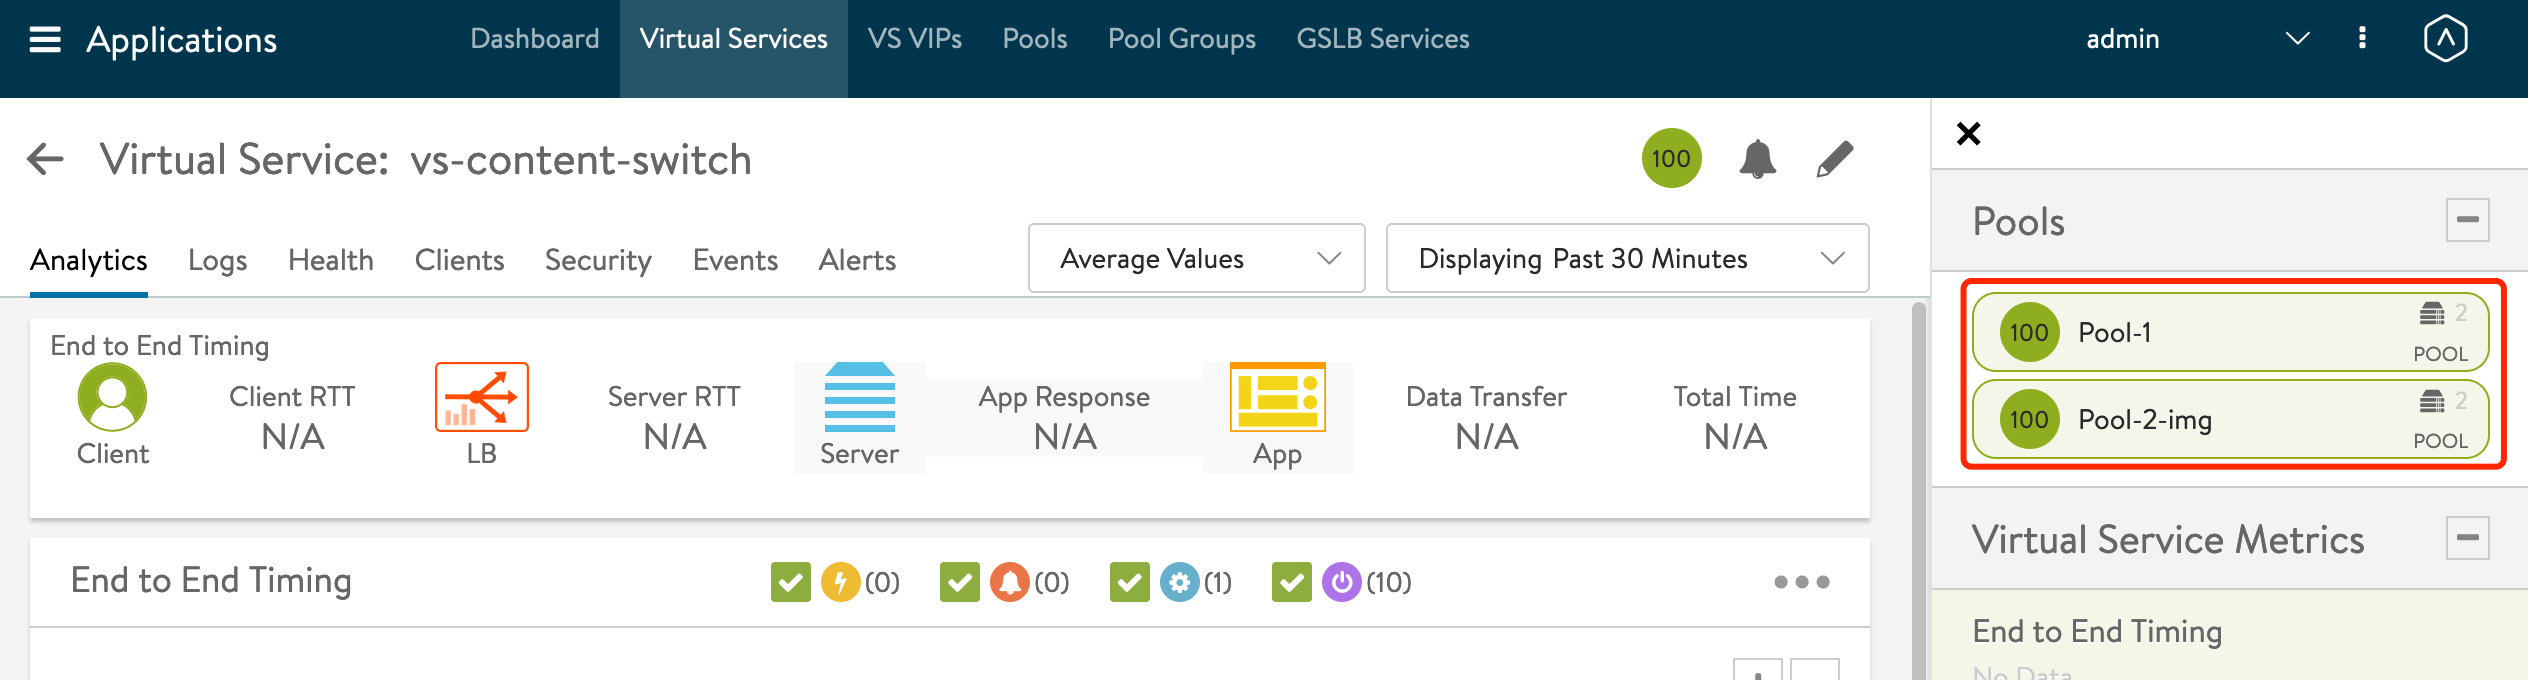
4、创建完成后 Virtual Service 监控界面会有两个 Pool:
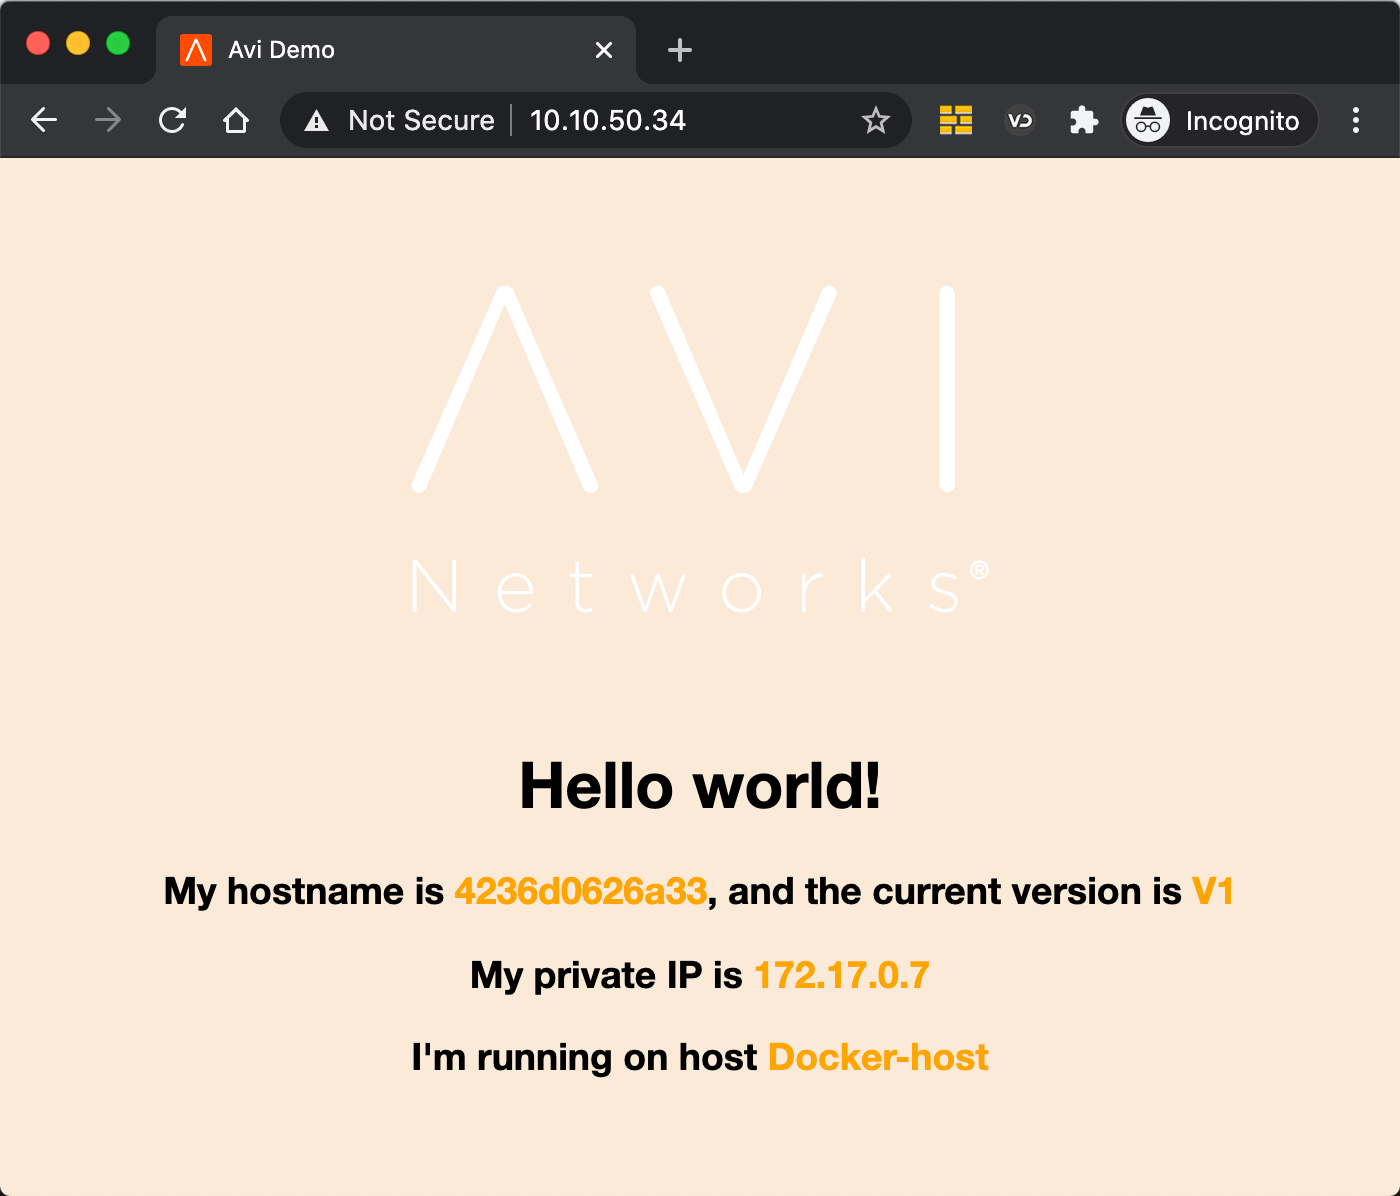
5、通过浏览器测试可以正常访问页面:
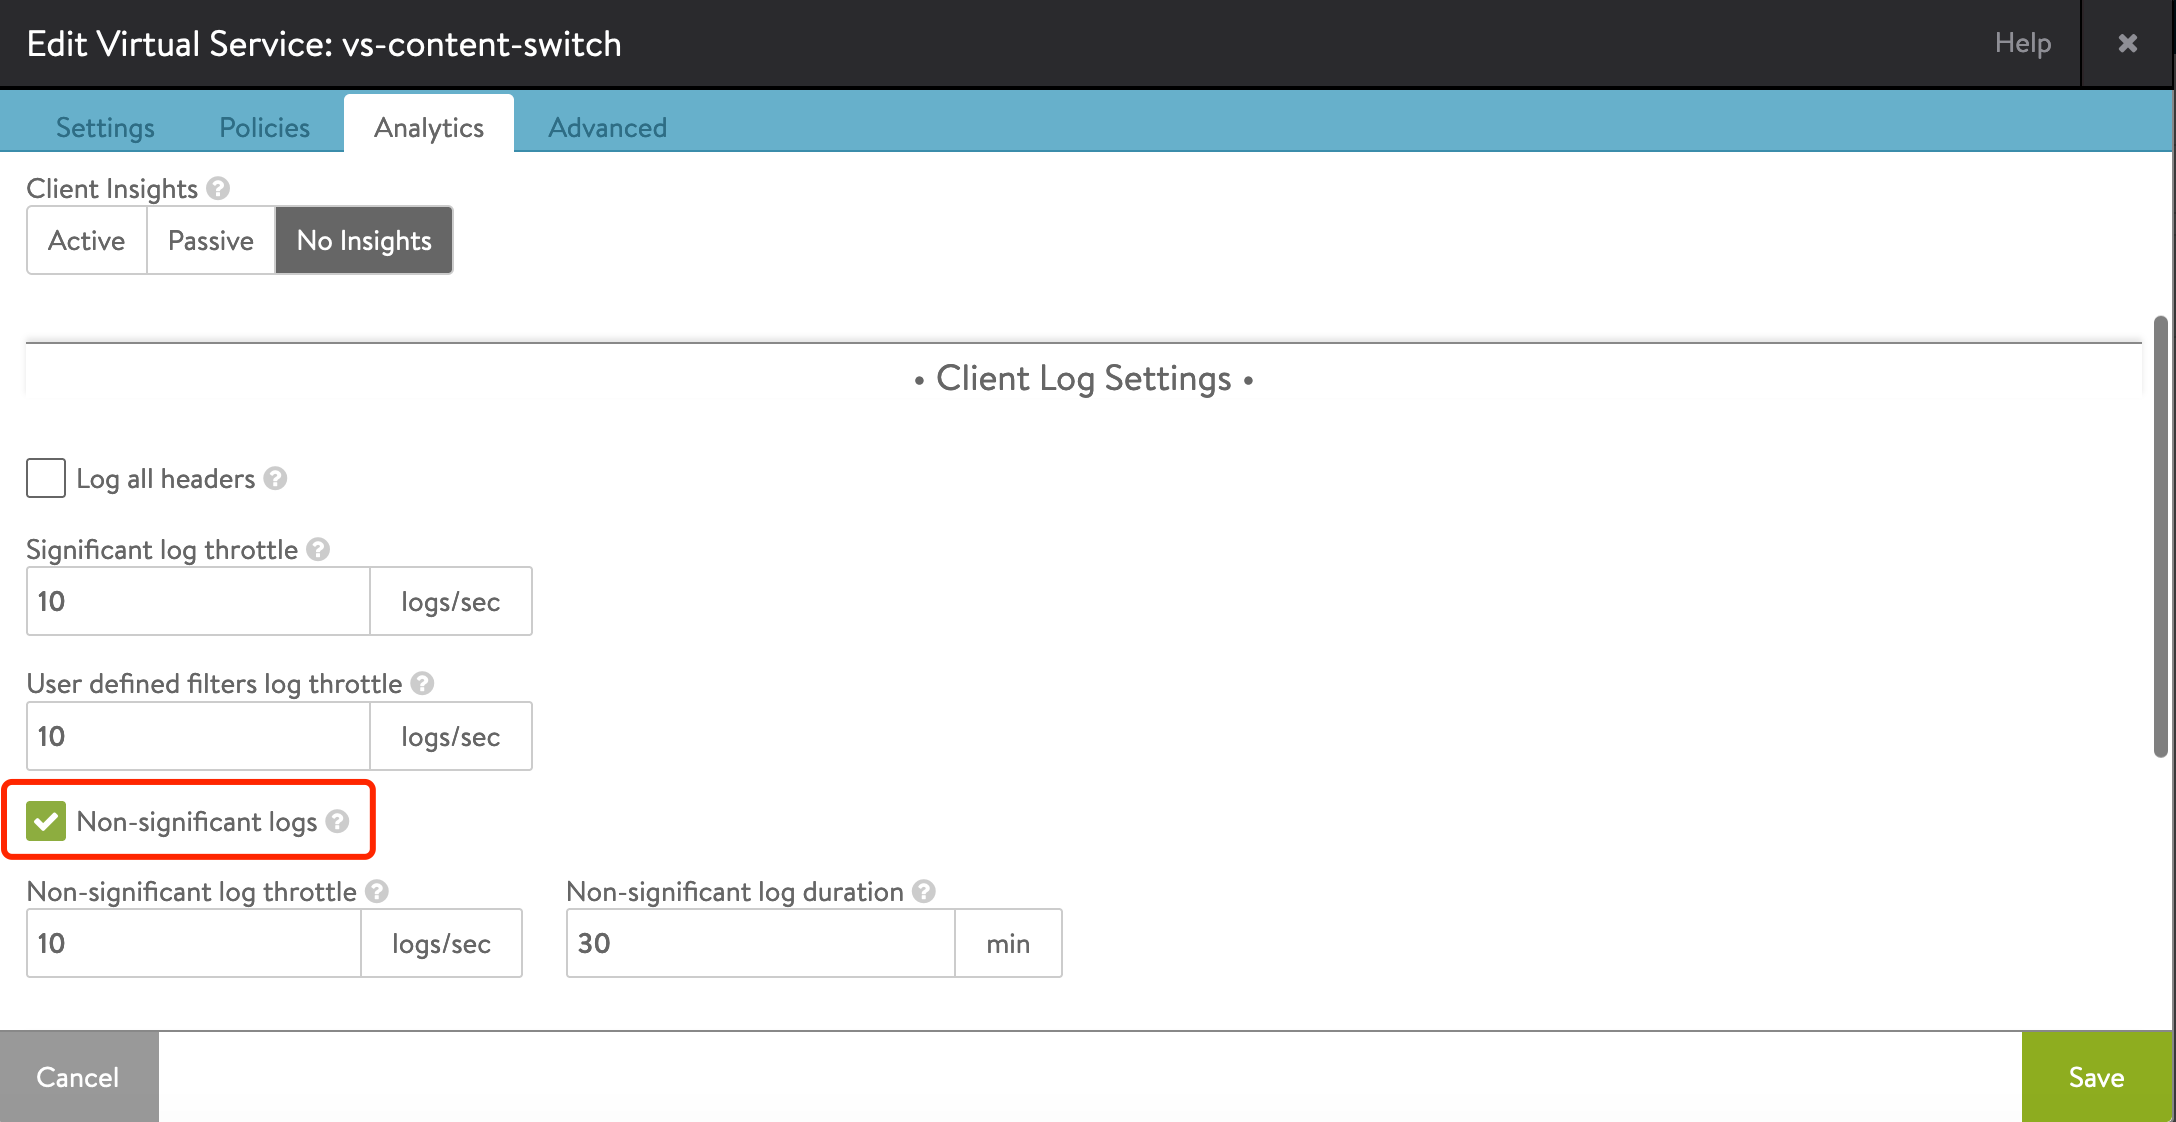
临时勾选 Virtual Service 的 Non-significant-log 以查看详细的访问日志:
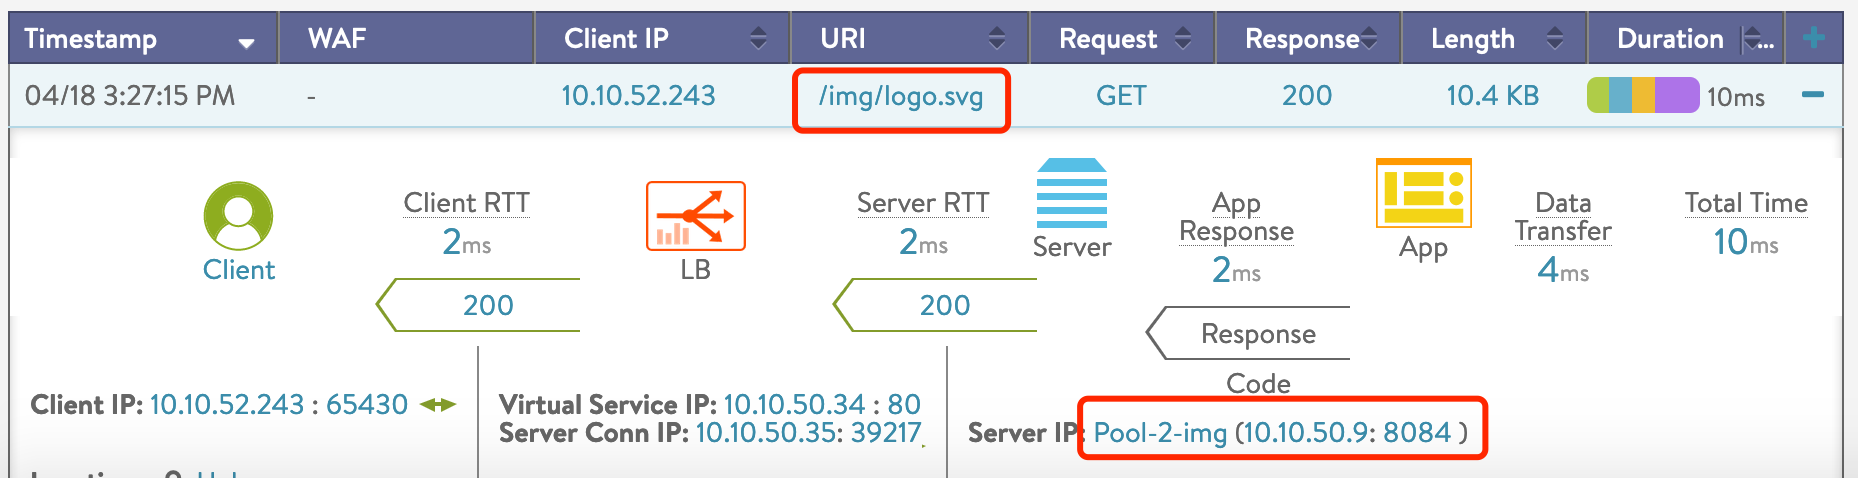
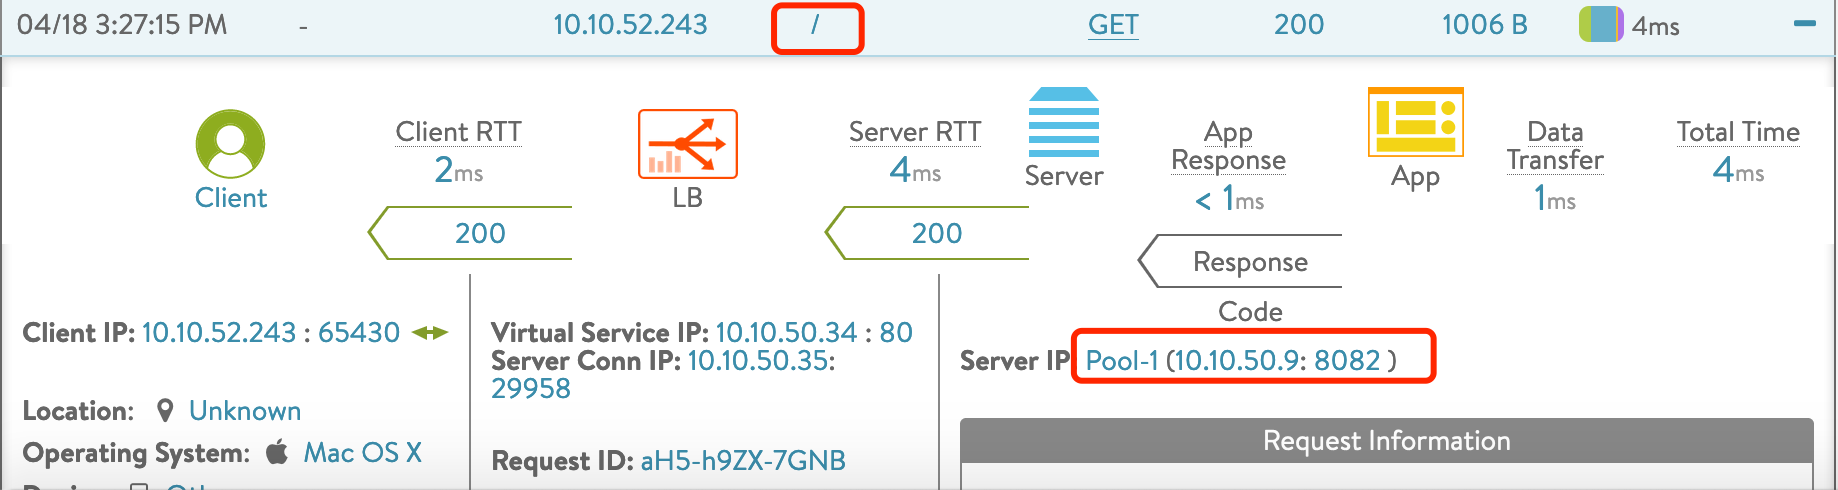
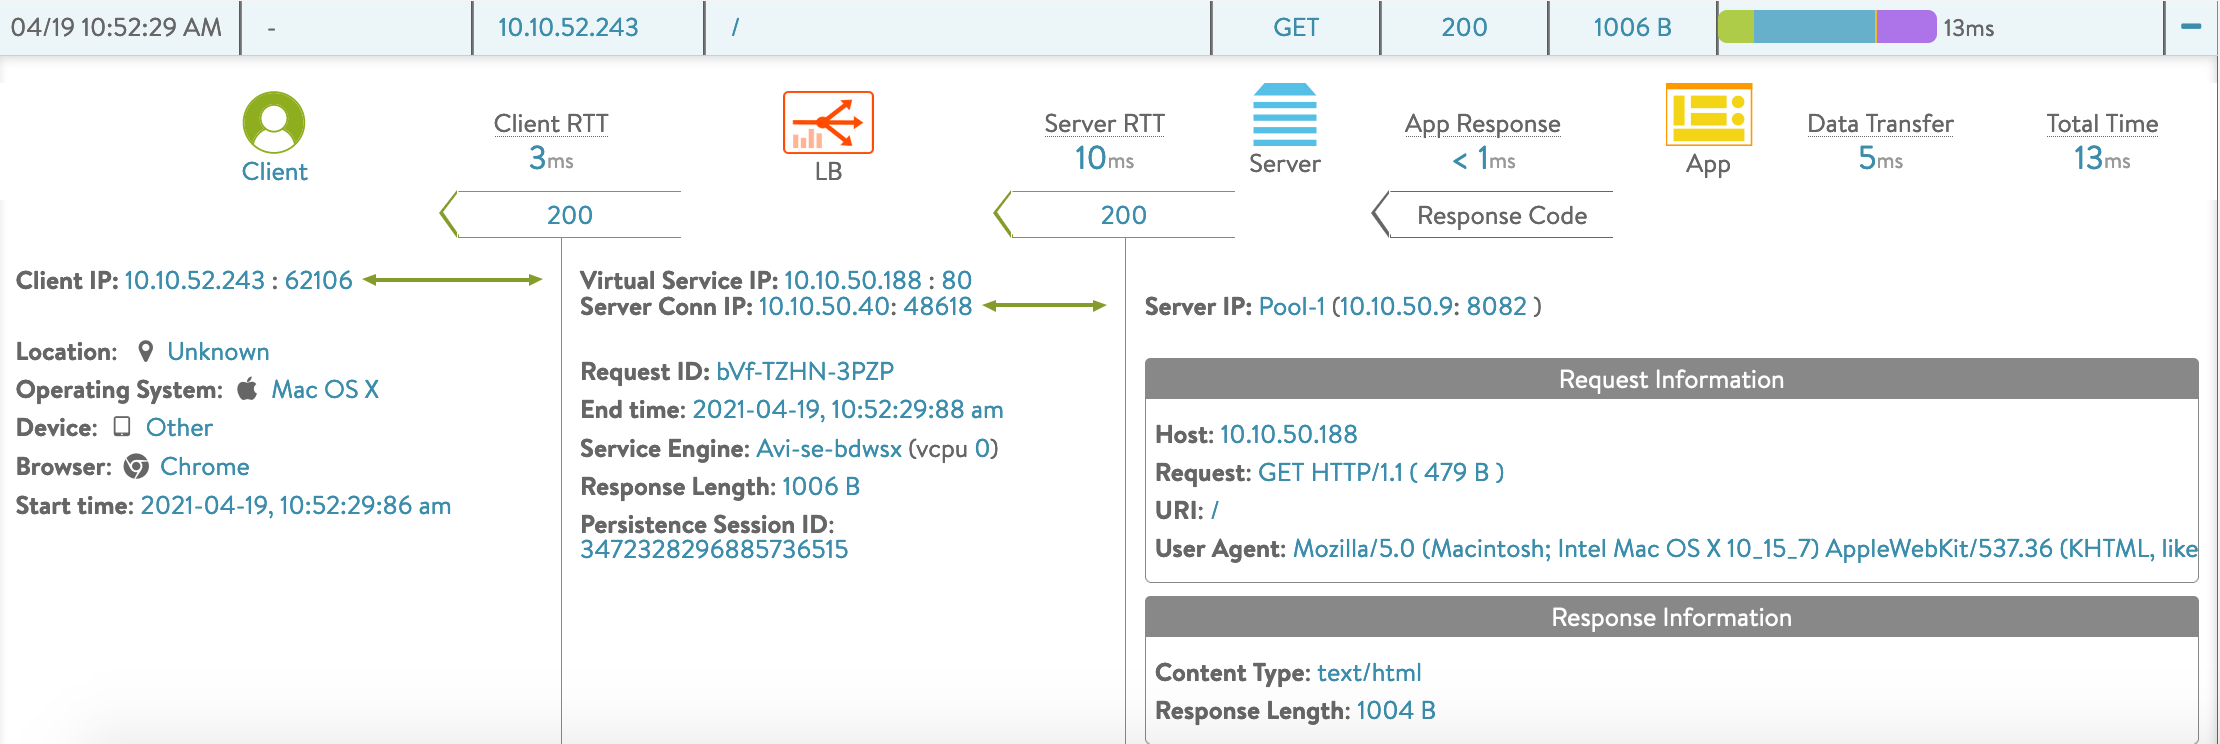
测试发现 img 路径被转发到了 Pool-2:
其他访问路径则是被转发到了 Pool-1:
6. 虚拟主机 Virtual hosting
需求描述:
- 为了节省 IP 地址耗用,多个服务共享一个虚拟 IP,基于域名或者路径来进行负载转发
- 聚合负载均衡流量入口,减少网络配置,增强安全性
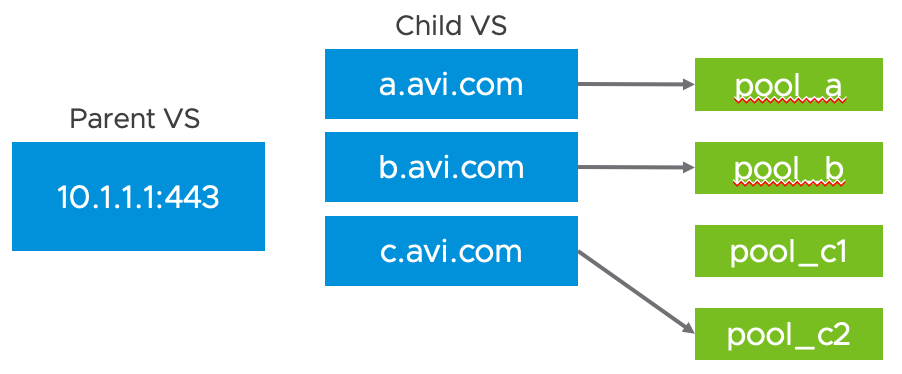
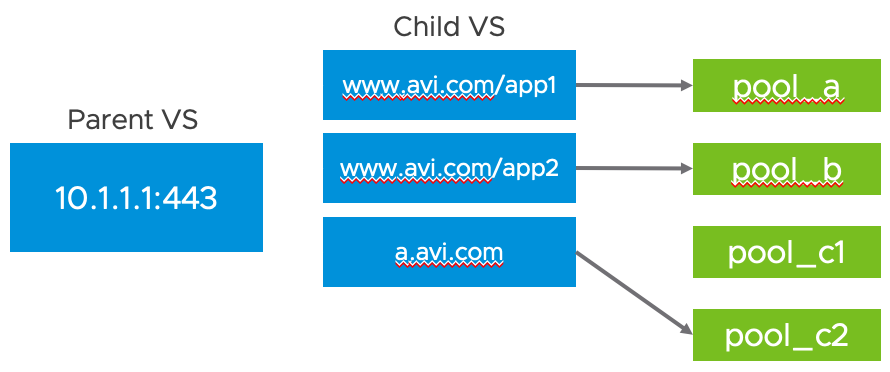
Avi 的 Virtual Hosting 可以实现将不同域名的访问请求转发给不同池,或者将同一域名的不同路径转发给不同的 Server。
使用 Virtual Hosting 时,每个 child vs 有自己独立的管理和监控界面,可以共享 parent vs 的 VIP 和 SSL 证书。
目前 Avi 下有两种 Virtual Hosting 模式:SNI 和 EVH,两者相比有下列区别:
- SNI: Child VS 必须通过 HTTPS 访问,多个 Child VS 可以共享 VIP,但不能共享域名。仅能根据不同域名将流量转发到不同的池;
- EVH:Child VS 同时支持 HTTP 和 HTTPS,多个 Child VS 可以共享 VIP,可以根据 host(域名或者 IP)及 path 来进行条件匹配。
具体详见:https://avinetworks.com/docs/20.1/enhanced-virtual-hosting/
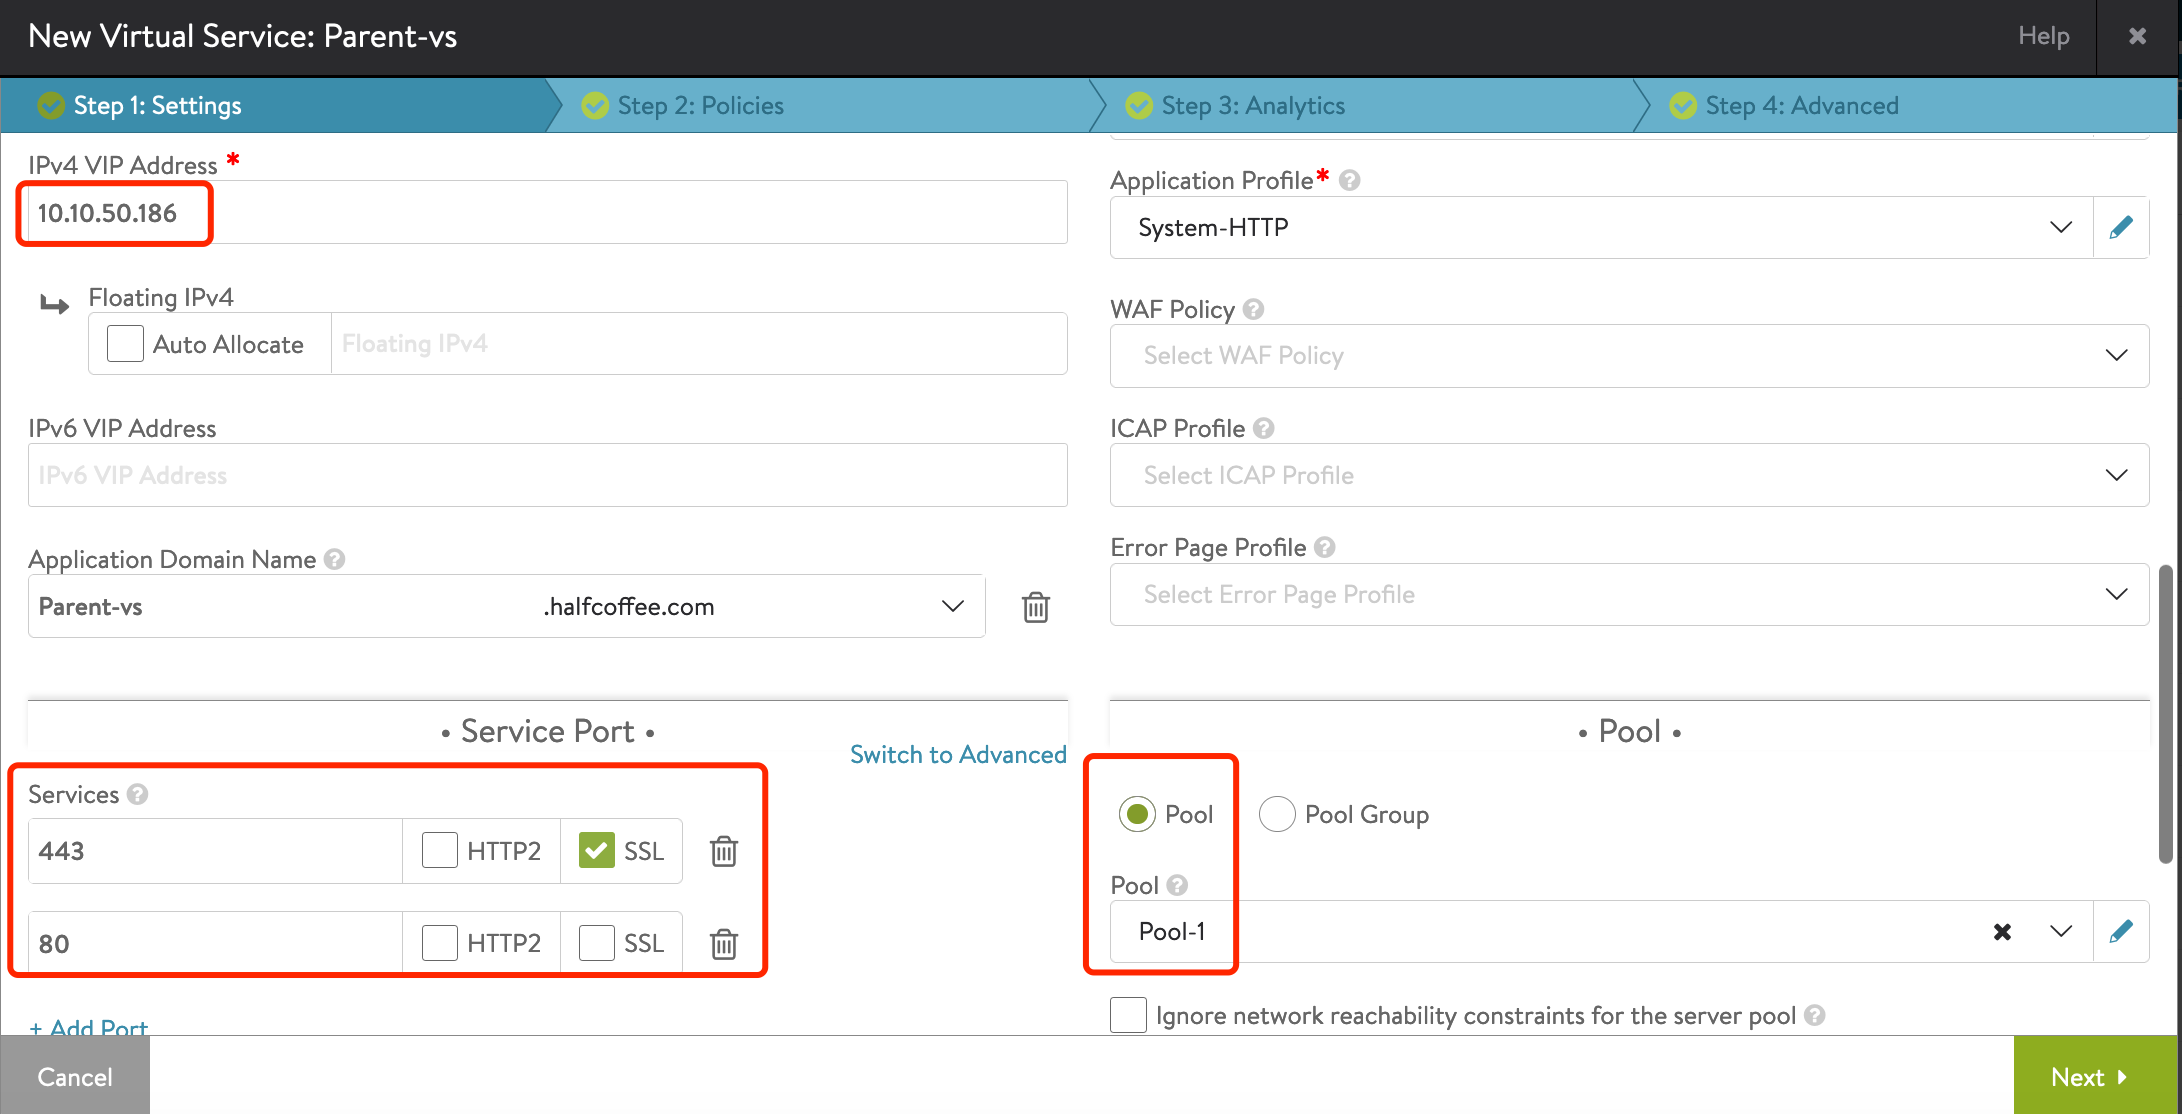
SNI 配置方式
配置步骤:
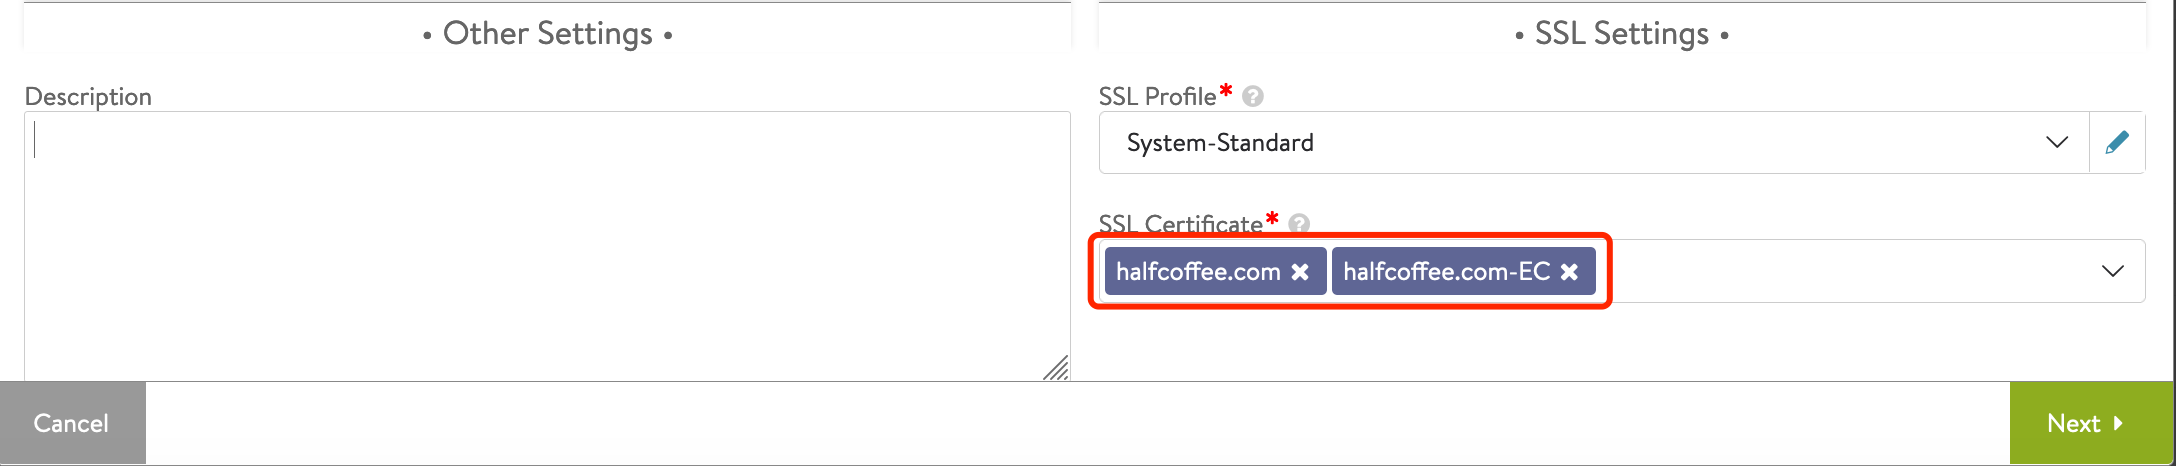
1、创建 Parent VS,启用 Virtual Hosting VS,Type 设置为 SNI:
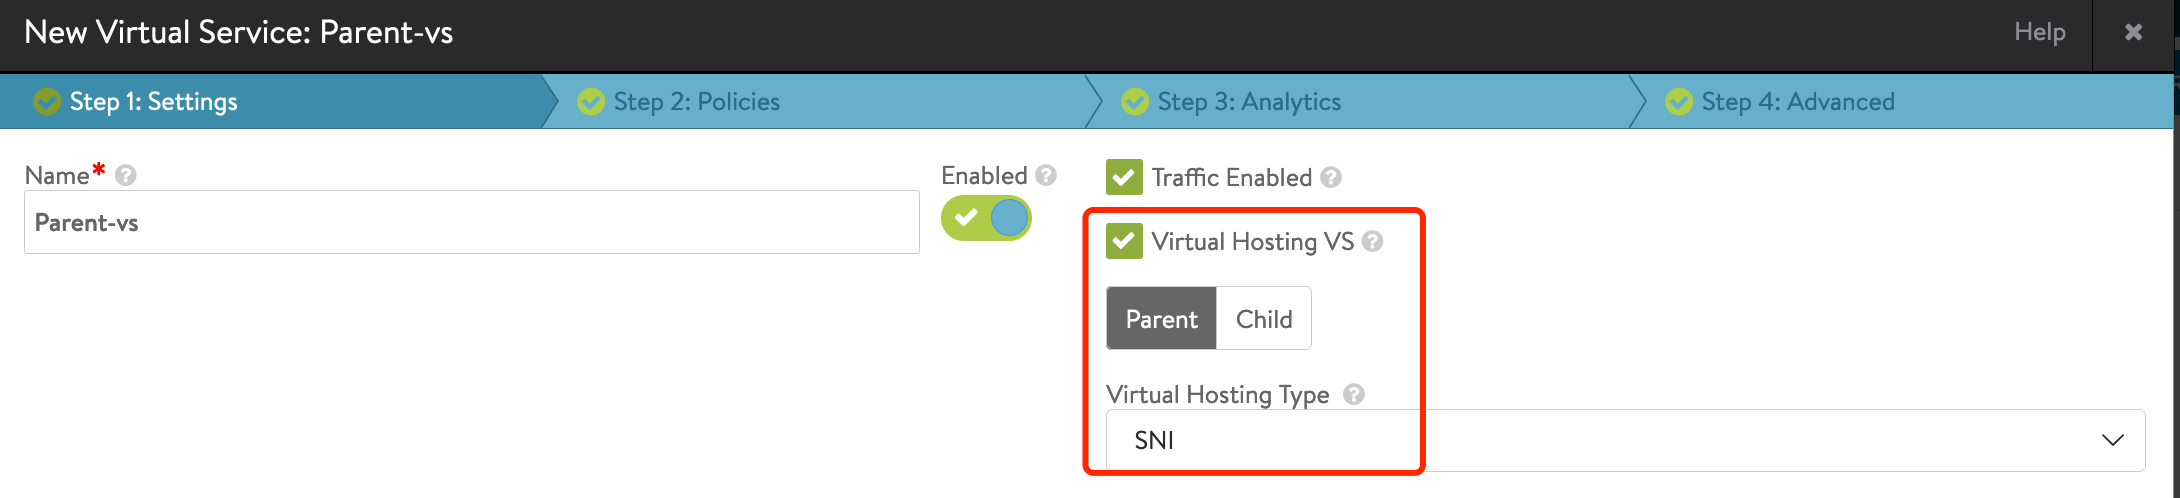
设置端口、默认的 Pool、证书。注意在 SNI 下 Parent VS 必须开启 SSL:
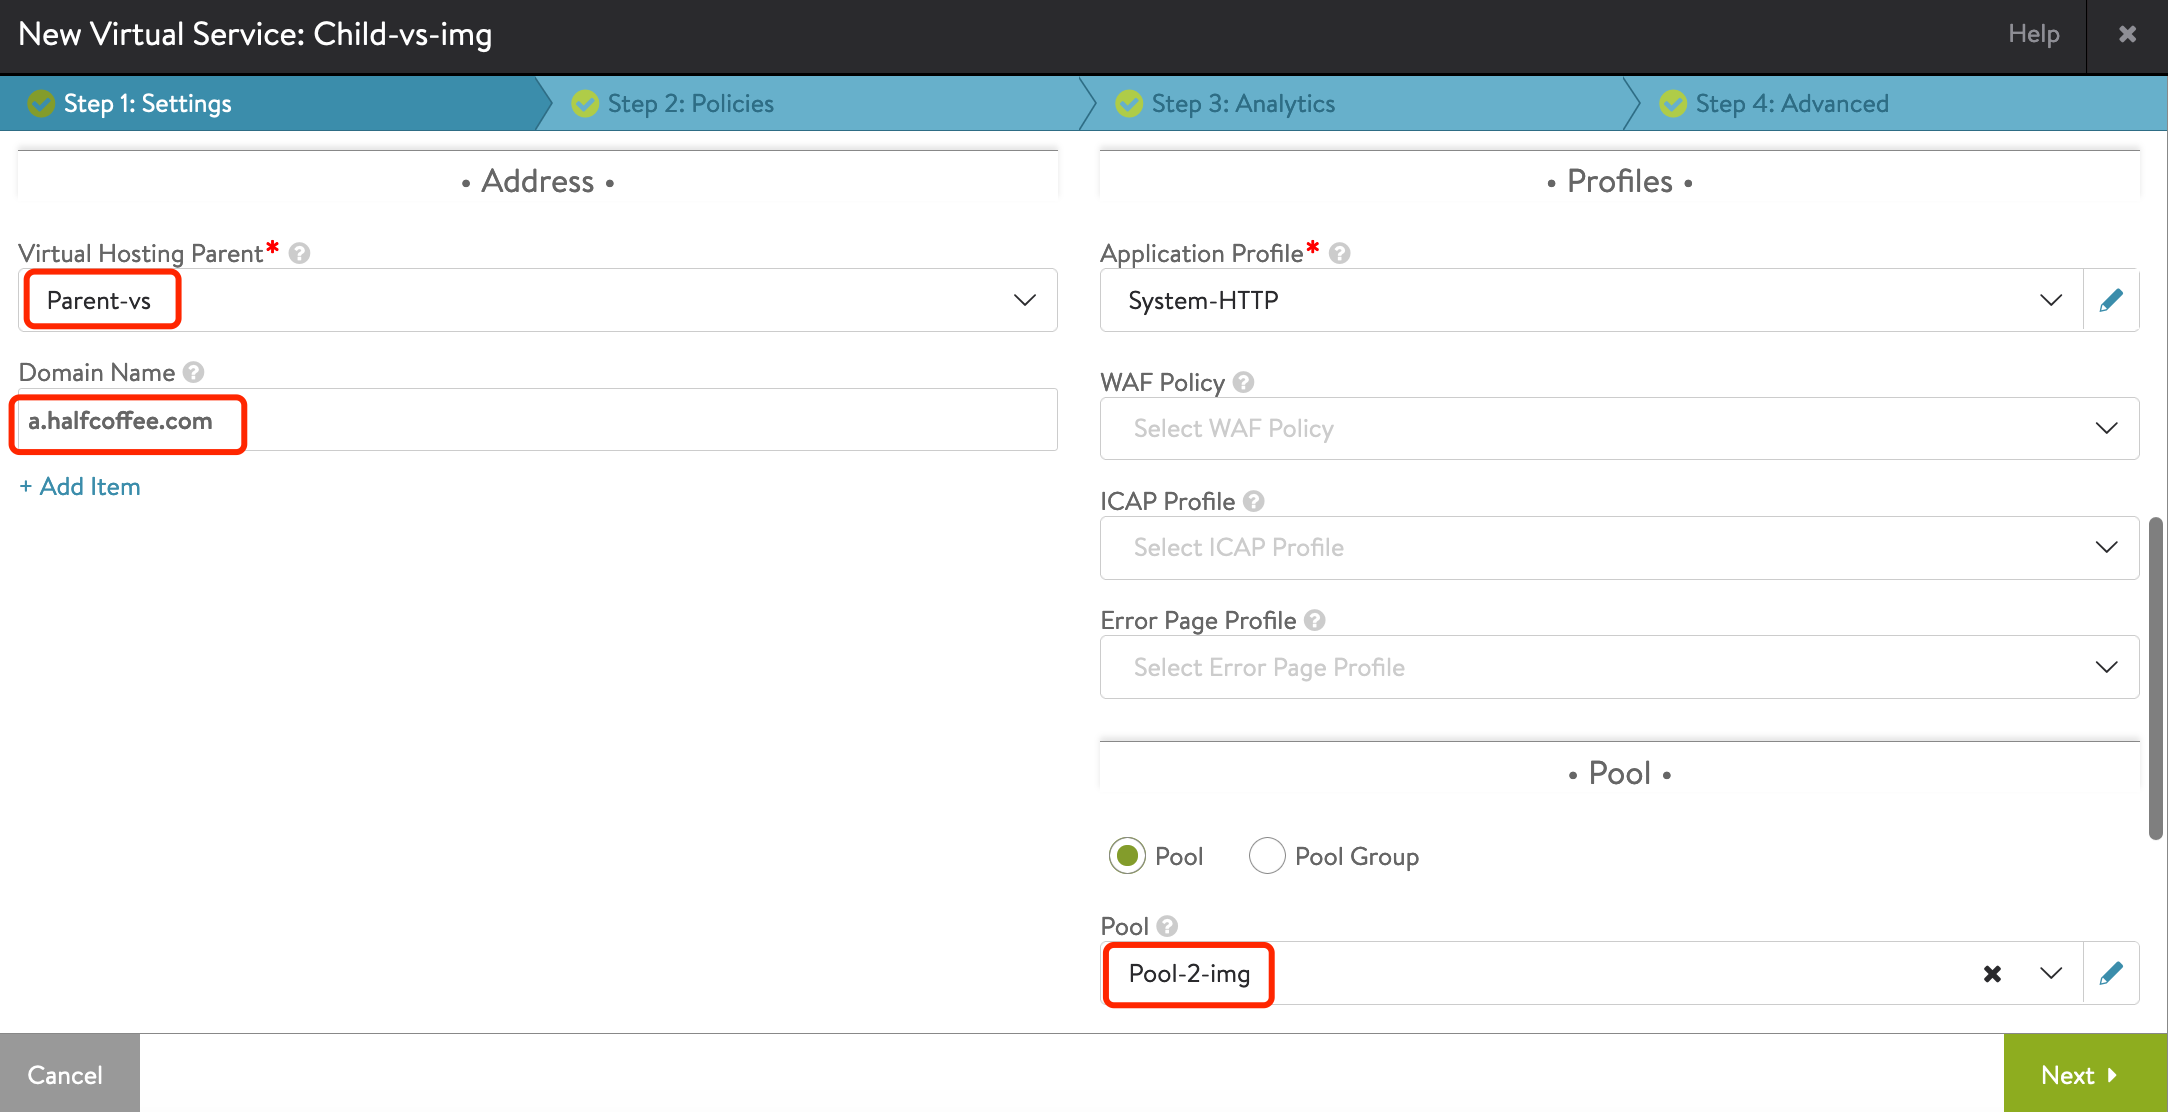
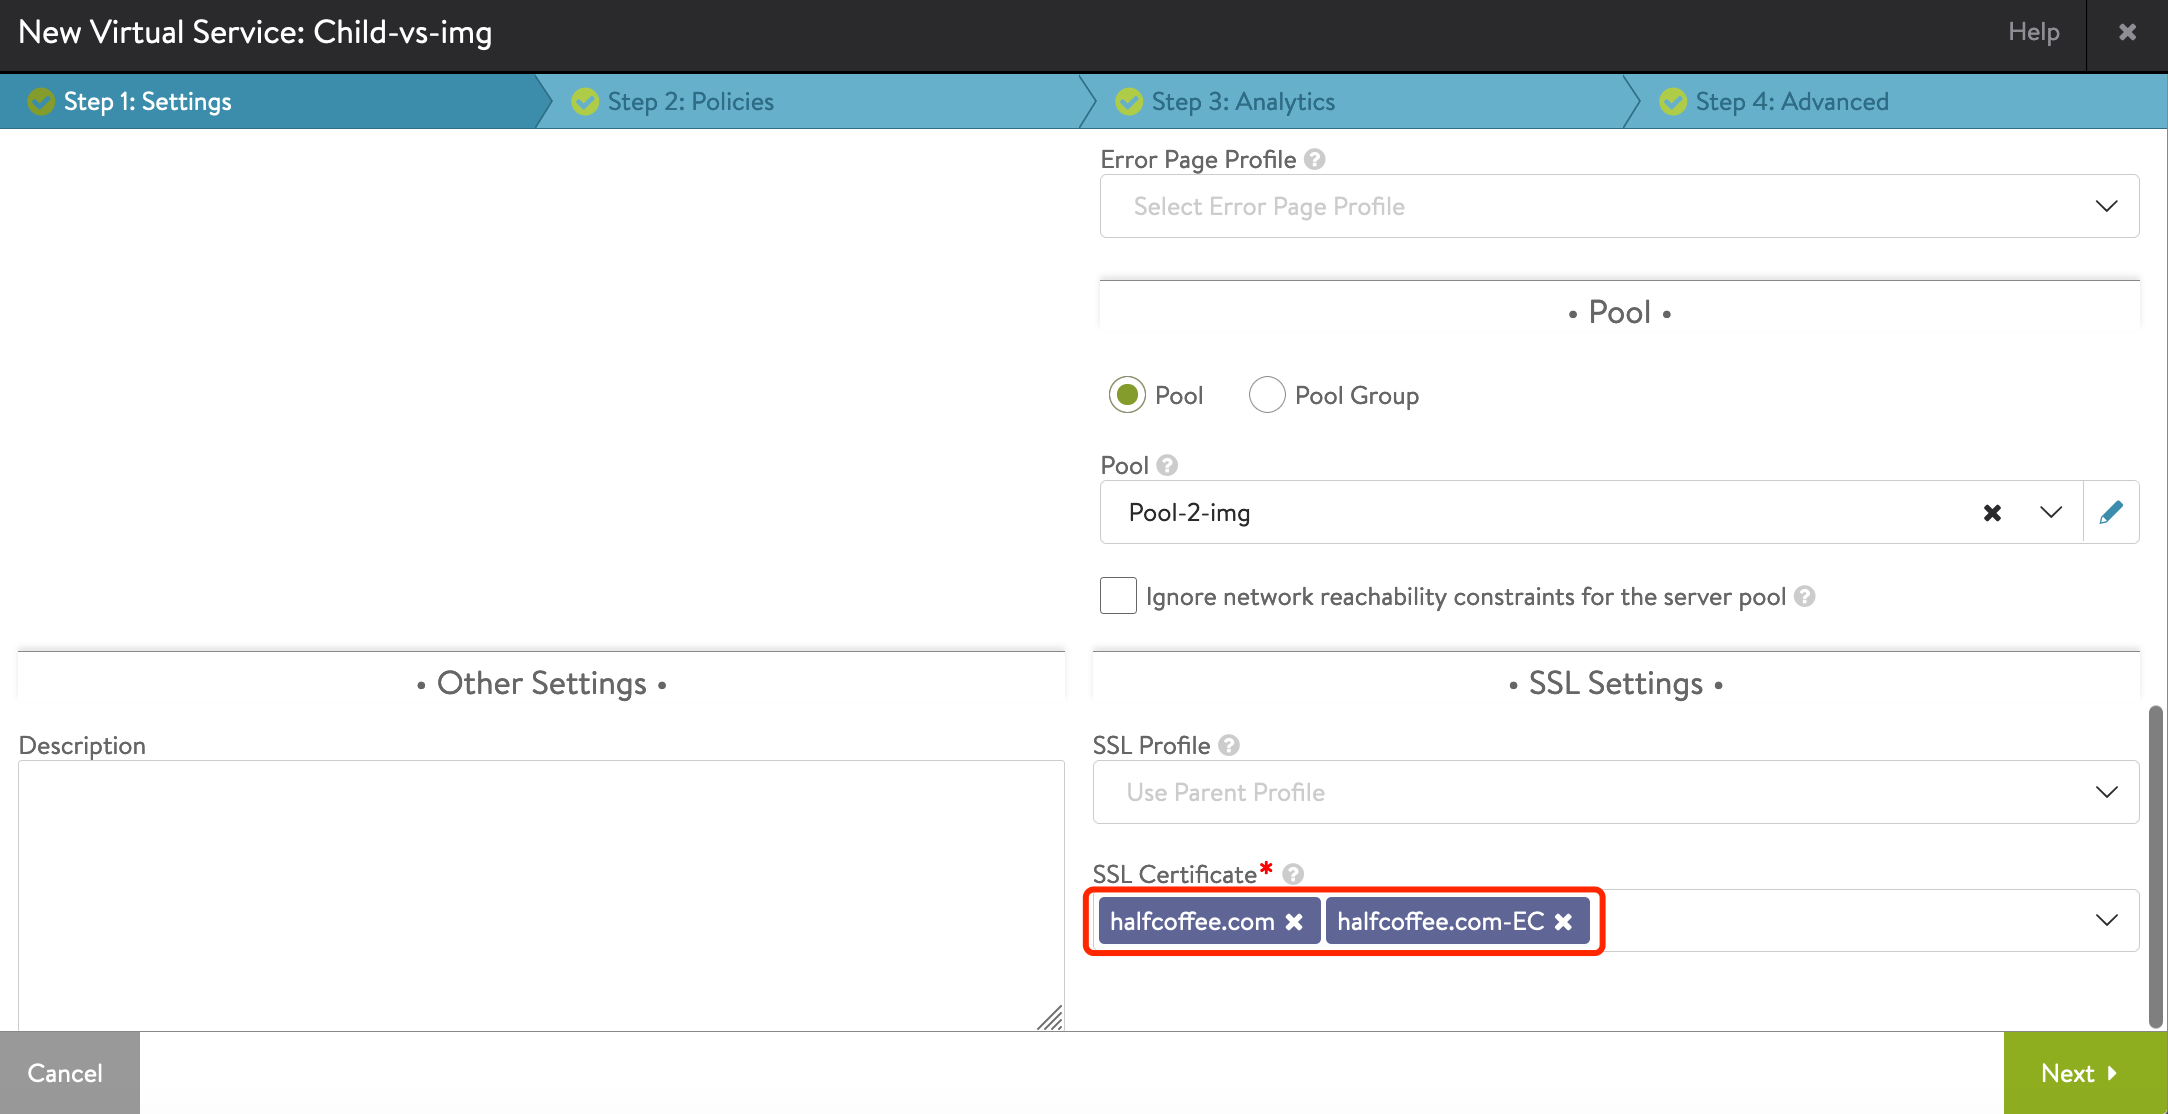
2、创建 Child VS,启用 Virtual Hosting:
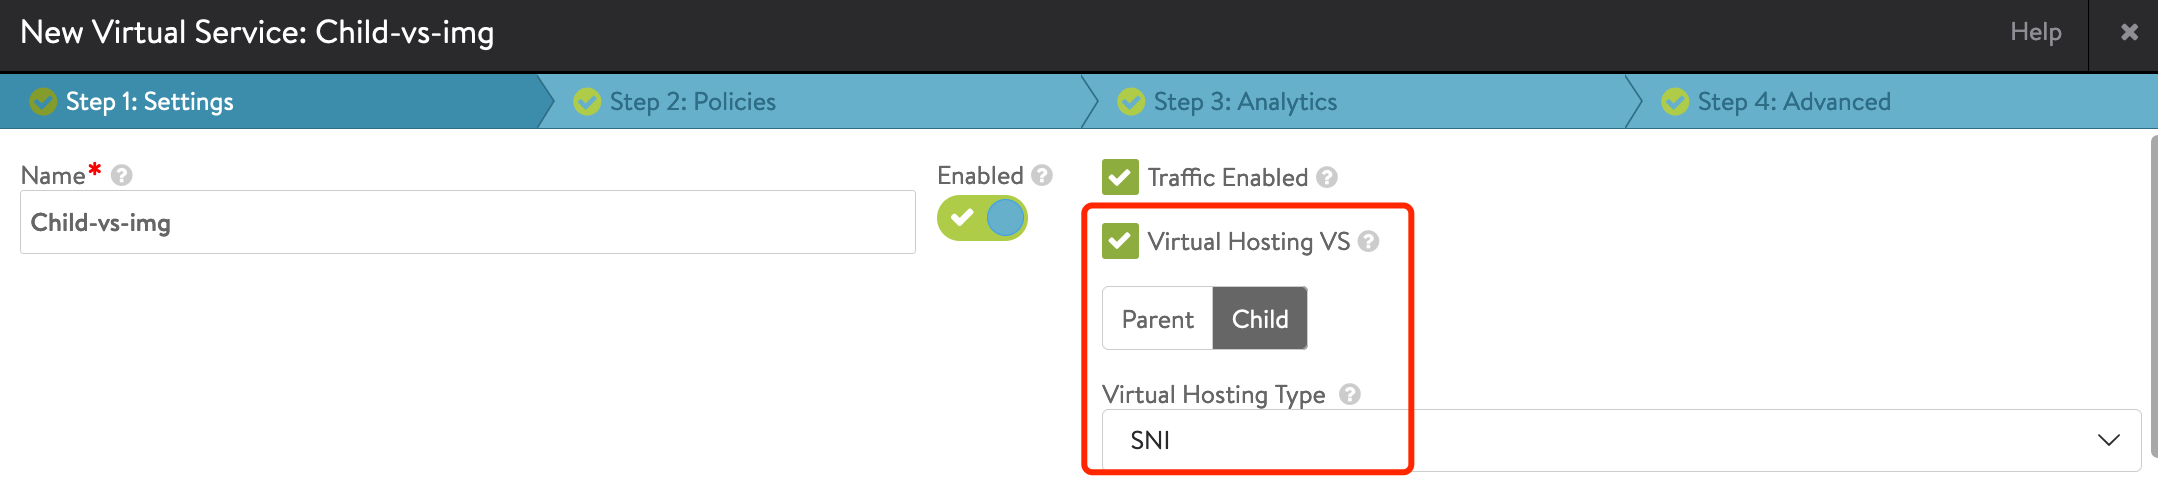
设置域名和需要使用的 Pool,证书。
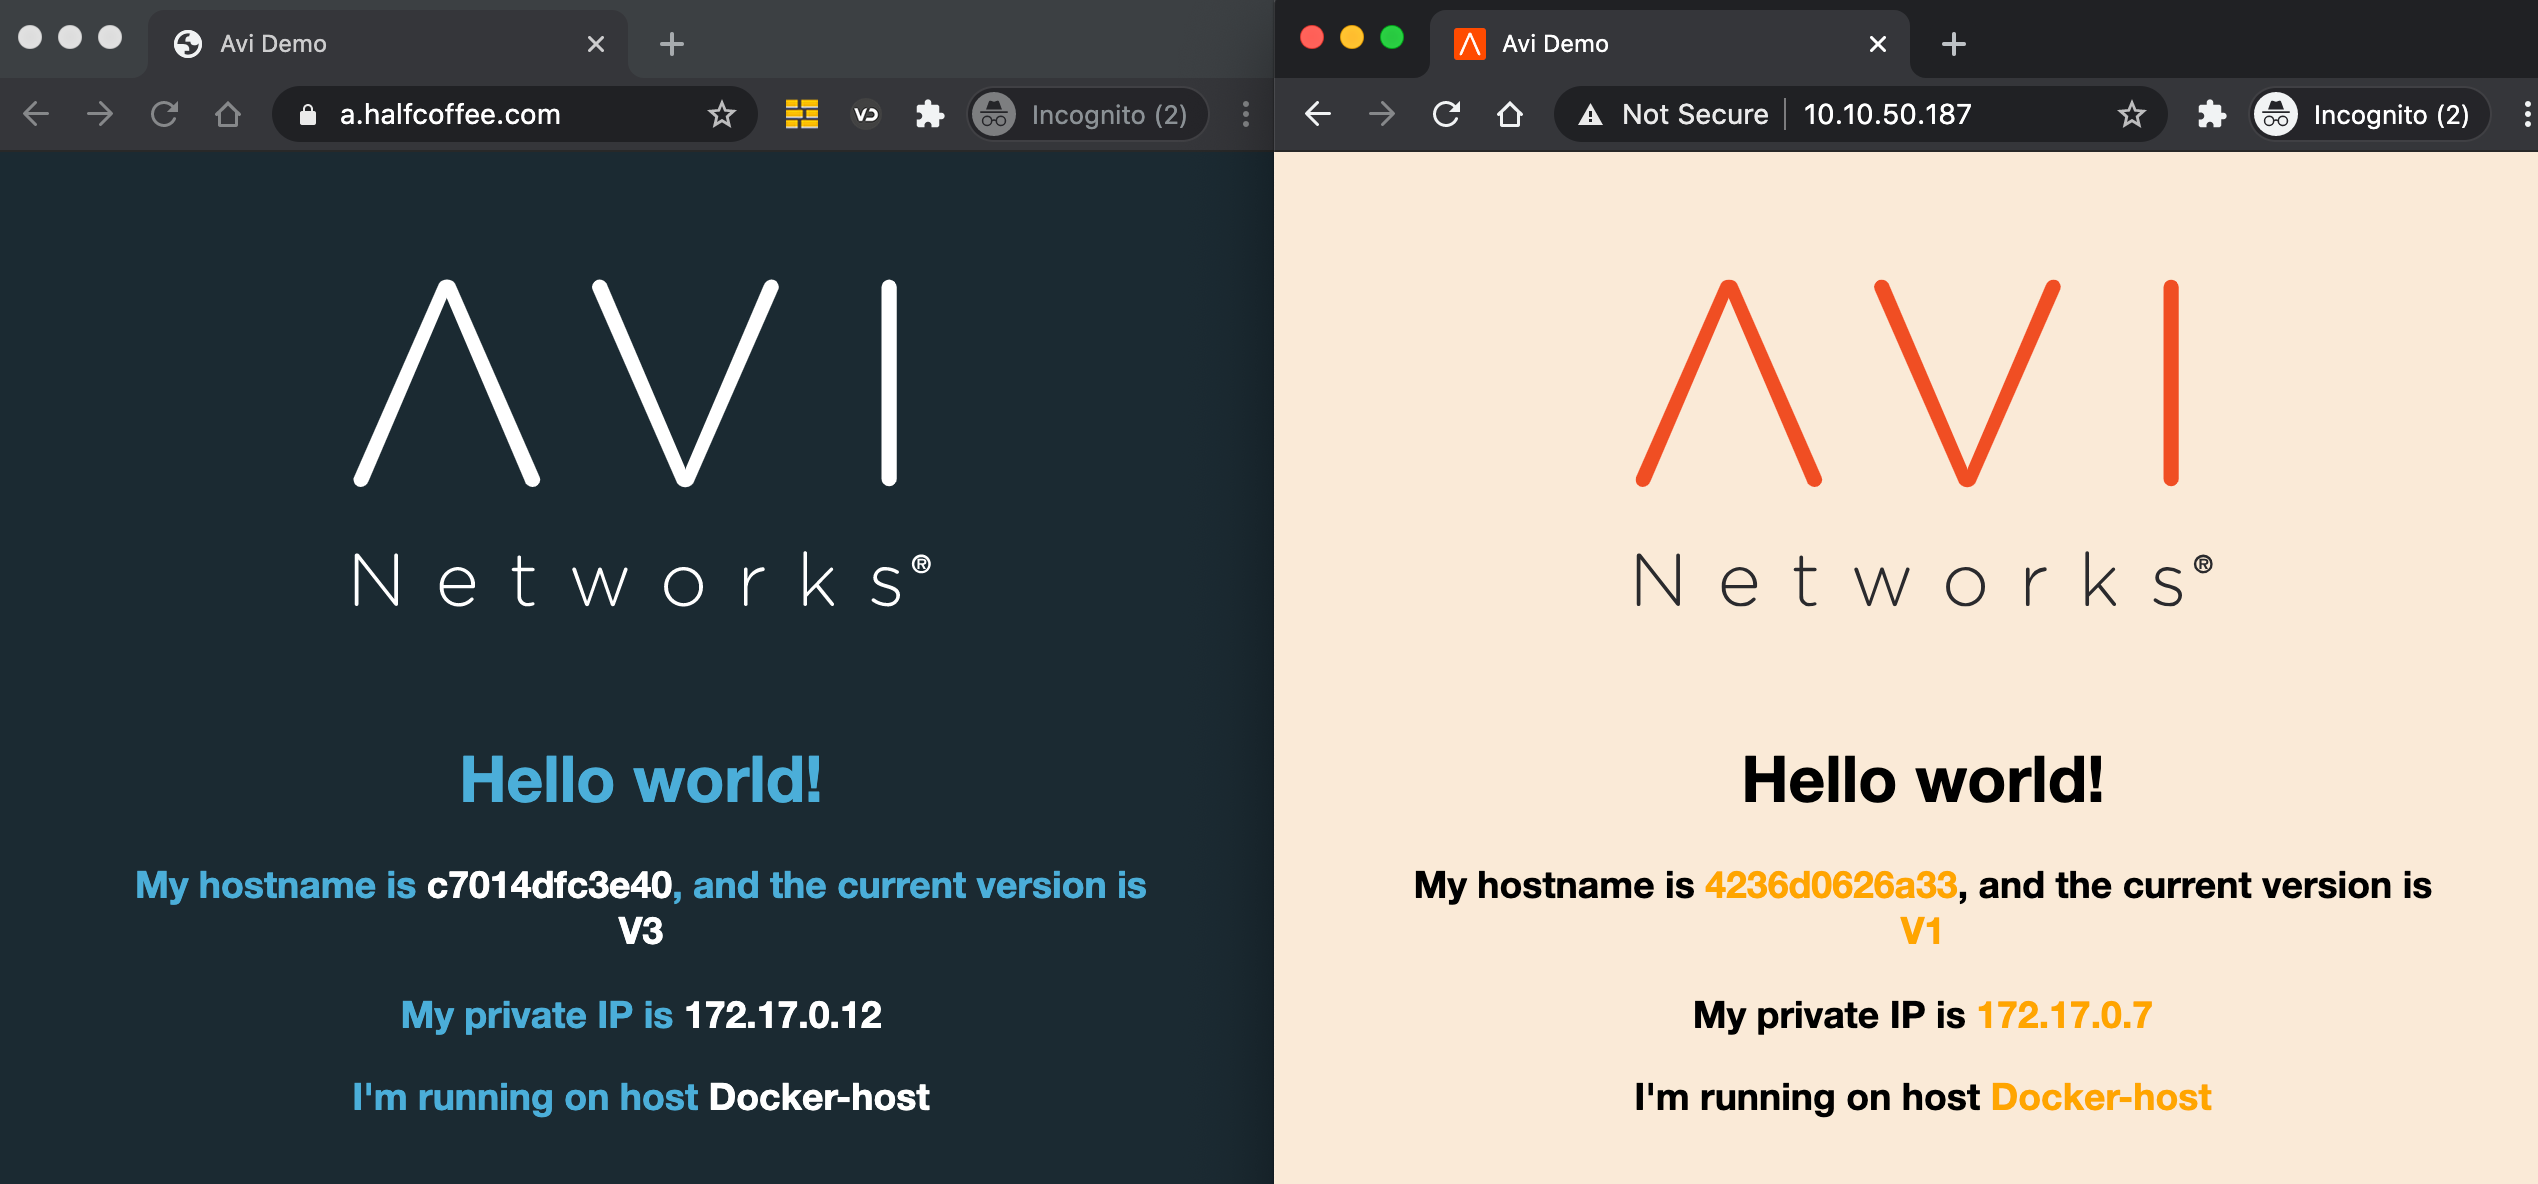
访问测试:
EVH(Enhanced Virtual Hosting)
EVH 是 Avi 20.1.3 后提供的新功能,可以根据 Host 和 Path 进行请求转发。
配置步骤:
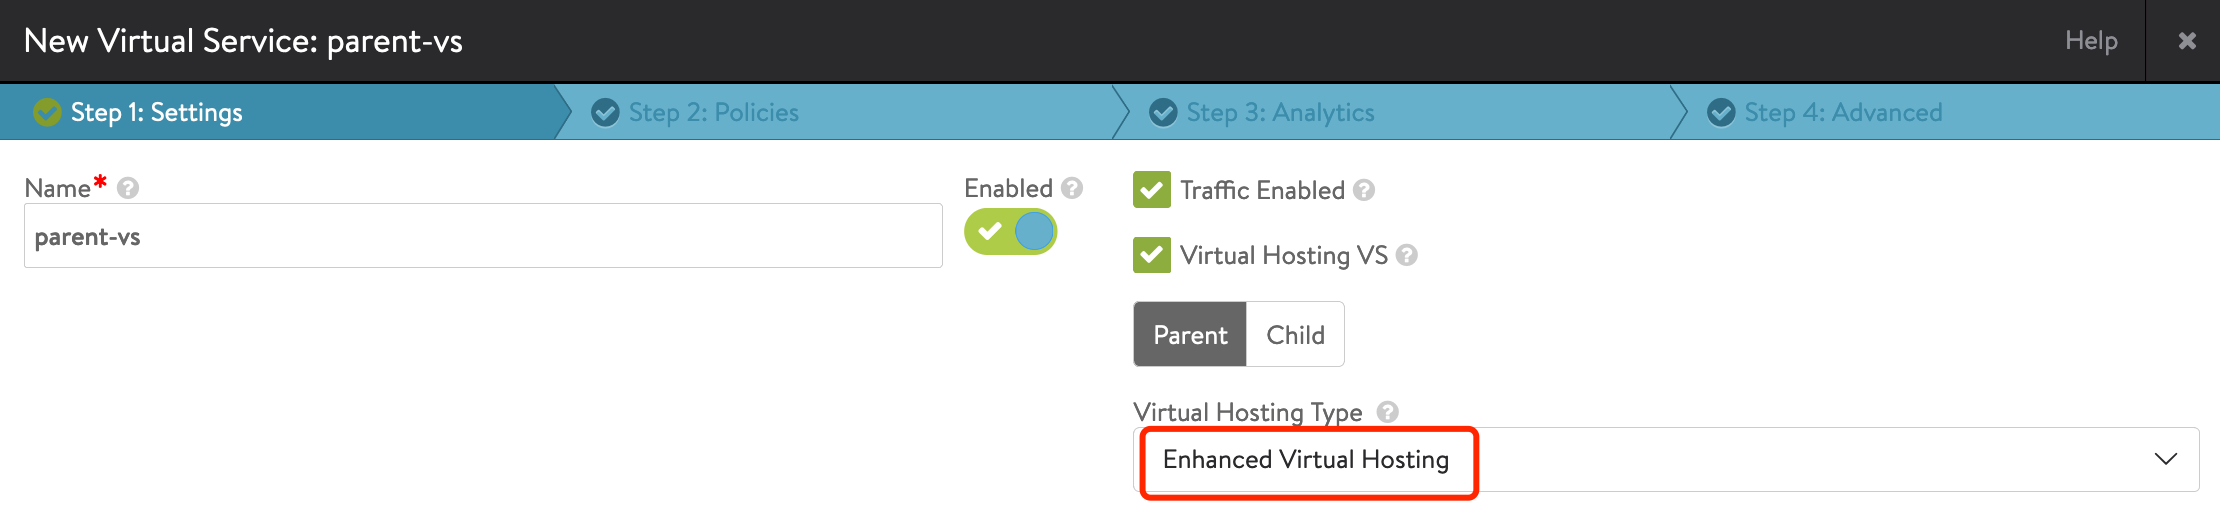
1、创建 Parent VS,启用 Virtual Hosting VS,type 设置为 Enhanced Virtual Hosting:
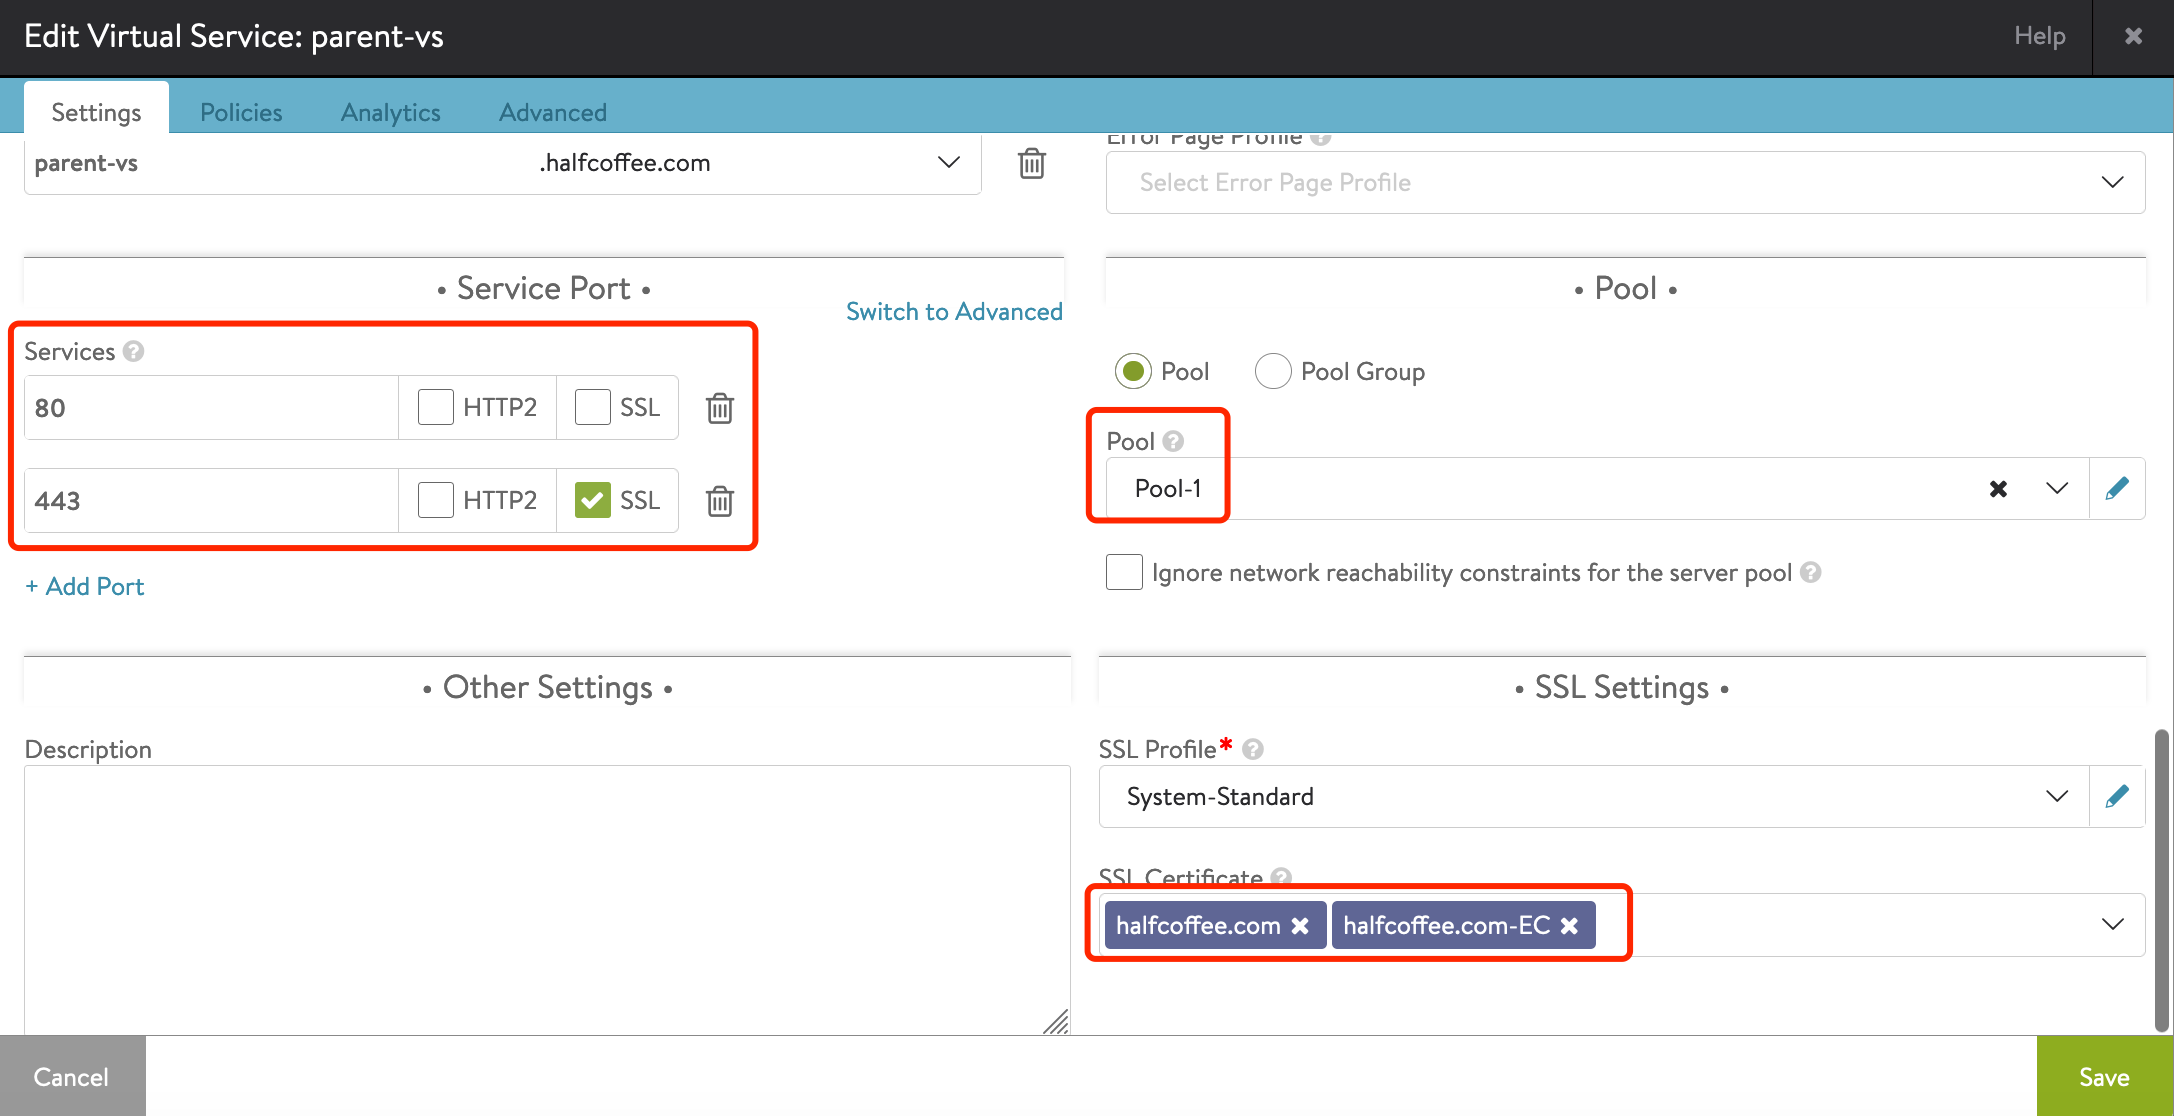
设置端口、默认的 Pool 及证书:
2、创建 Child VS,启用 Virtual Hosting
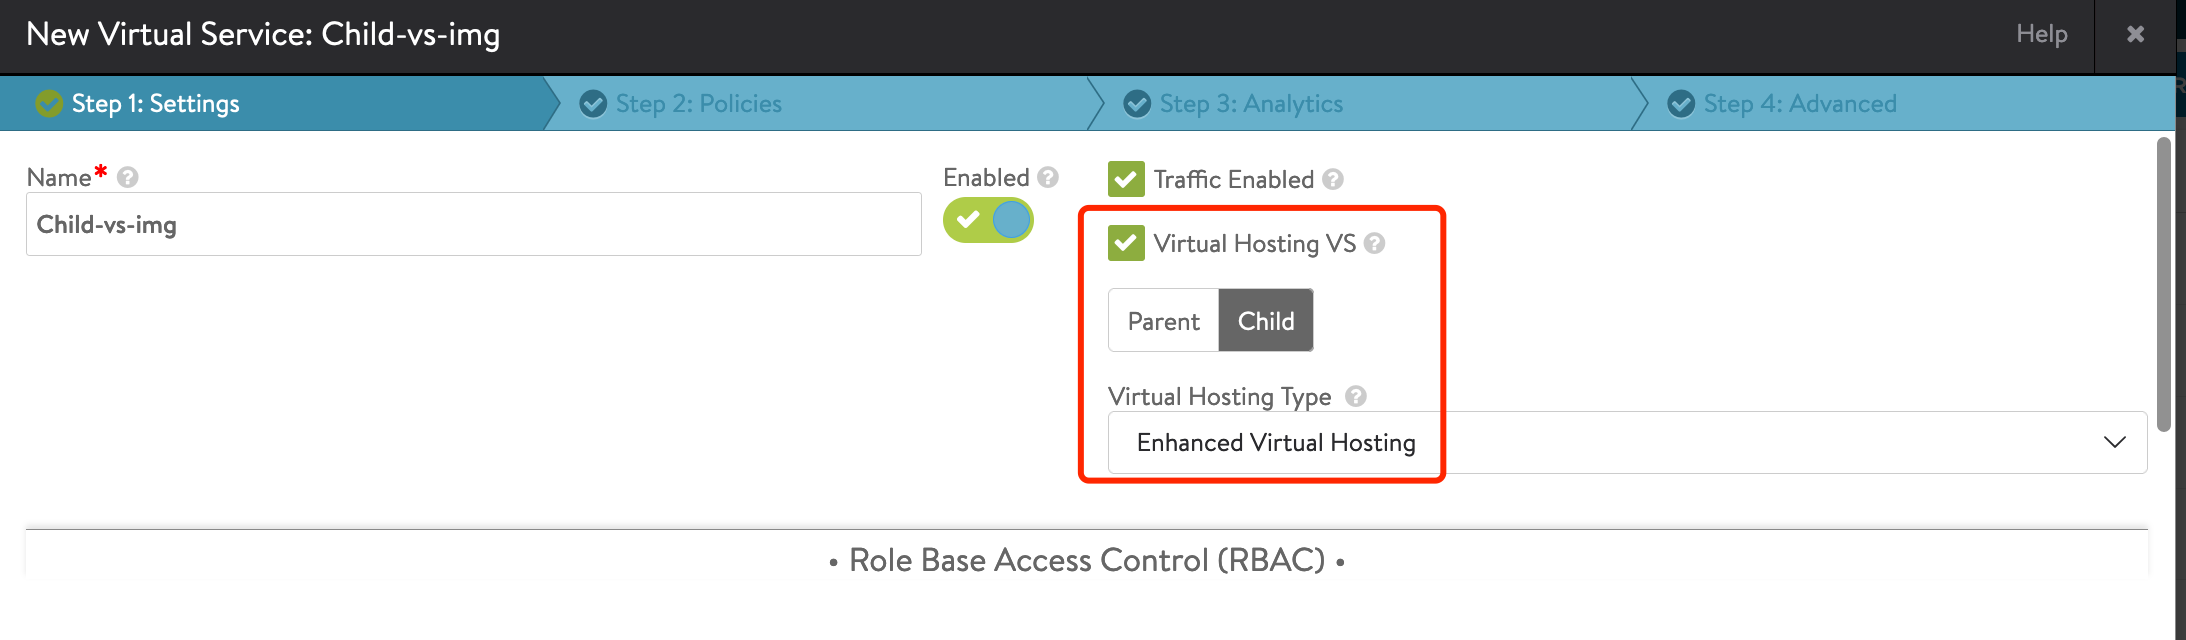
设置 Host 和 Path 匹配条件。Host 可以使用 Parent VS 的 VIP 或者域名。
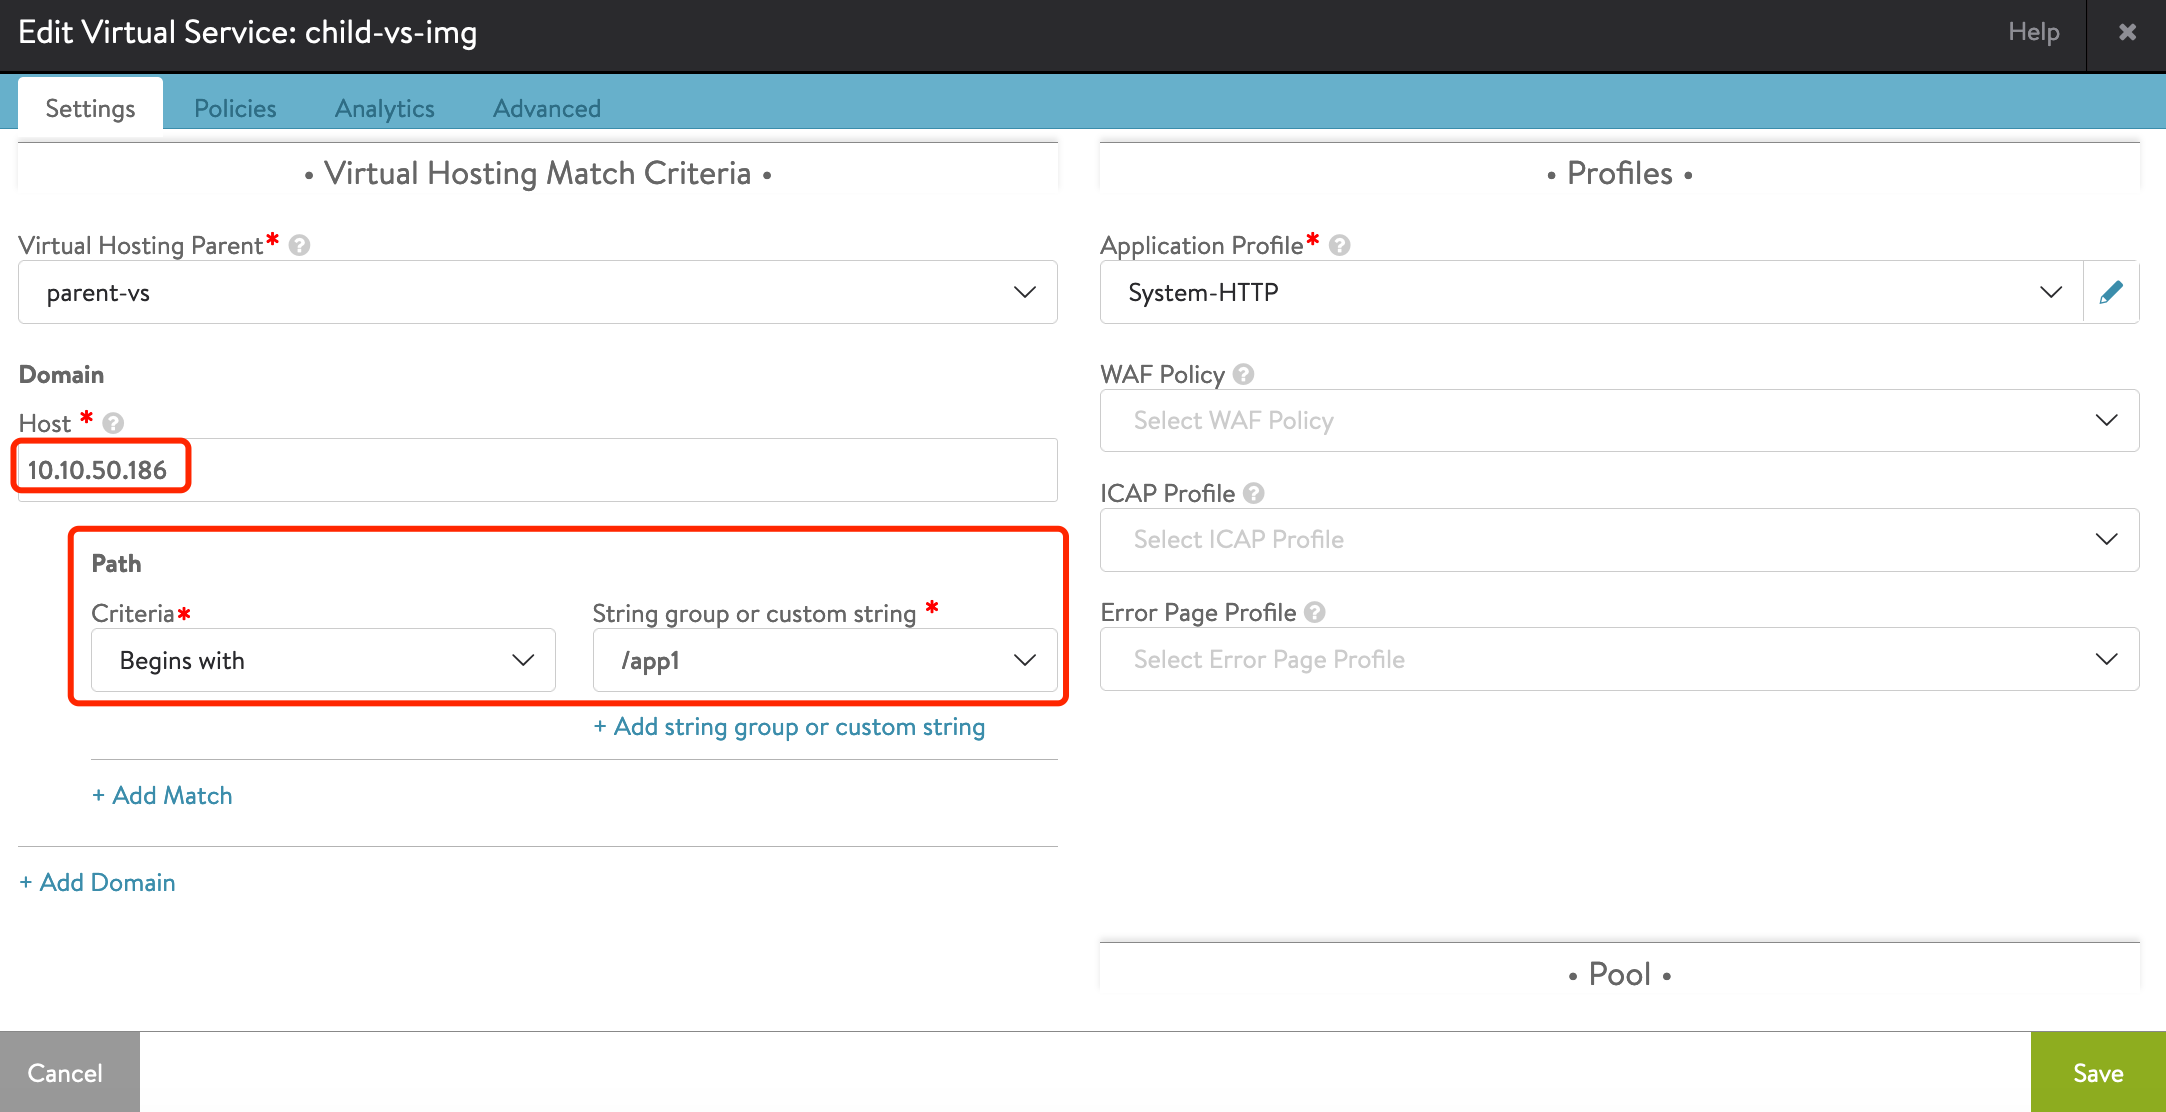
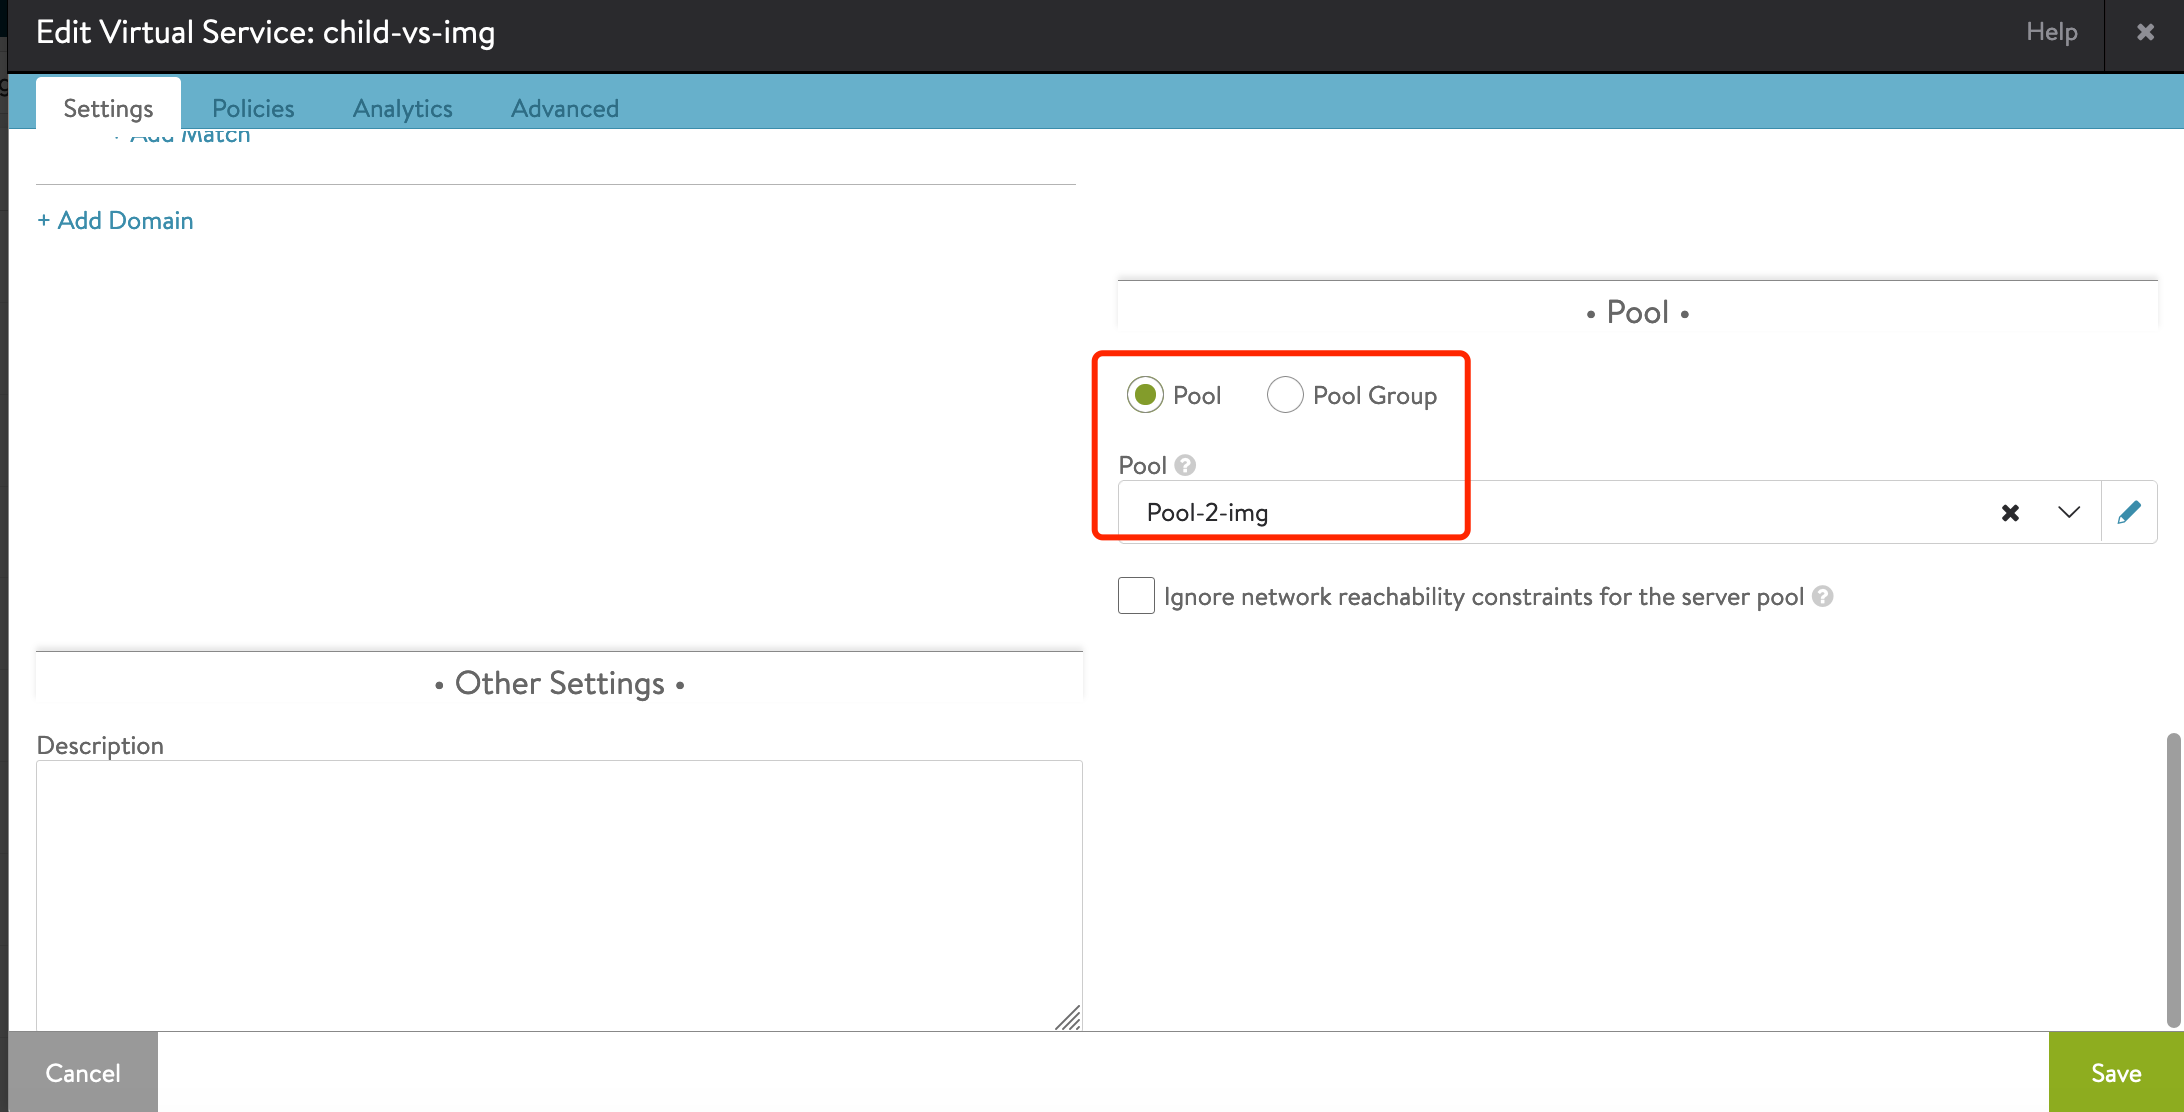
设置此 Child VS 的 Pool:
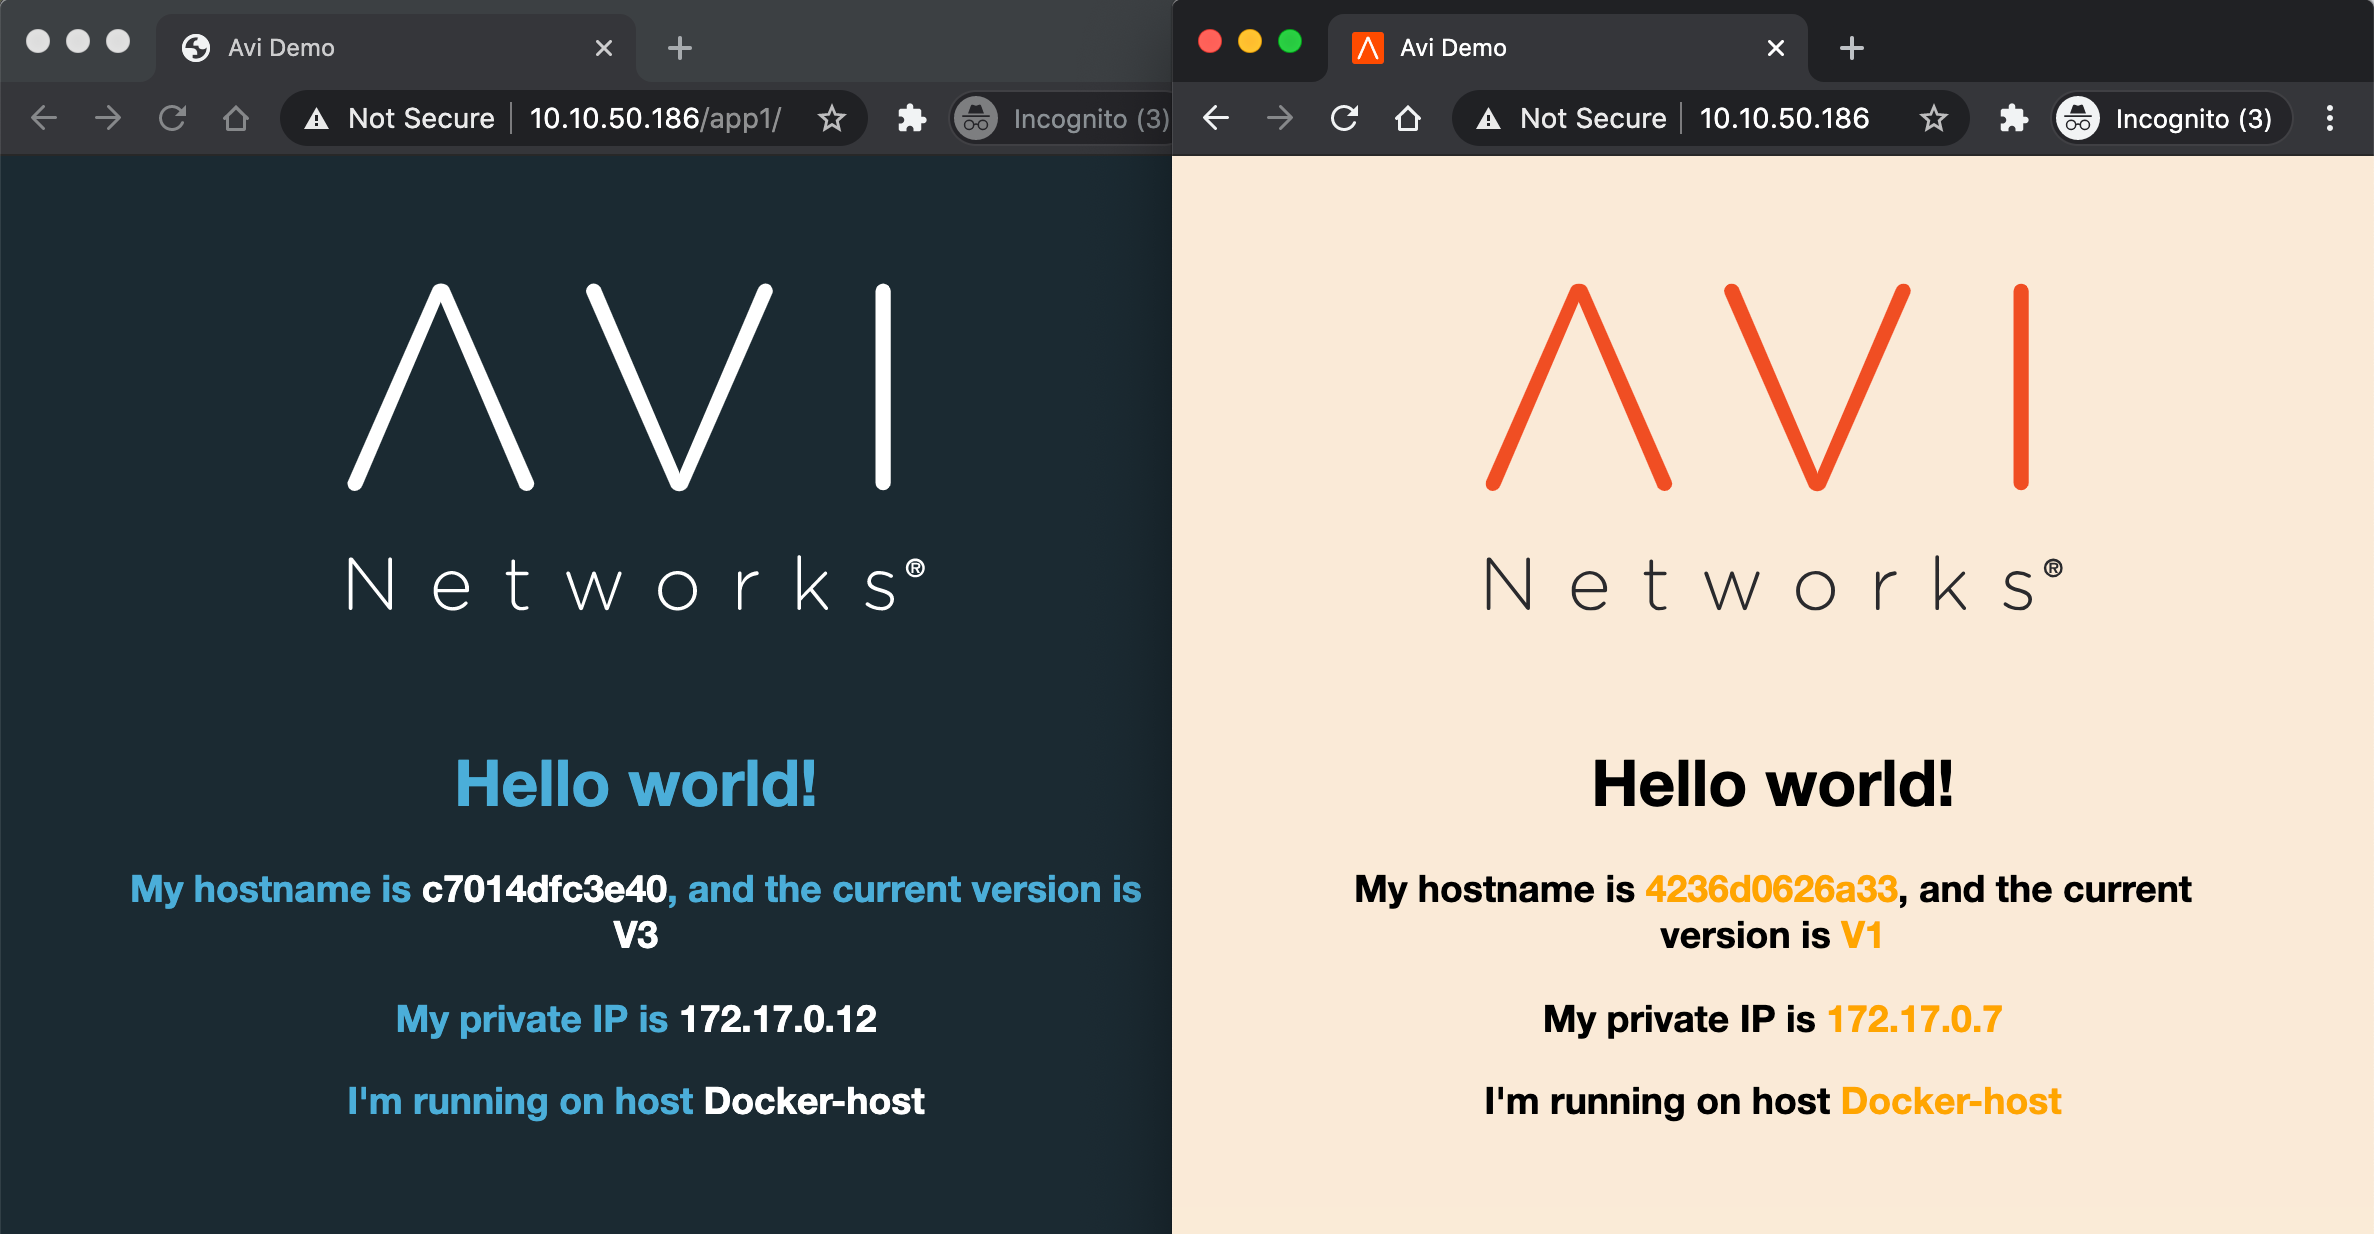
配置完成后的访问效果:
7. 移除访问路径中的字段(重写 URI)
需求描述:
- 对原始请求中的 URI 进行修改,满足应用需求,比如去掉访问 URI 中的 img 字段
- 原始请求: http://10.10.50.188/img/logo.svg
- 转换后的请求:http://10.10.50.9/logo.svg
此需求可以通过 HTTP Request Policy 的 Policy Tokens 实现,或者使用 Datascript 实现。
7.1 通过 HTTP Request Policy 实现
参考链接:https://avinetworks.com/docs/20.1/configuration-guide/applications/vs-policies/#policy-tokens
Policy Tokens 可以将一个请求路径转换成多个 Token,方便用户进行URL重组,例如:
原始访问请求: http://www1.avinetworks.com/docs/index.htm
| 原始 Request 各个字段 | www1 | avinetworks | com | docs | Index.html |
|---|---|---|---|---|---|
| Token | host[0] | host[1] | host[2] | path[0] | path[1] |
可以通过下列配置修改请求URL:
New host: [www.host1:]
New path:/host[0]/path[0:]
重组后的 URL:www.avinetworks.com/www1/docs/index.htm
配置方式:
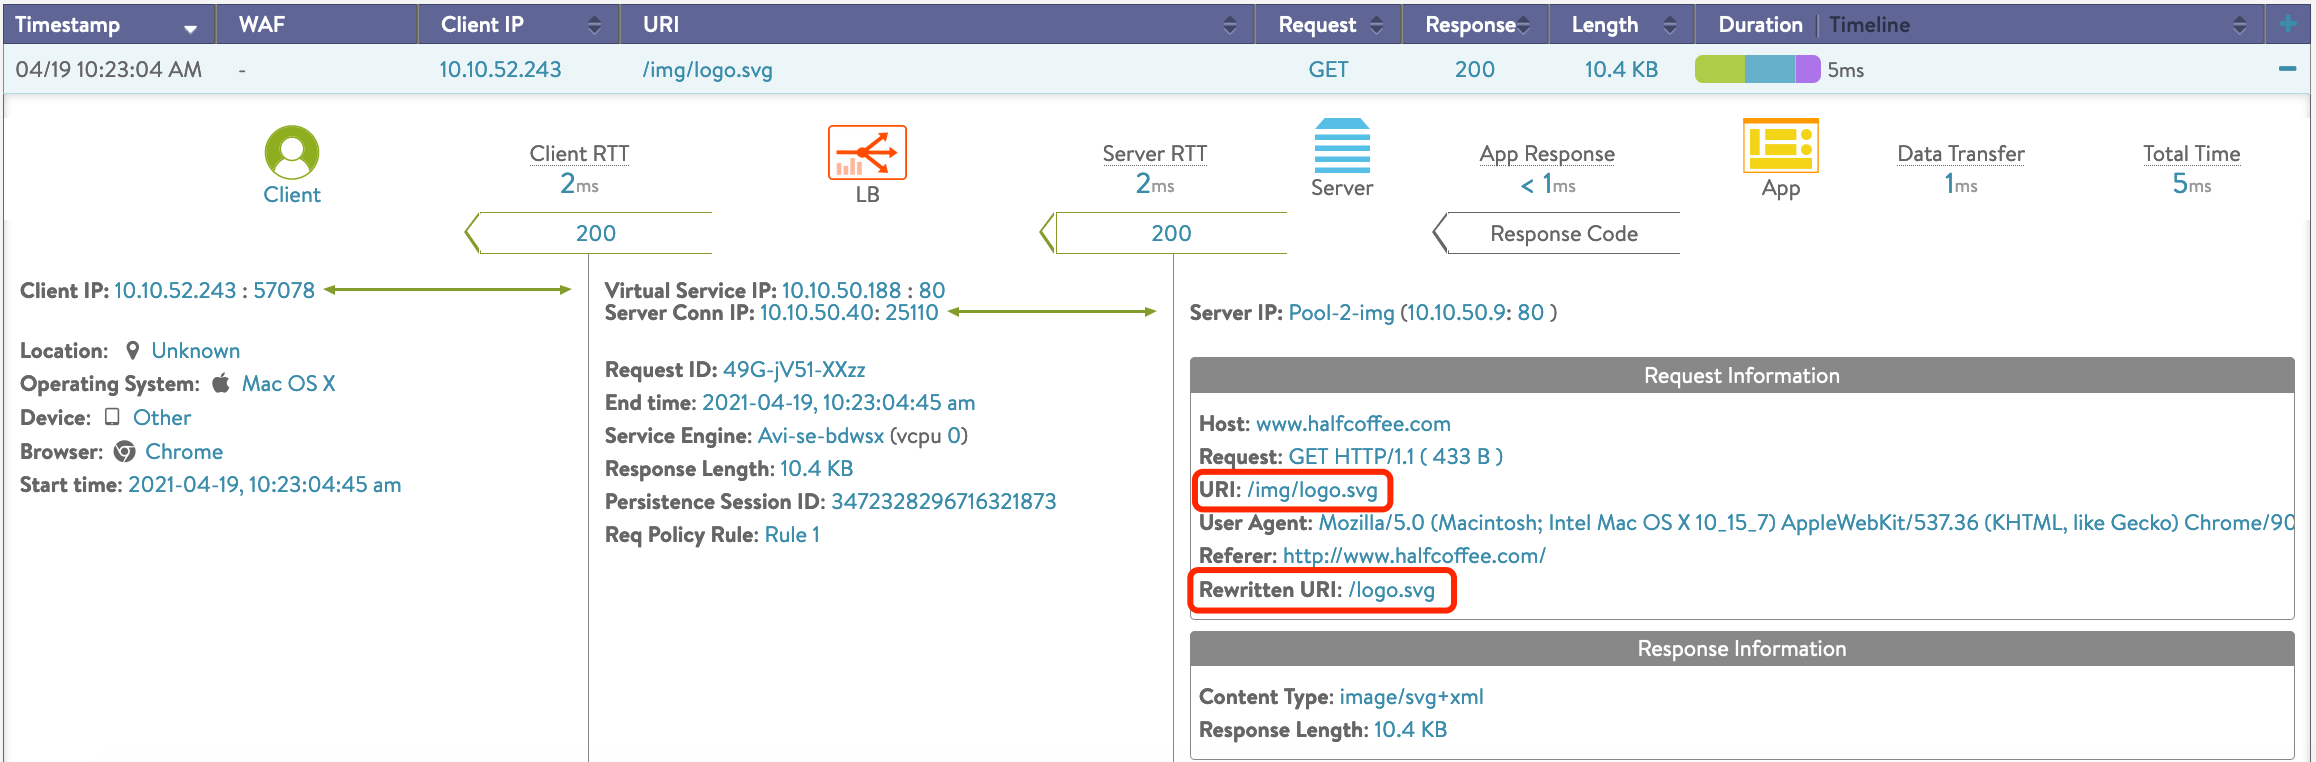
1、为应用添加一个 HTTP Request Policy,匹配条件为 Path 起始为 /img,设置 Content Switch 和 Rewrite URL,Rewrite URL 时,HOST header 保持不变(http://10.10.50.188),修改 Path,只保留 path[1] 及之后的 Path,且保留 Query。

2、查看访问日志,有 /img 路径时去掉了 /img :
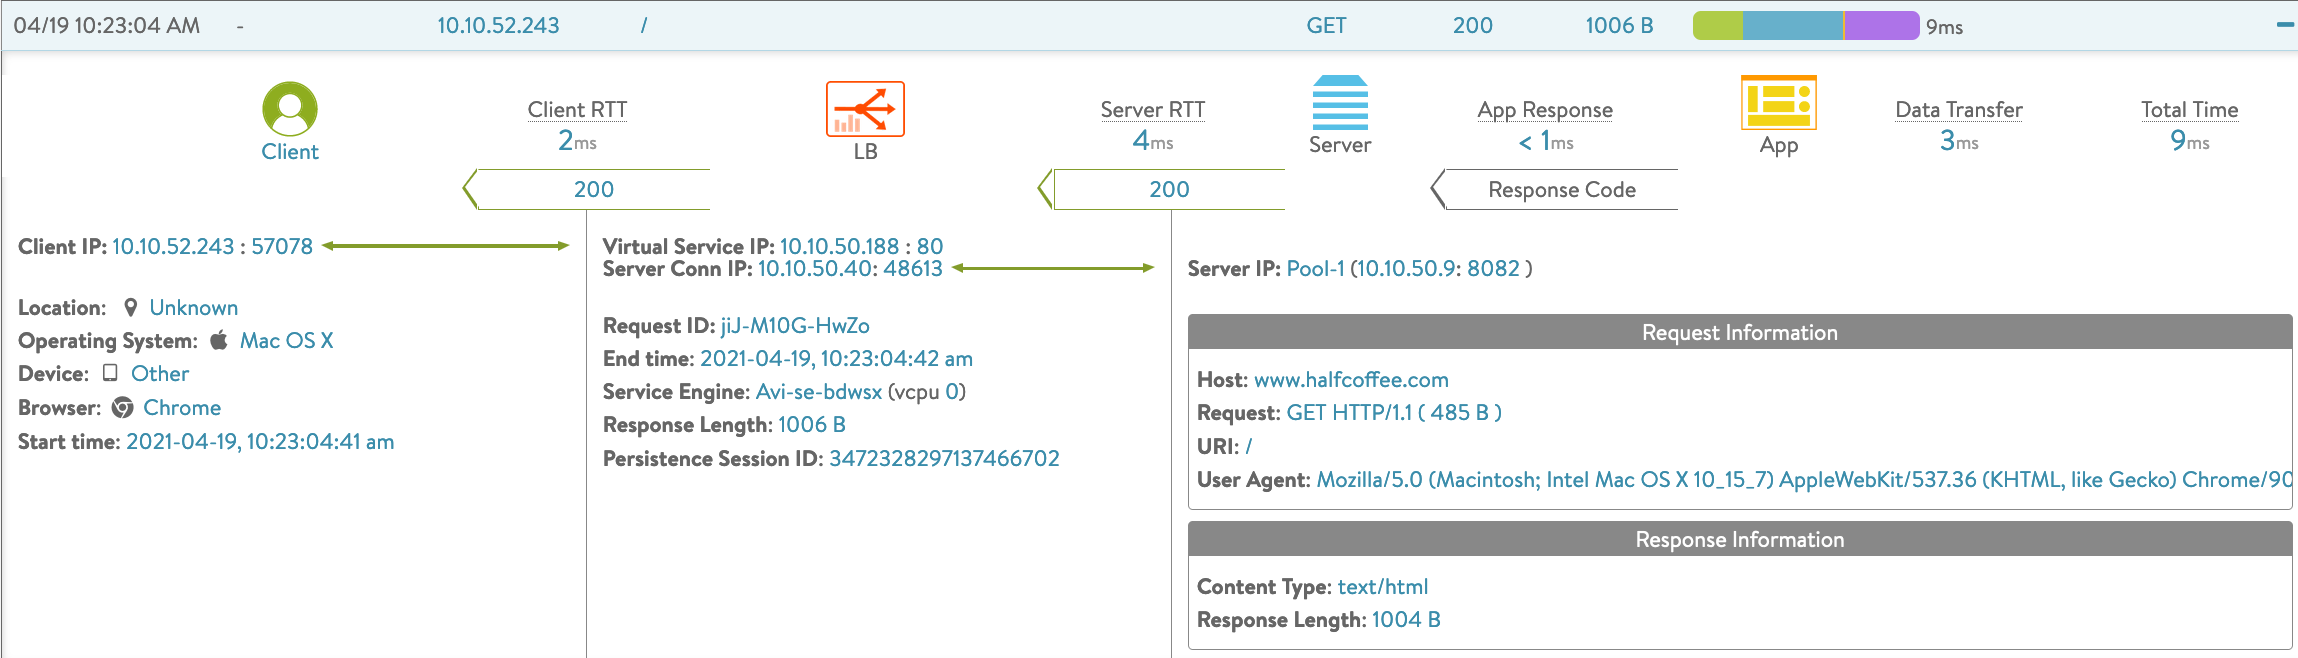
针对 / 路径,则没有进行 URI Rewrite:
7.2 通过datascript实现1
参考链接:https://avinetworks.com/docs/20.1/datascript-avi-http-get_path_tokens/
除了使用 HTTP Request Policy,也可以用 Datascript 来修改请求中的路径,例如:
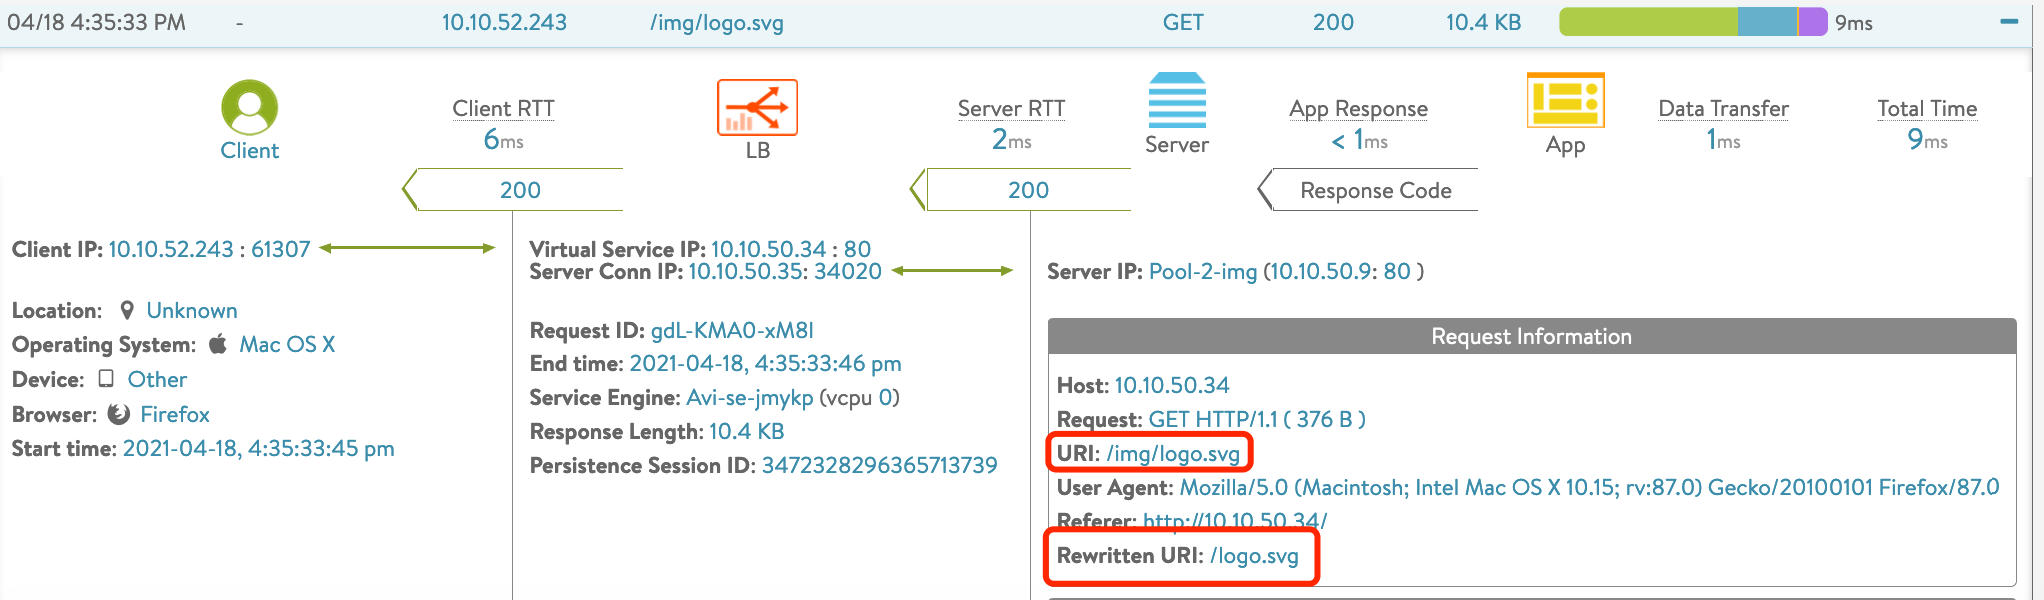
原始请求: http://10.10.50.188/img/logo.svg
转换后的请求:http://10.10.50.9/logo.svg
除了修改路径外,同时本示例也配置了 Content Switch。
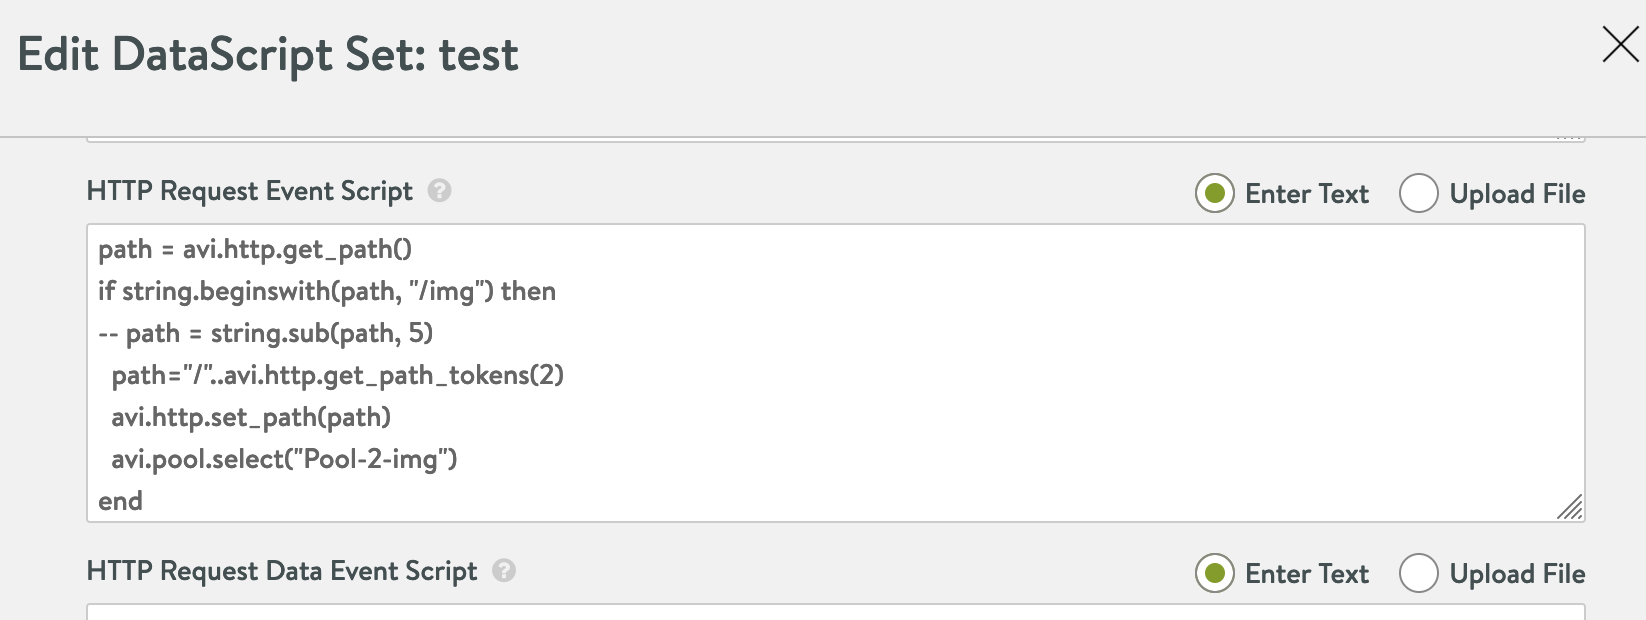
配置方式:在 HTTP Request Event Script 中添加下列内容:
path = avi.http.get_path()
if string.beginswith(path, "/img") then
 path="/"..avi.http.get_path_tokens(2)
 avi.http.set_path(path)
 avi.Pool.select("Pool-2-img")
end

# 注:get_path_tokens(2) 表示保留path变量中第二个token及之后的内容。

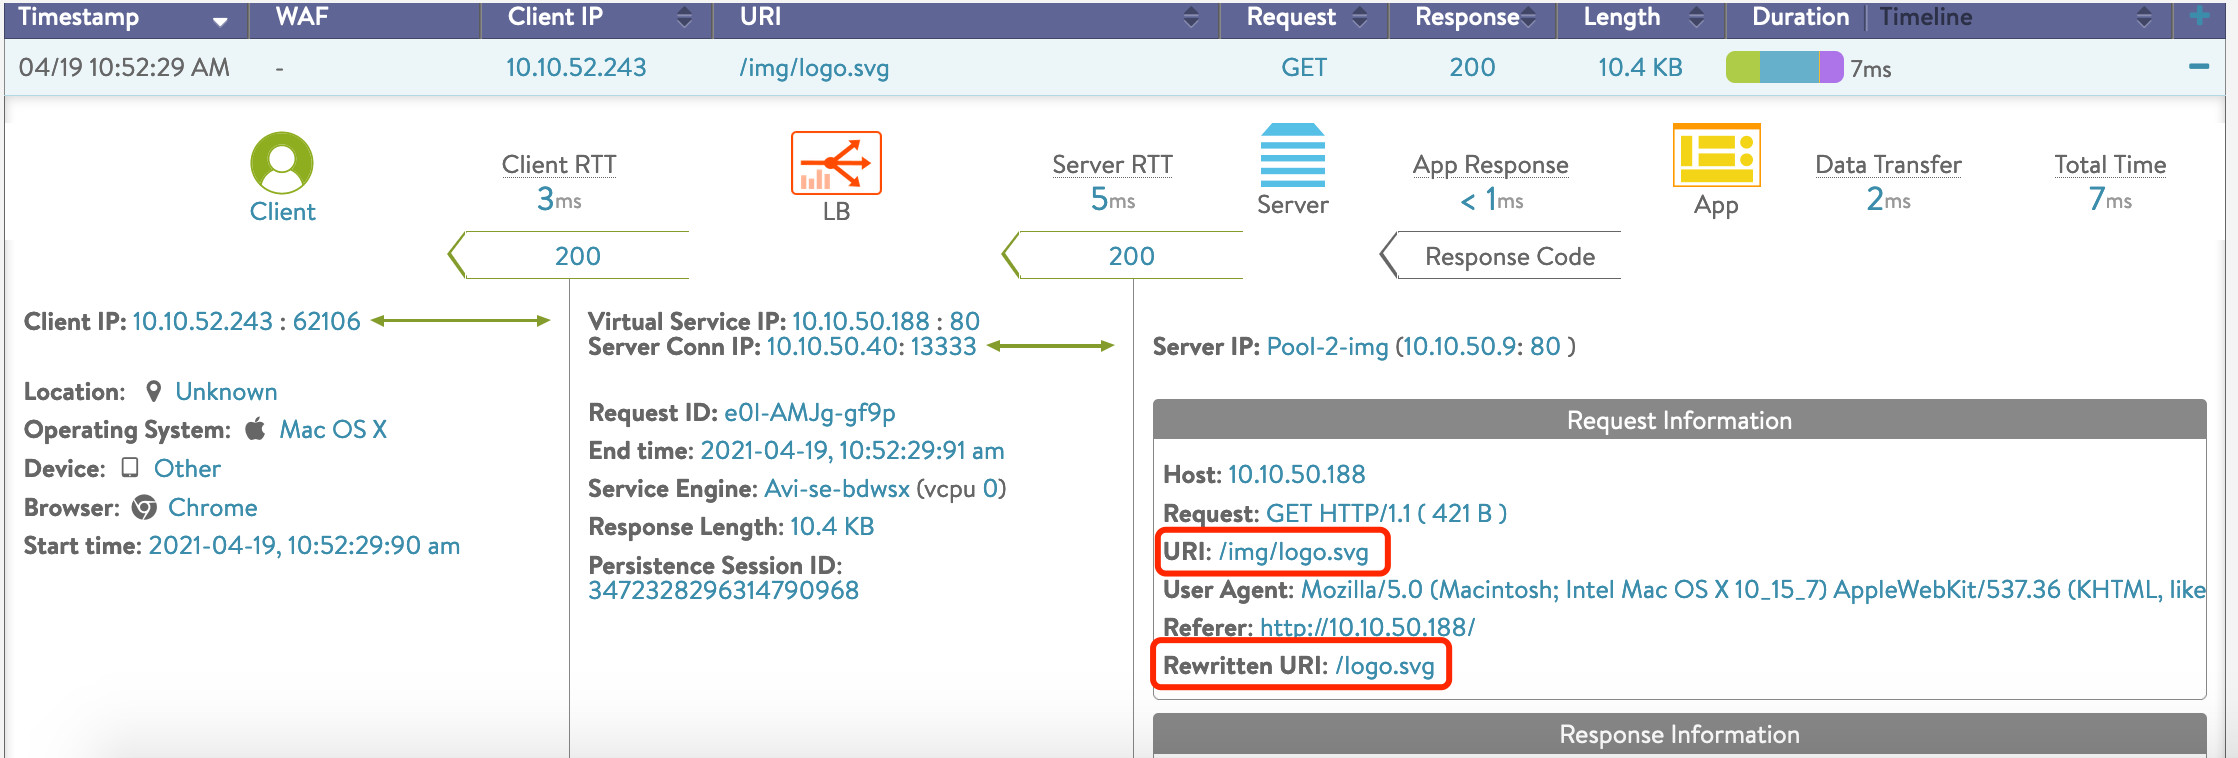
访问 /img 时的日志:
访问 / 时的日志:
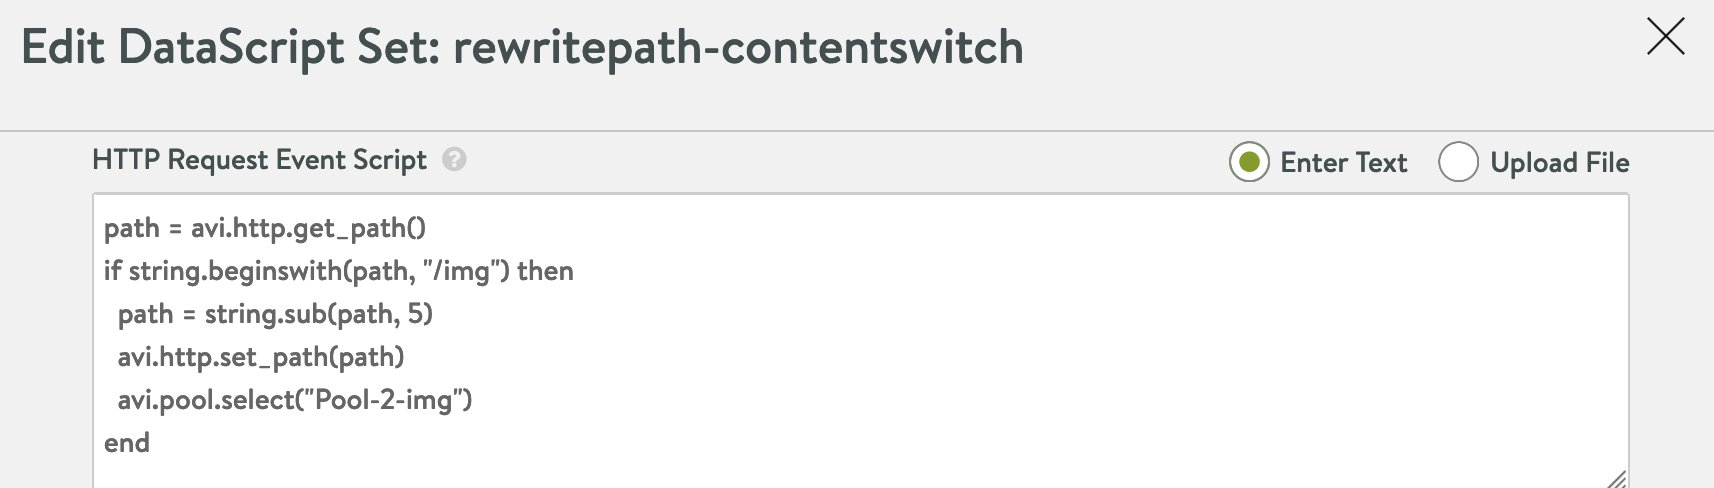
7.3 通过datascript实现2
参考链接:
https://avinetworks.com/docs/20.1/datascript-string-sub/
除了使用 Path token,也可以使用 string.sub 来剔除某些字符。
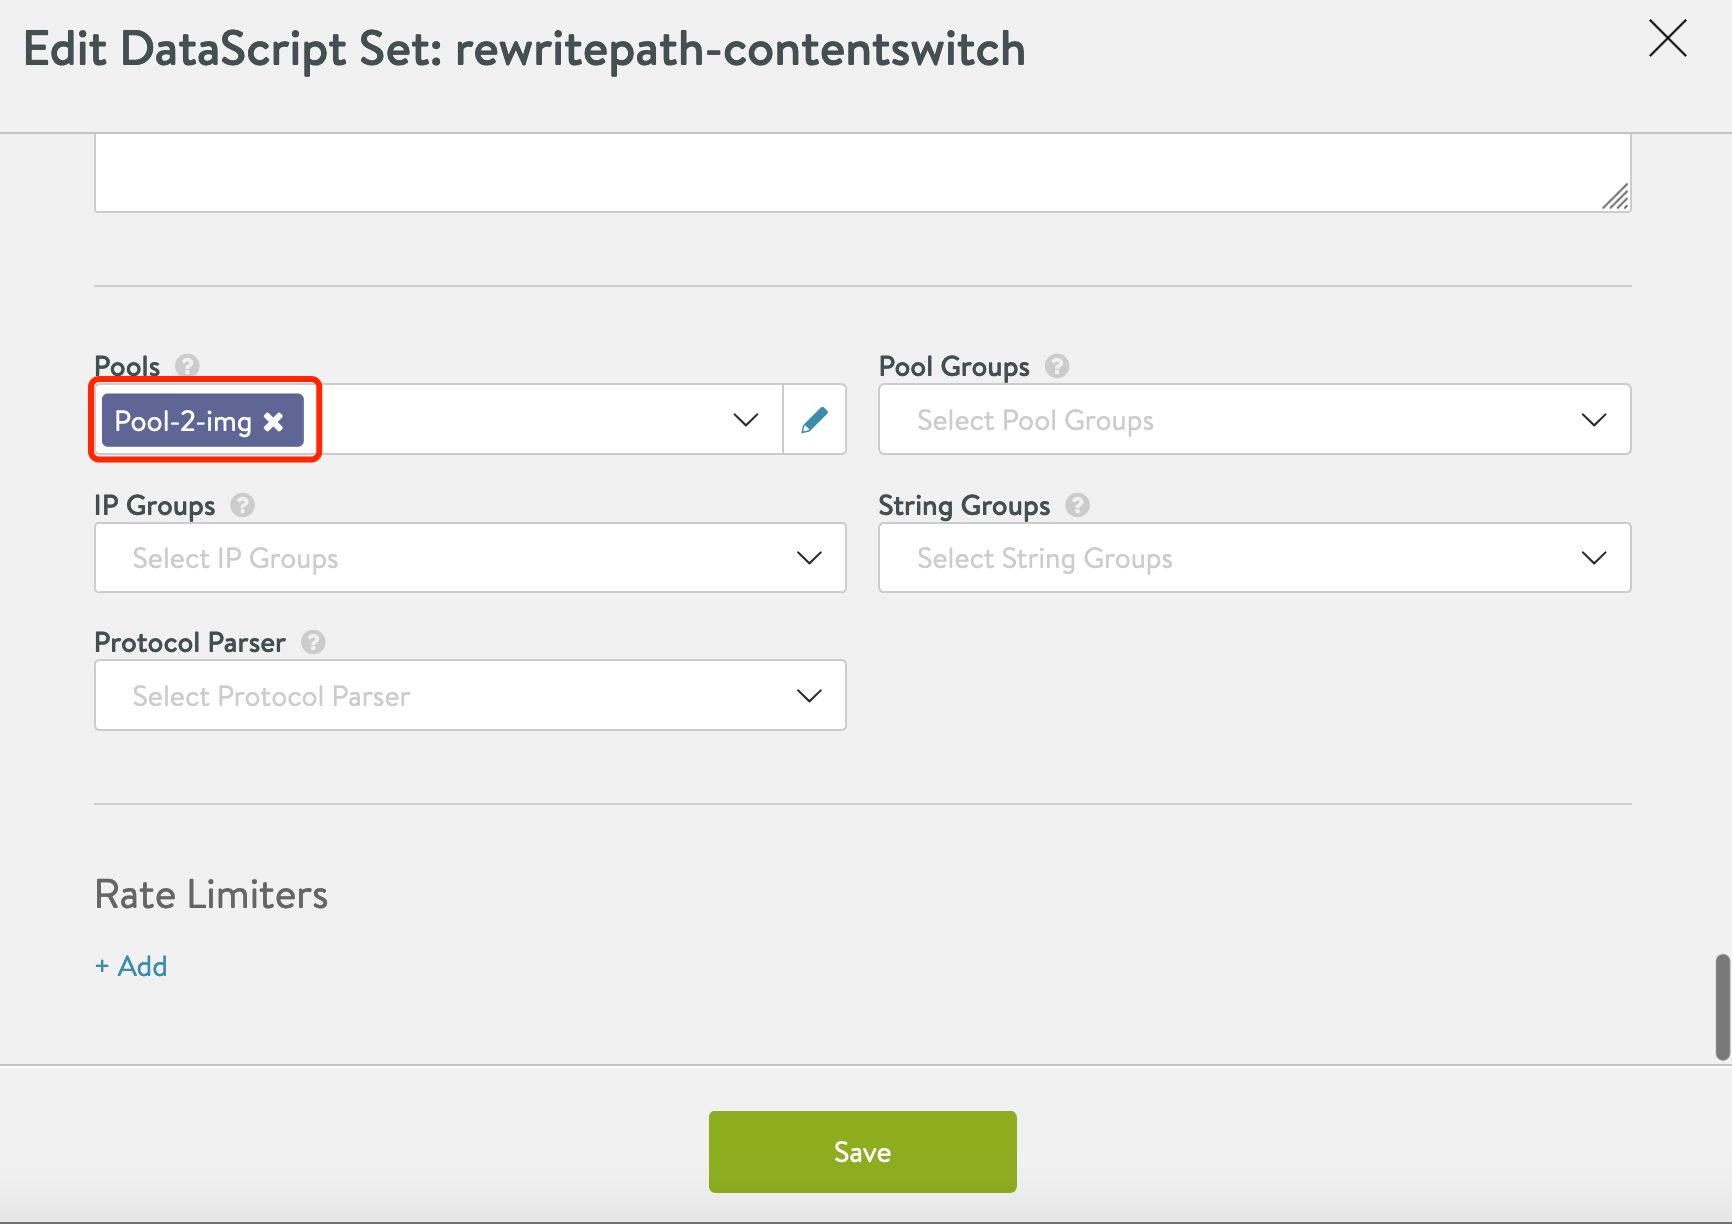
配置方式:在 HTTP Request Event Script 中添加下列内容:
path = avi.http.get_path()
if string.beginswith(path, "/img") then
 path = string.sub(path, 5)
 avi.http.set_path(path)
 avi.Pool.select("Pool-2-img")
end

#注:string.sub(path, 5) 表示保留path变量中第五个字符(/img这四个字符之后的字符)开始之后的path。
访问 /img 时的日志:
访问 / 时的日志:
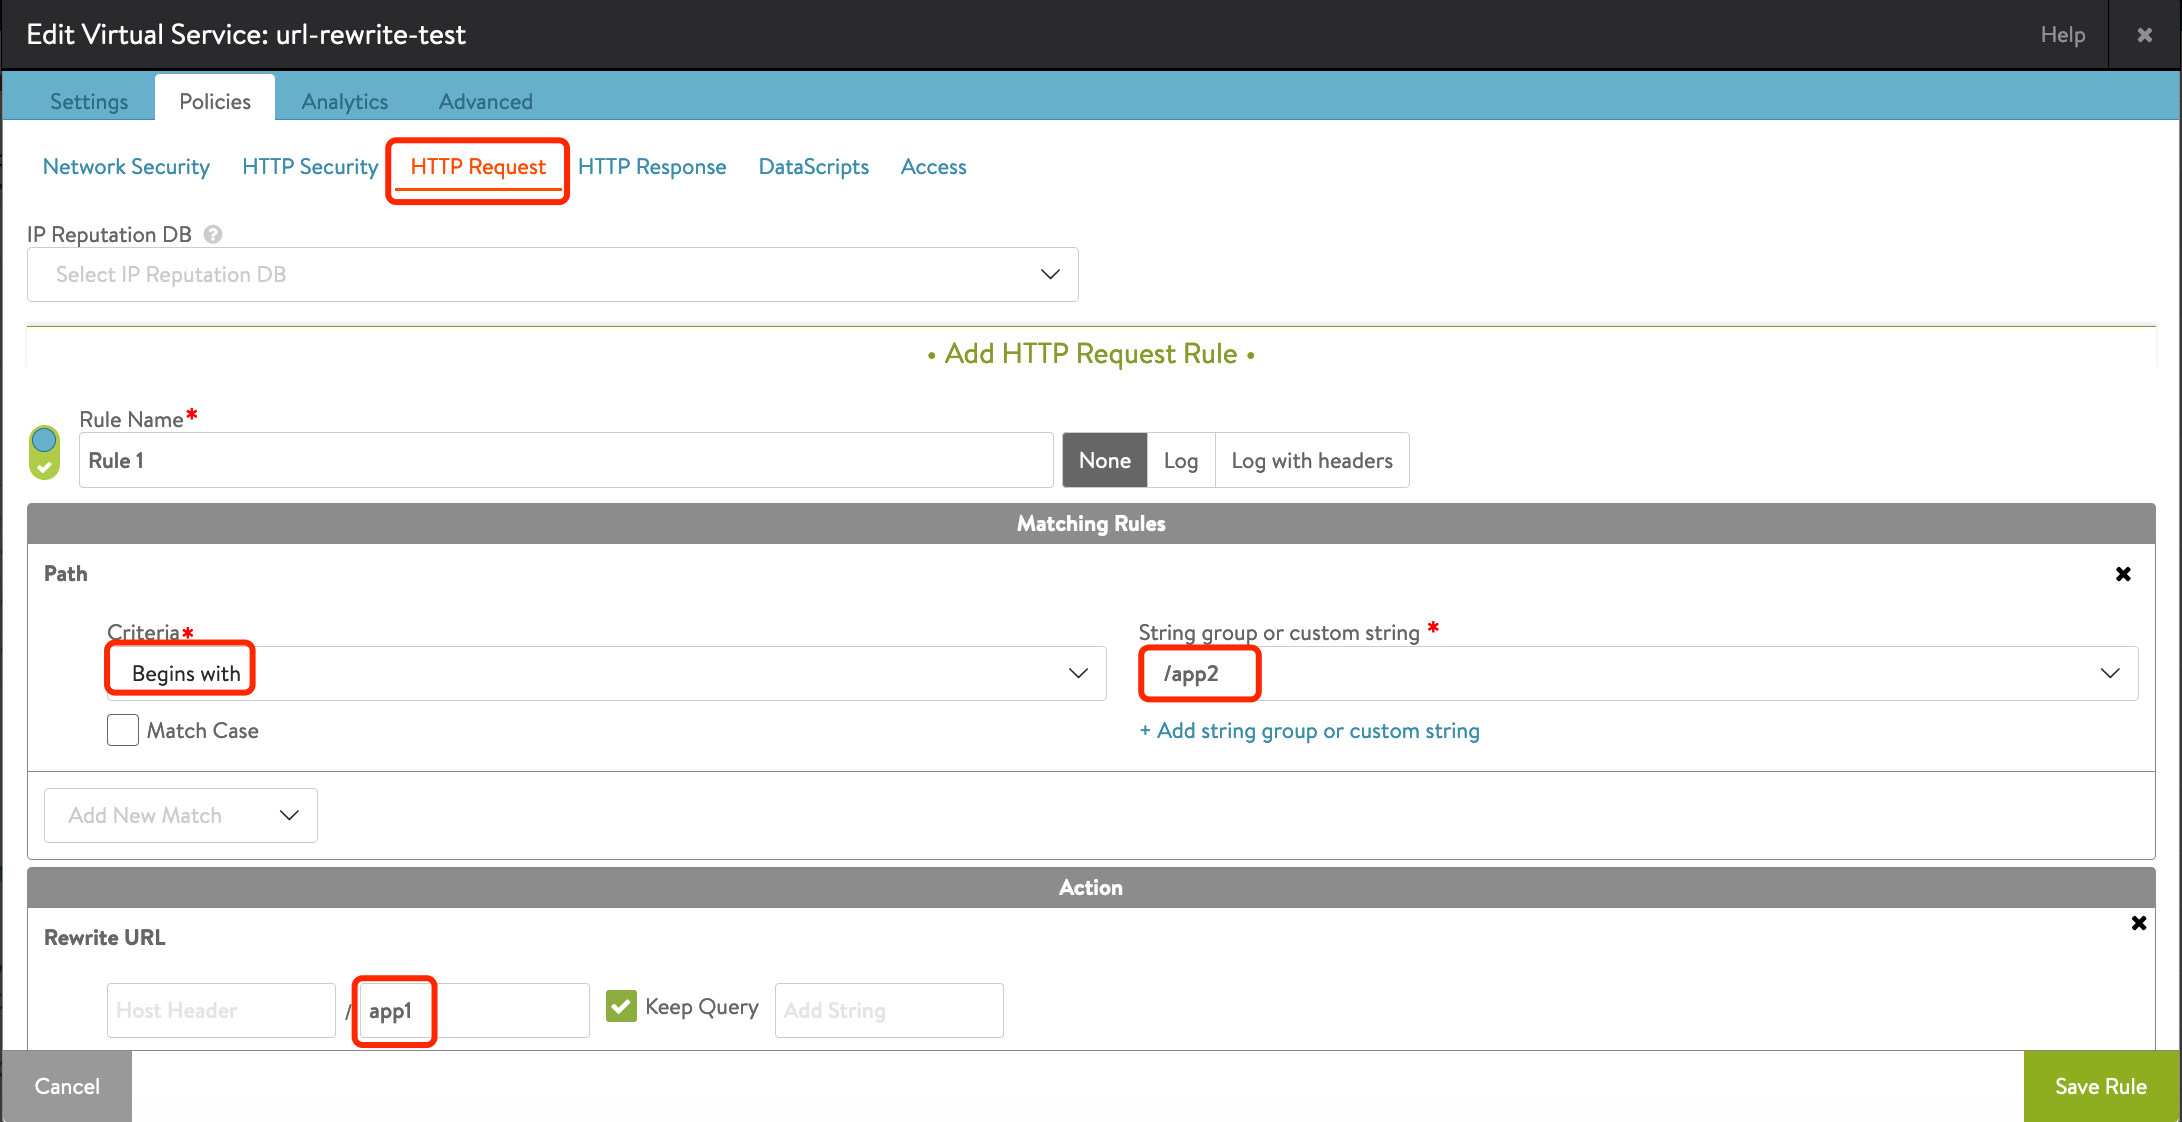
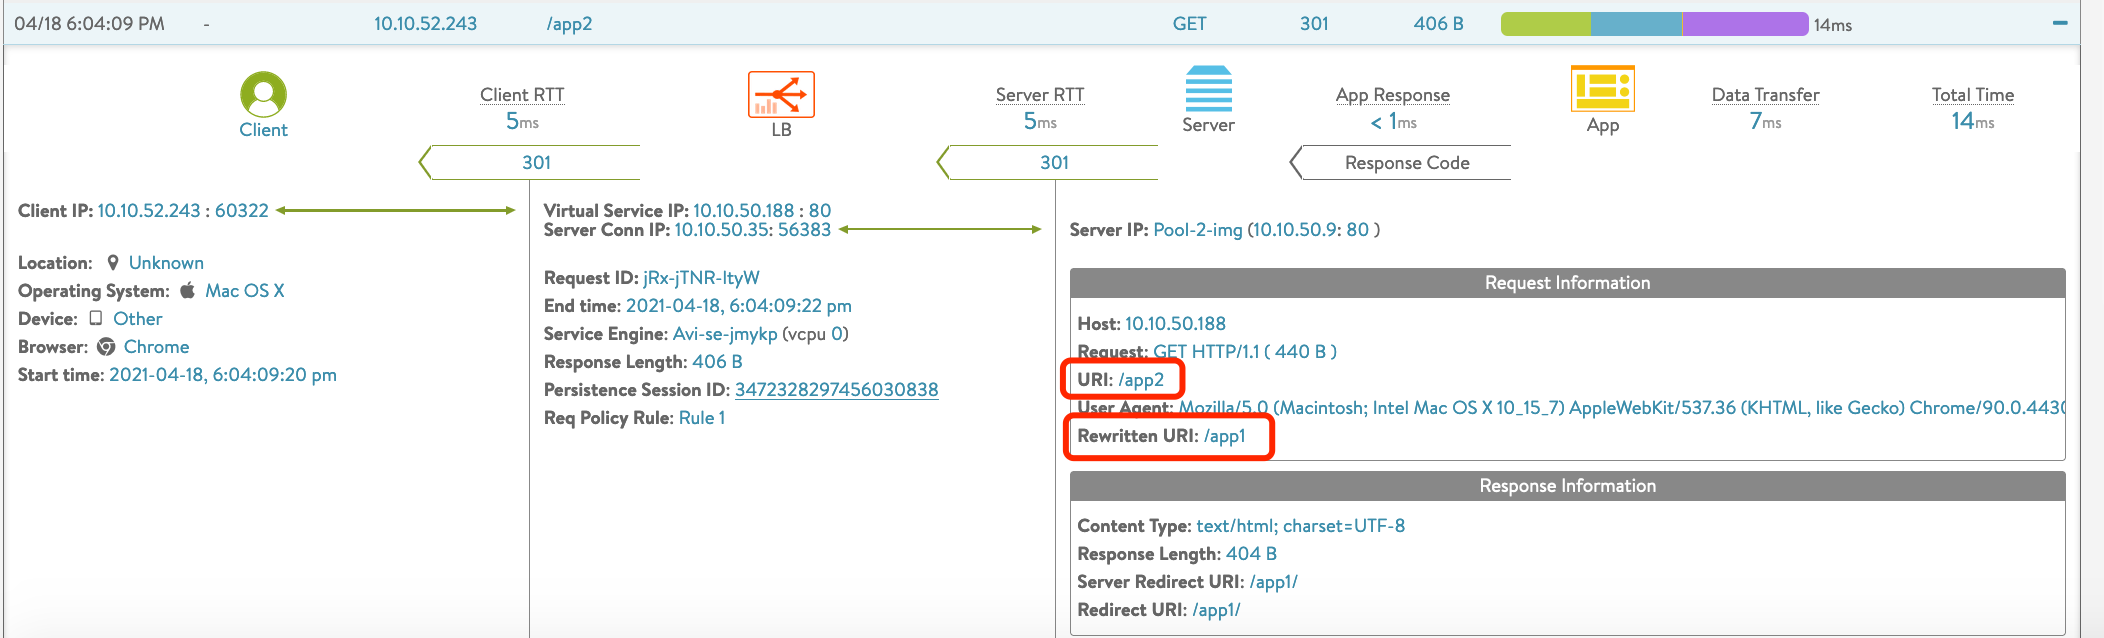
8. 请求路径重定向
需求描述:
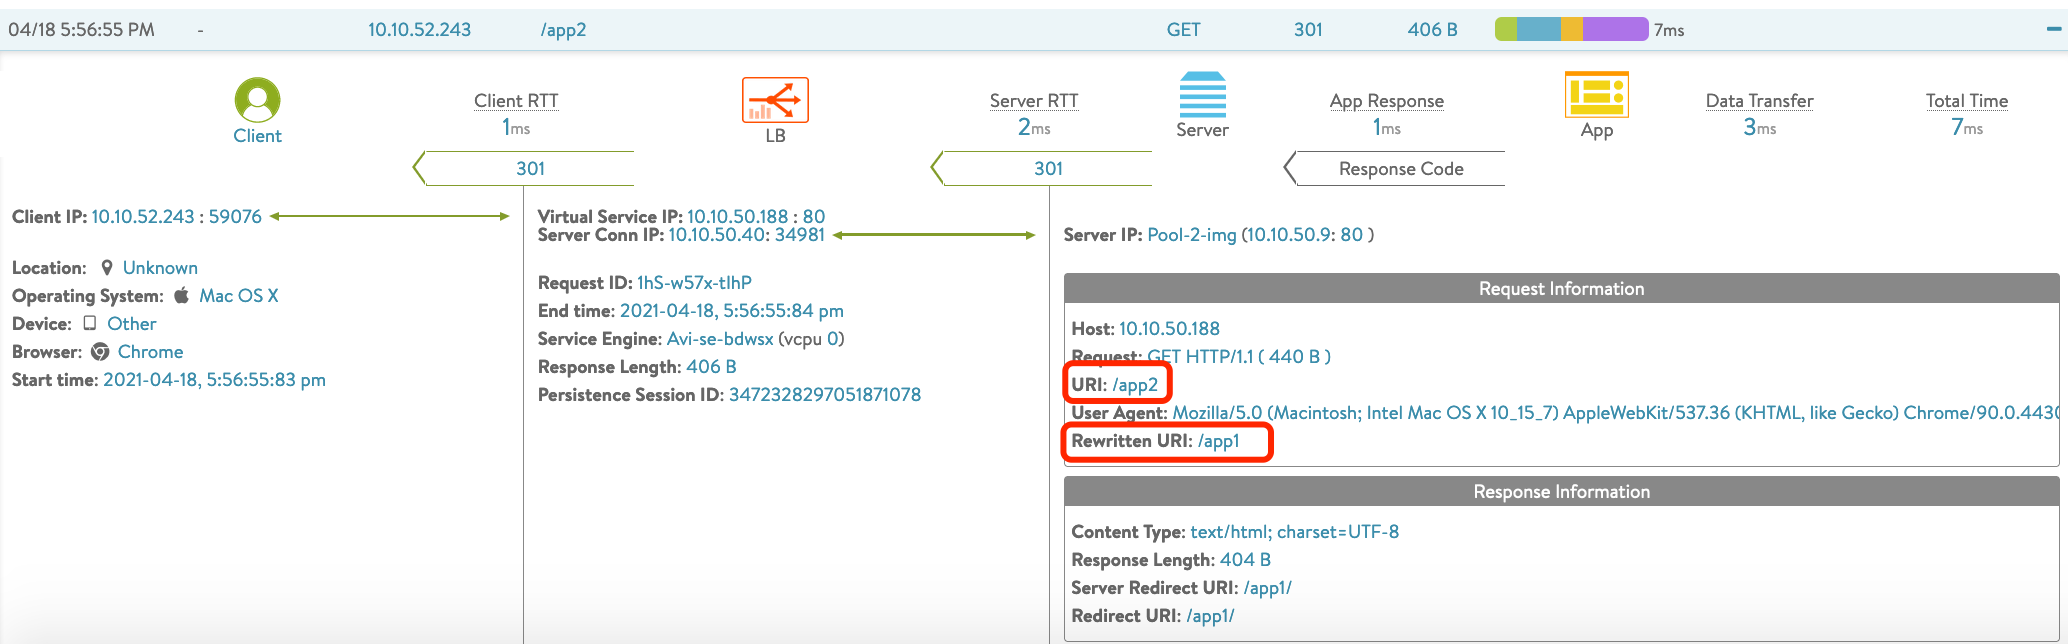
原始请求: http://10.10.50.34/app2
转换后的请求:http://10.10.50.9/app1
配置方式 1 - 通过 HTTP Request Policy
相关访问请求日志:
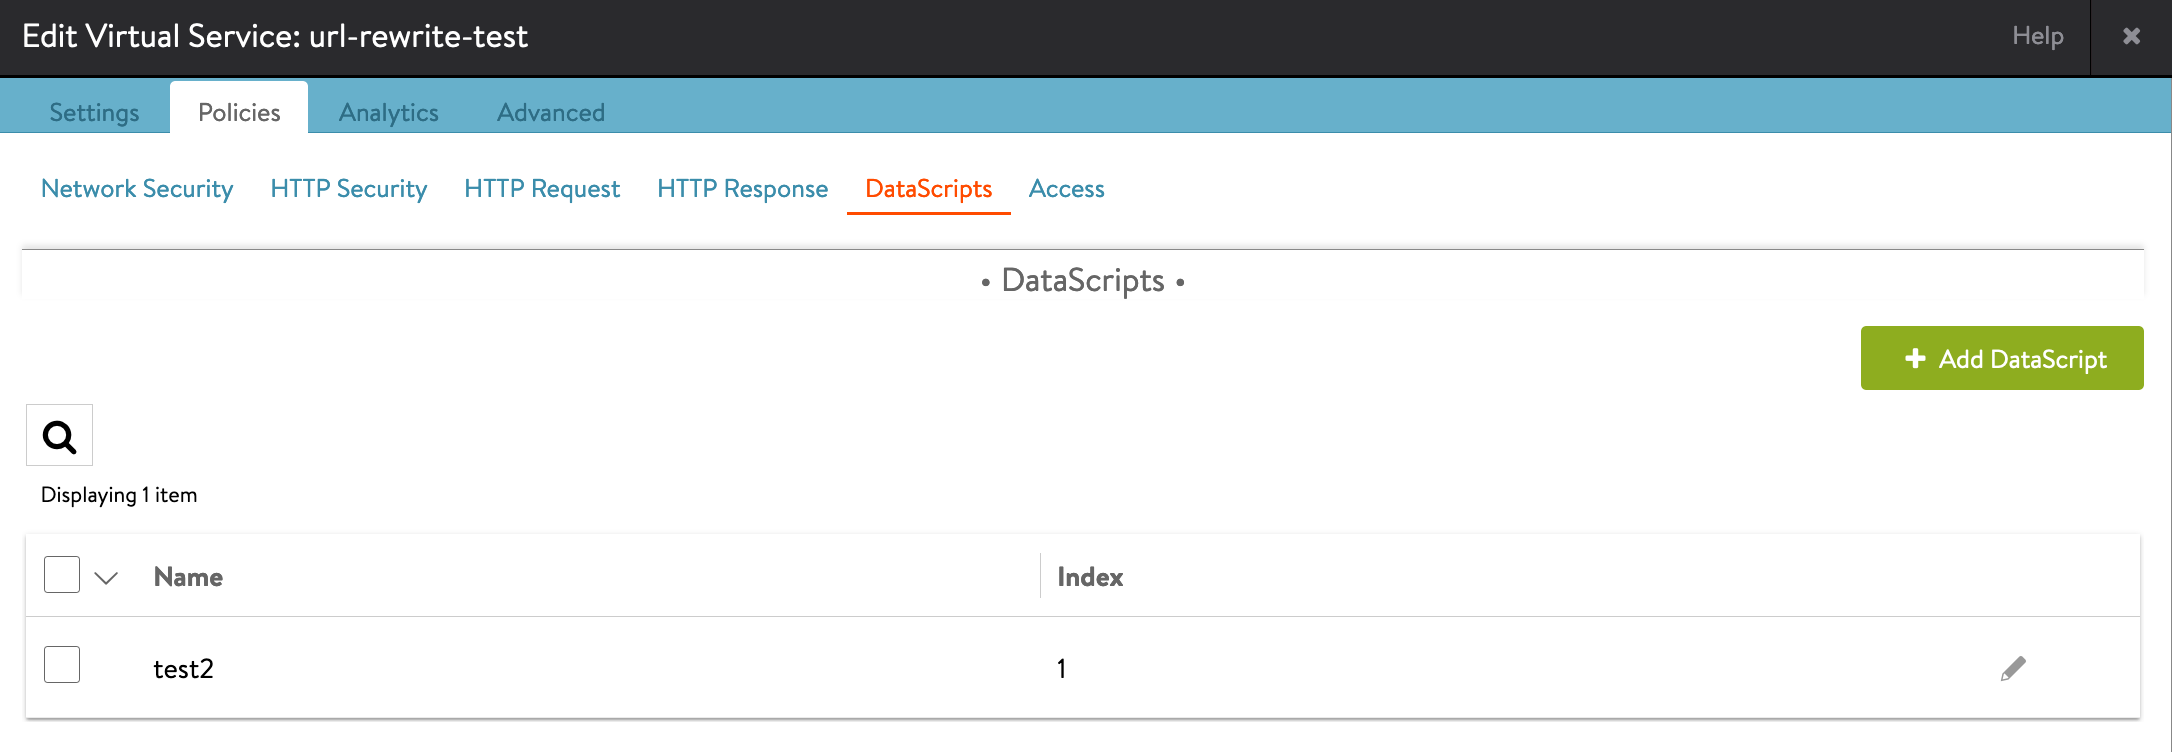
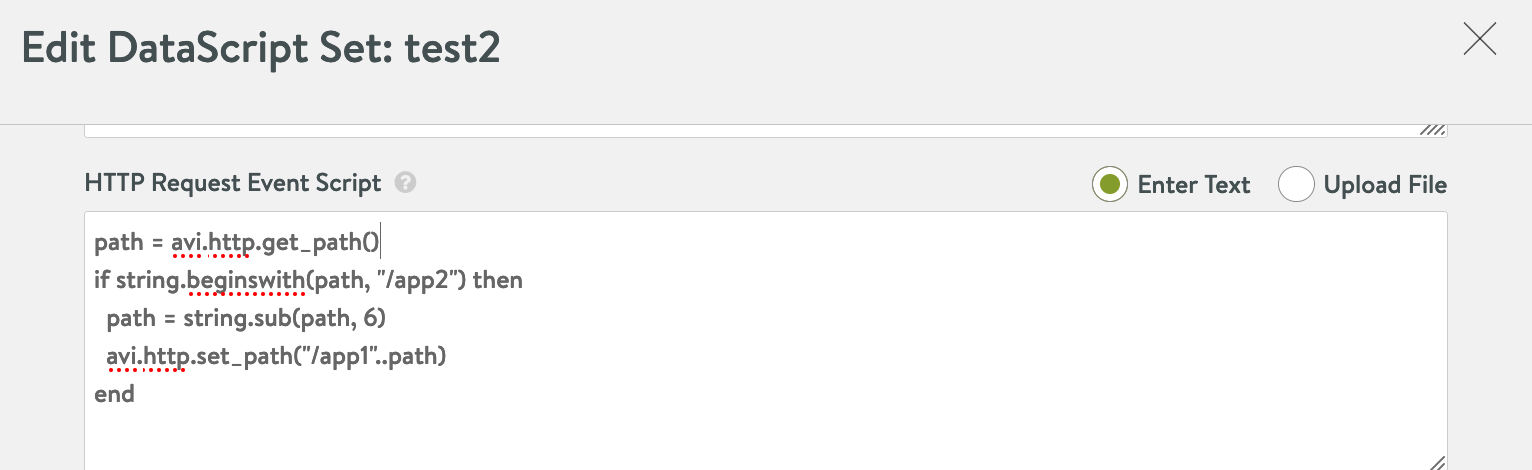
配置方式 2 - 使用 Datascript 来修改请求中的路径
添加 Datascript,在 HTTP Request Event Script 中添加下列内容:
path = avi.http.get_path()
if string.beginswith(path, "/app2") then
 path = string.sub(path, 6)
 avi.http.set_path("/app1"..path)
end
相关访问请求日志:
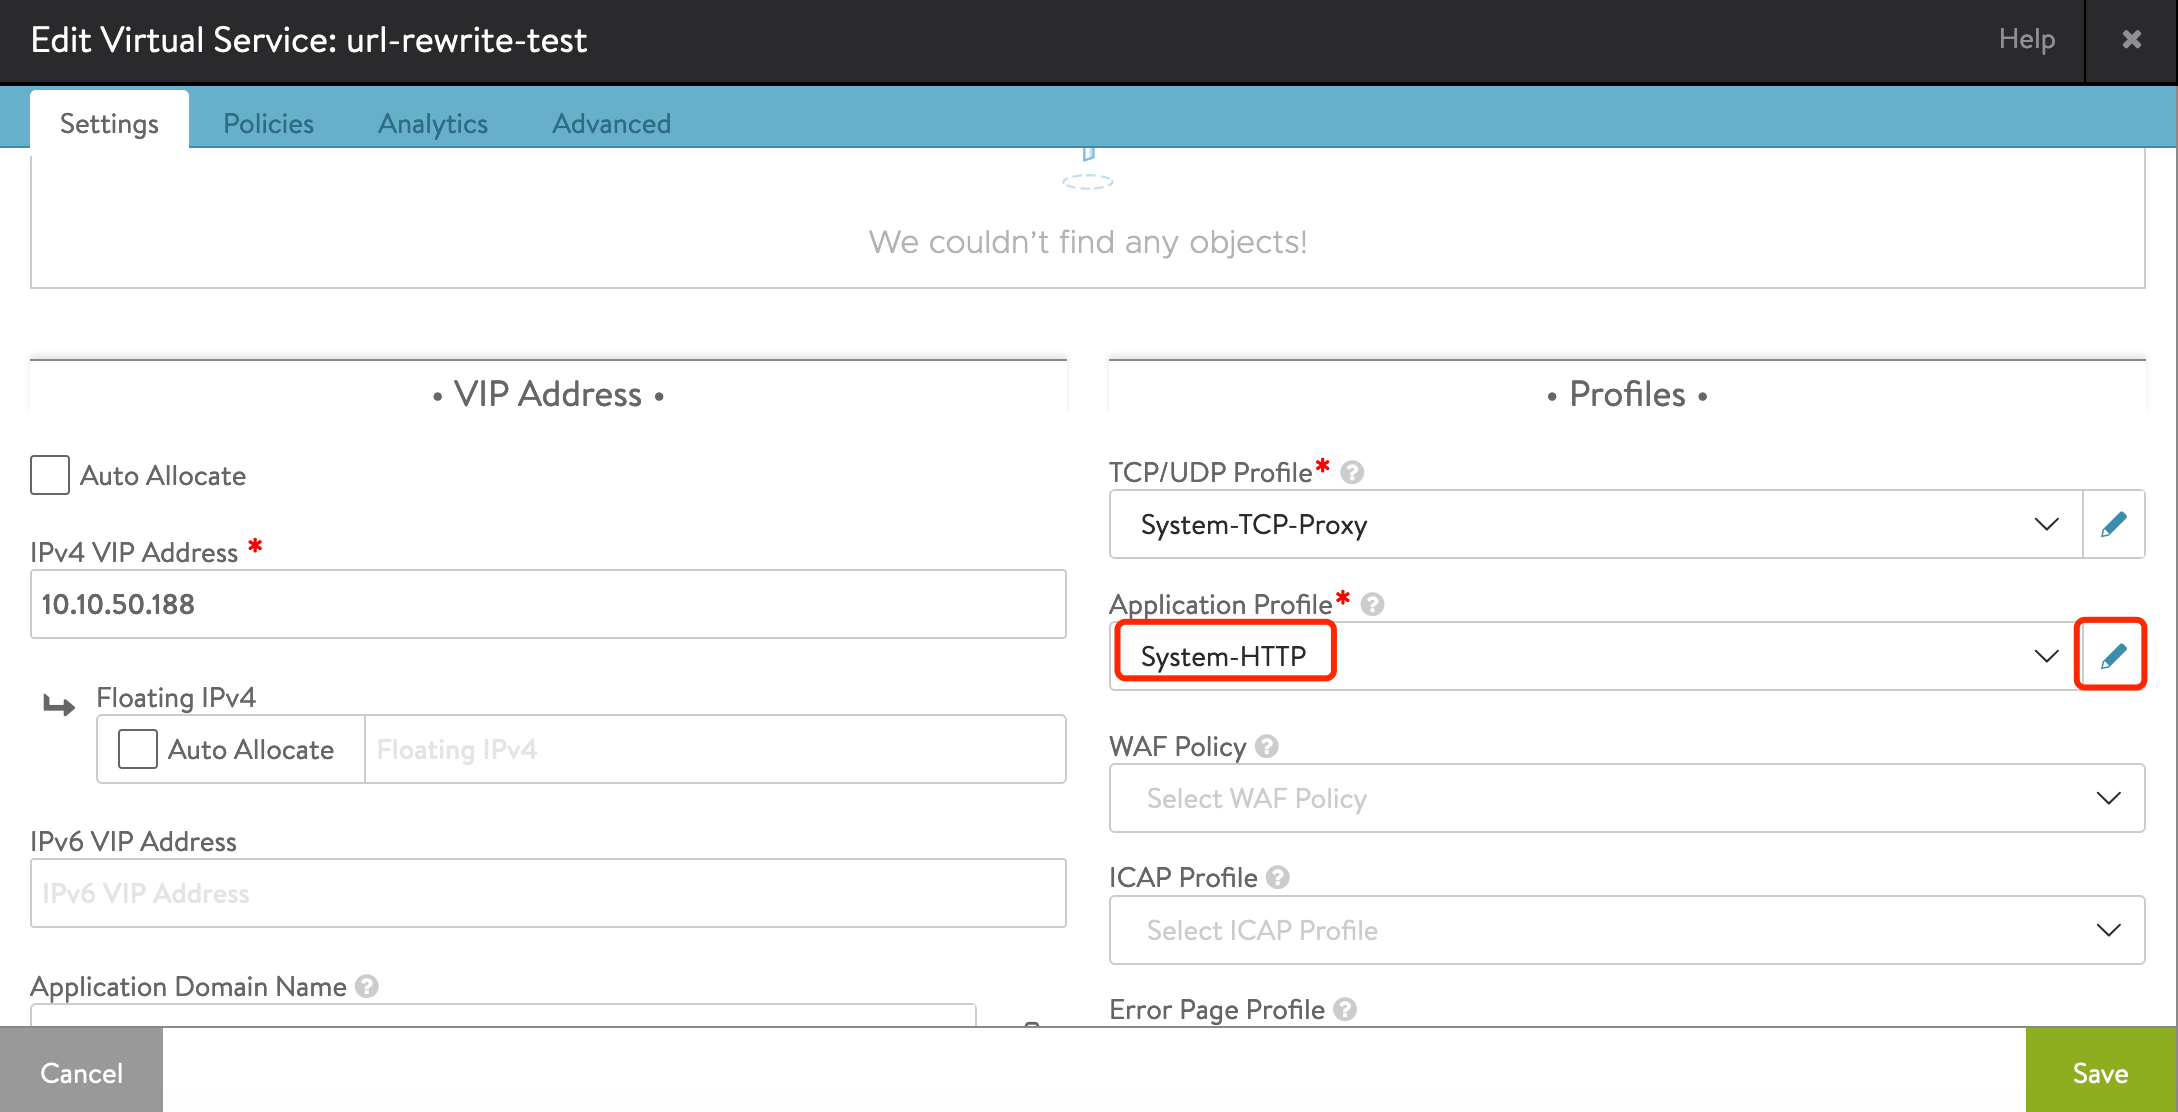
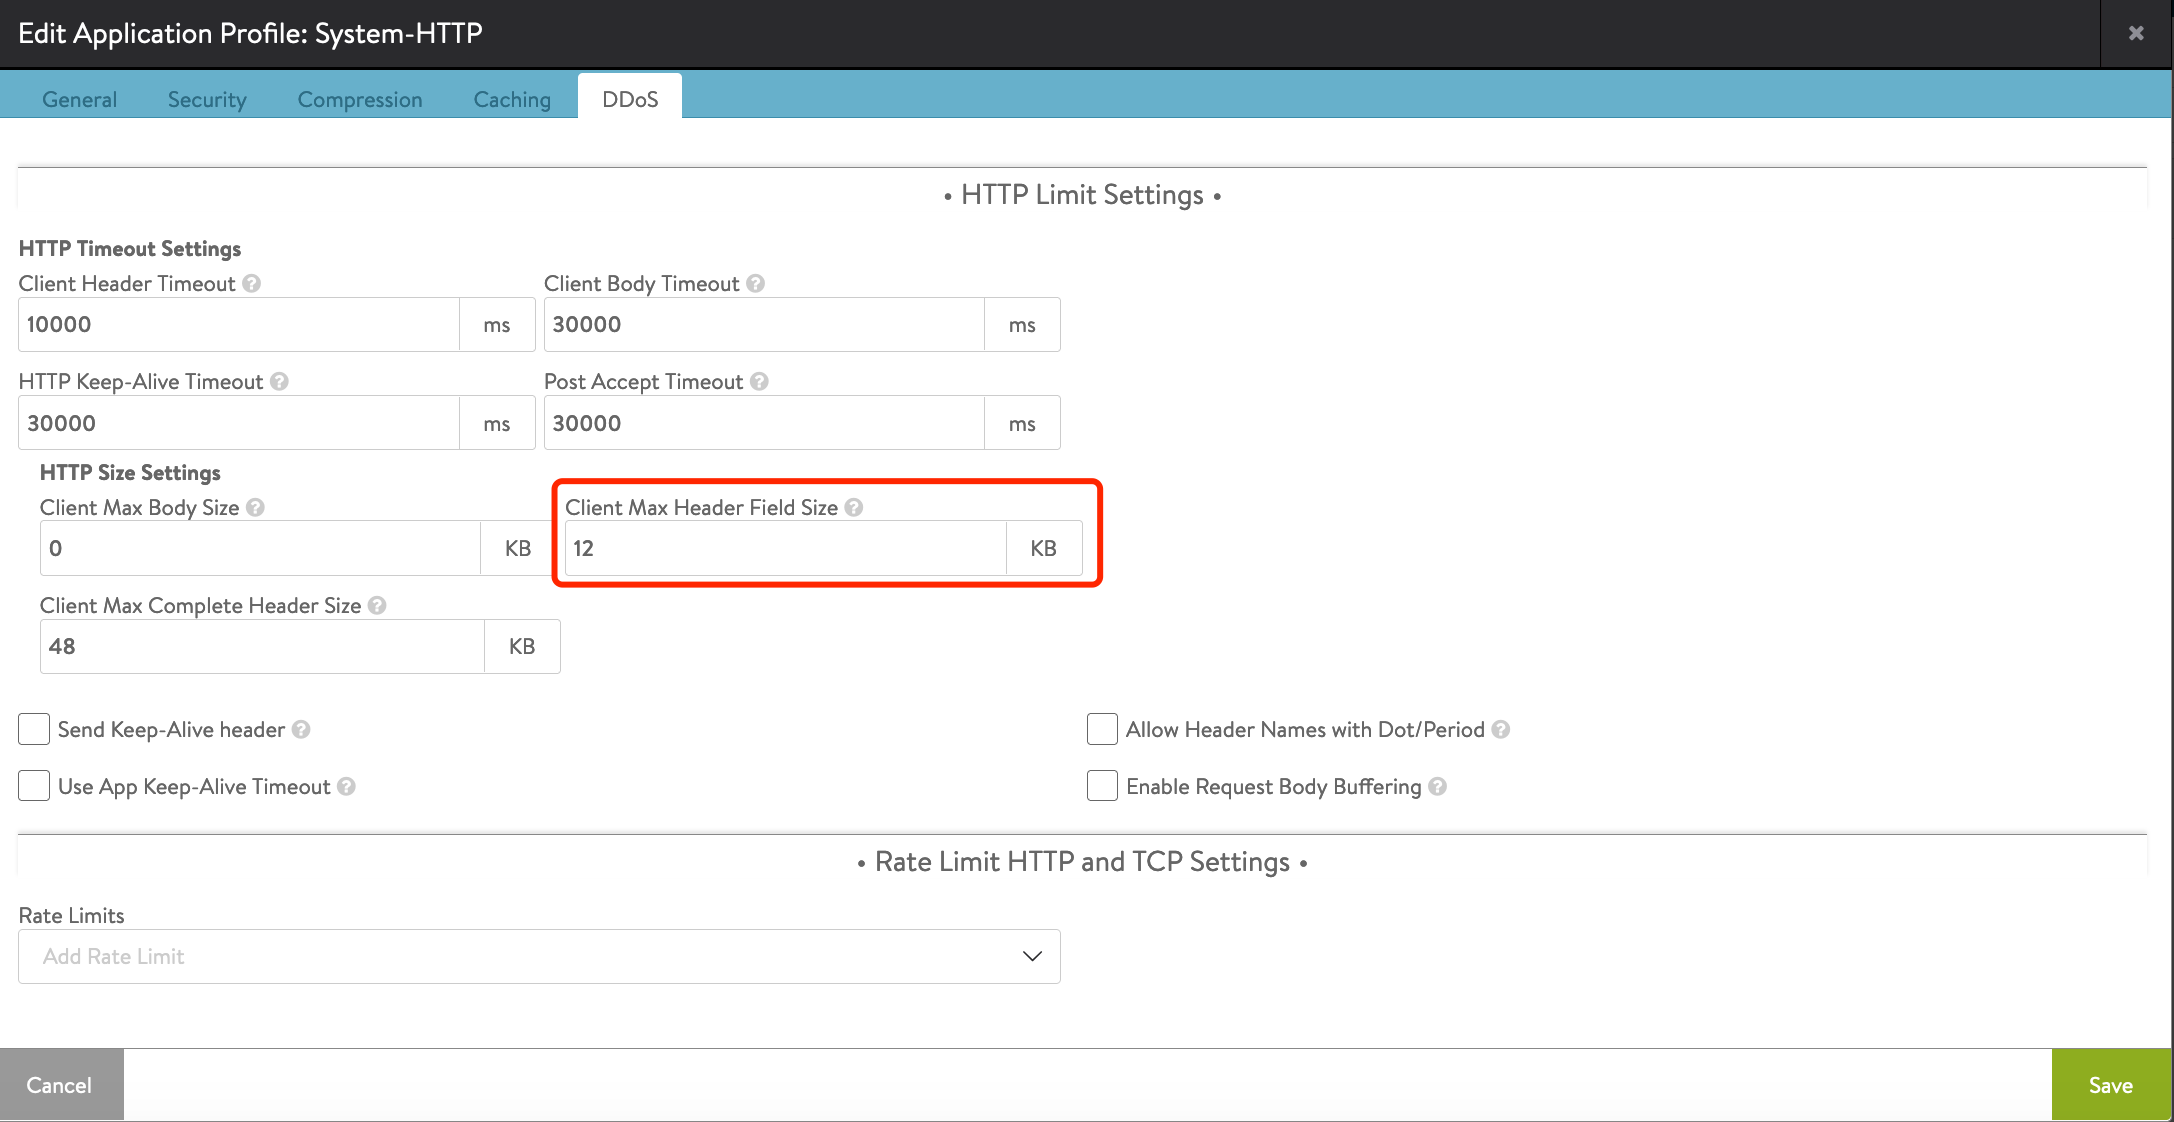
9. 修改客户端请求包头大小限制
需求描述:
- 默认 Avi 会限制单个 Client 请求包头最大为 12KB,如果应用的请求包头会大于此限制,请求会被 Avi 丢弃且返回 “414 Request-URI Too Large”,可以通过修改 Application Profile 来调整此值。
配置方式:
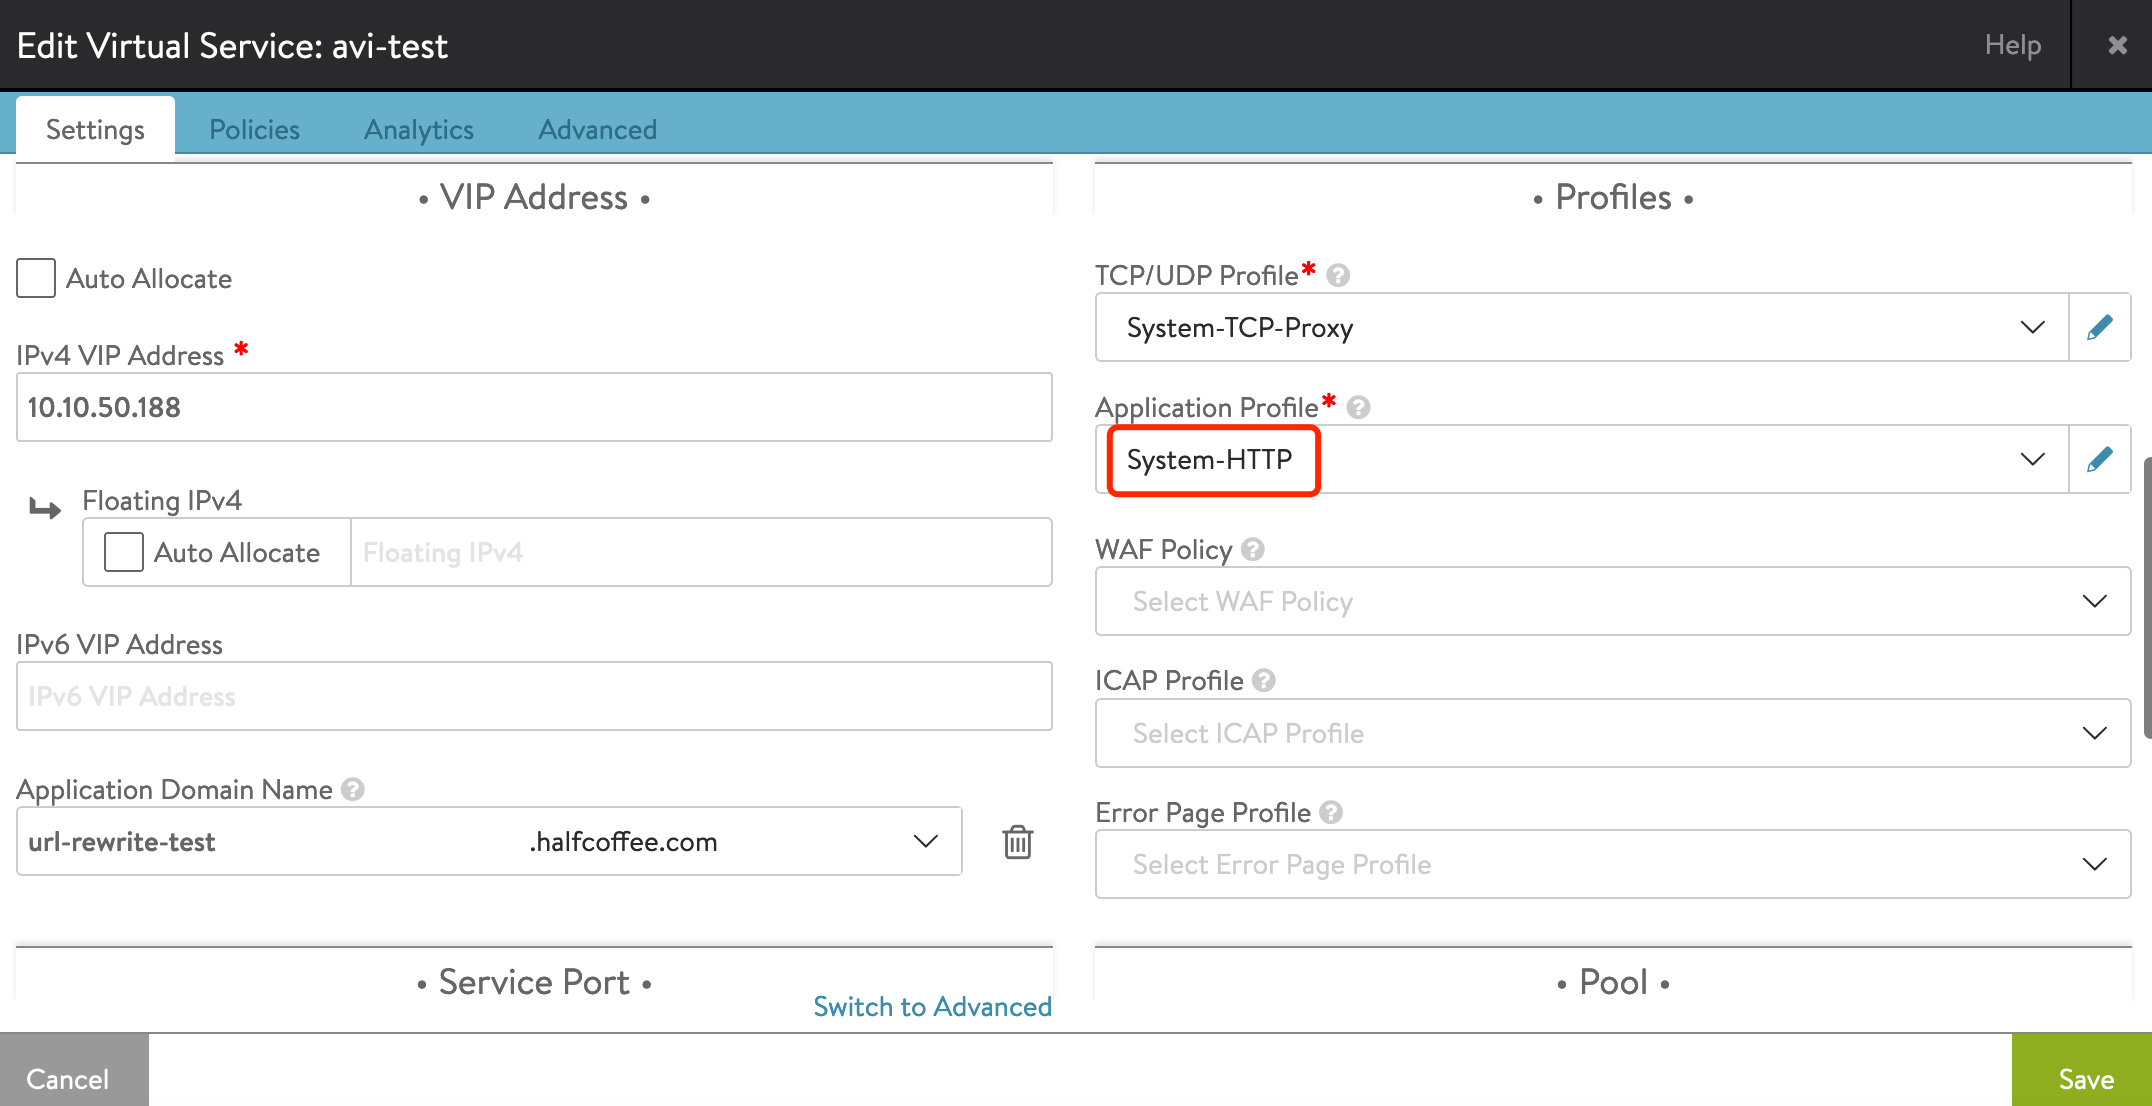
1、编辑应用当前使用的 Application Profile(建议为应用新建一个,不要修改系统默认的 System-HTTP):
2、在 DDoS 中找到 “HTTP Size Settings”,修改 “Client Max Header Field Size”。
10. 在访问域名前加 www
需求描述:
- 某些时候,用户希望访问根域名时自动加上 www,此需求可以通过 Datascript 实现。
具体的 Datascript 示例如下:
if string.beginswith(avi.http.hostname(),"www") == false then
  avi.http.redirect(avi.http.protocol() .. "://www." .. avi.http.hostname() ..
  avi.http.get_uri())
end
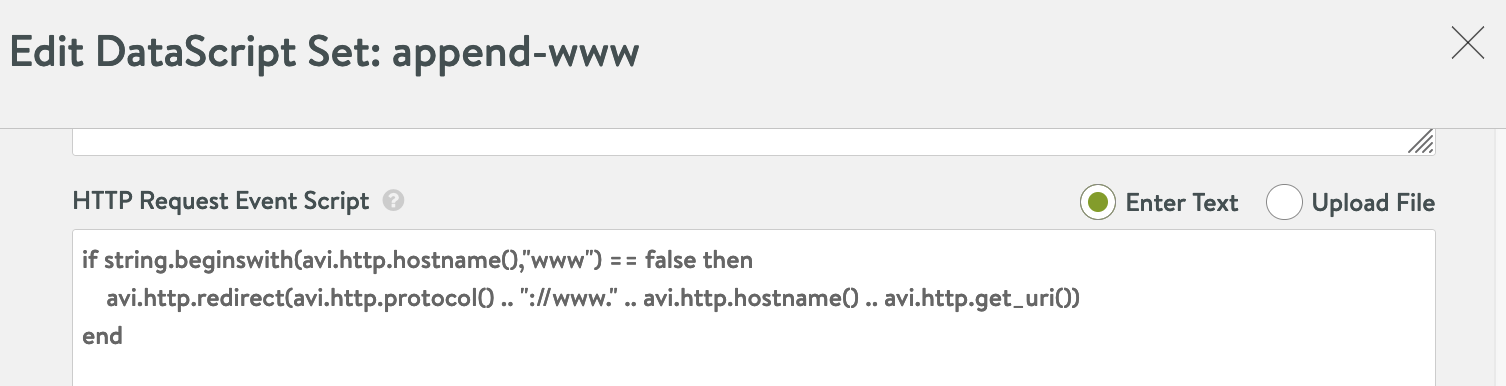
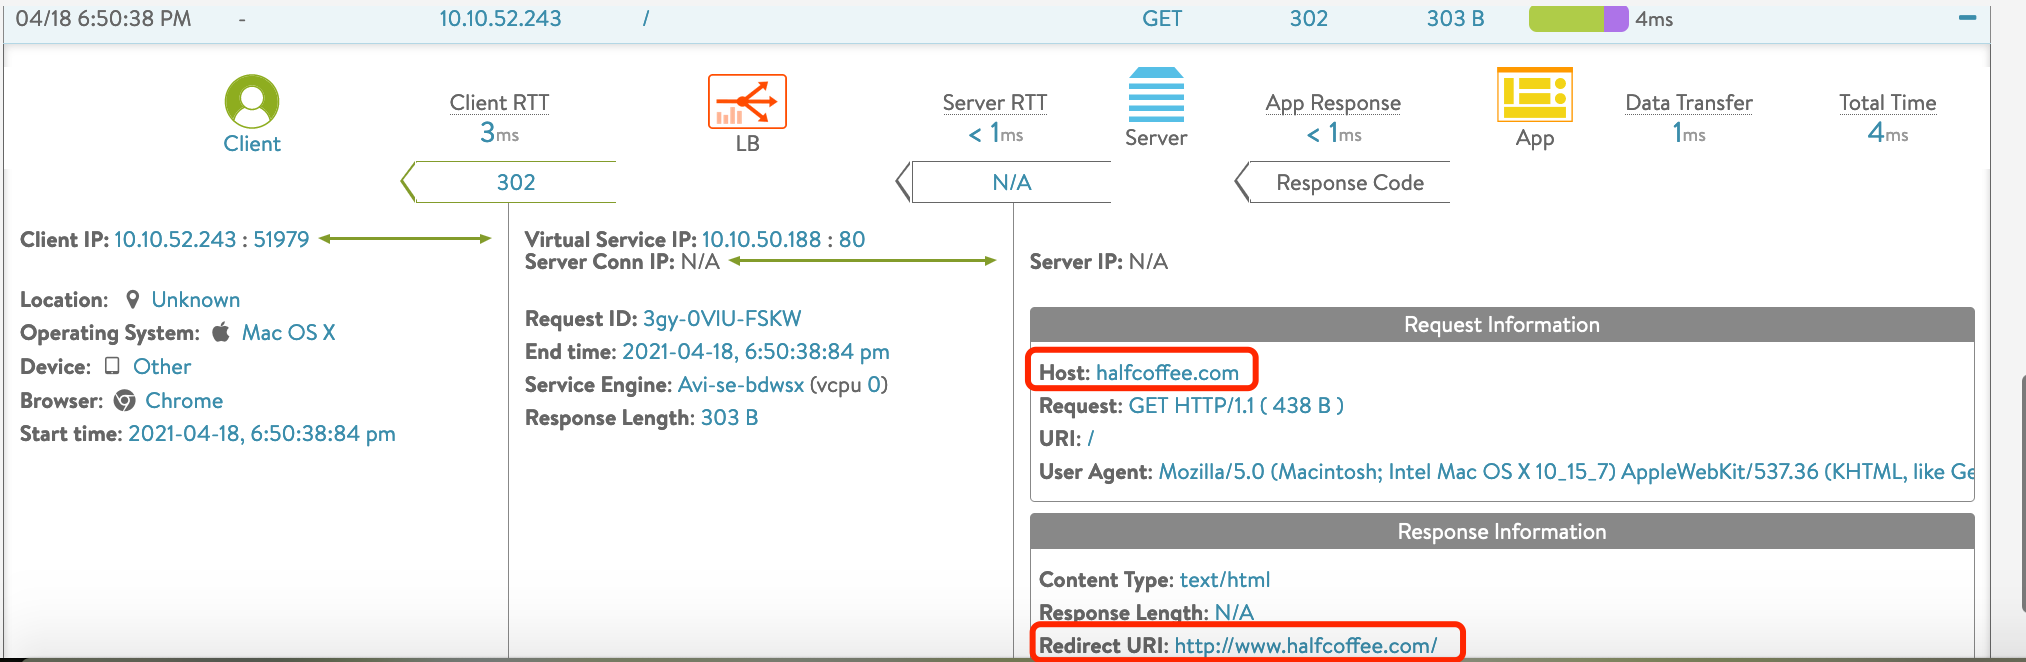
访问效果:
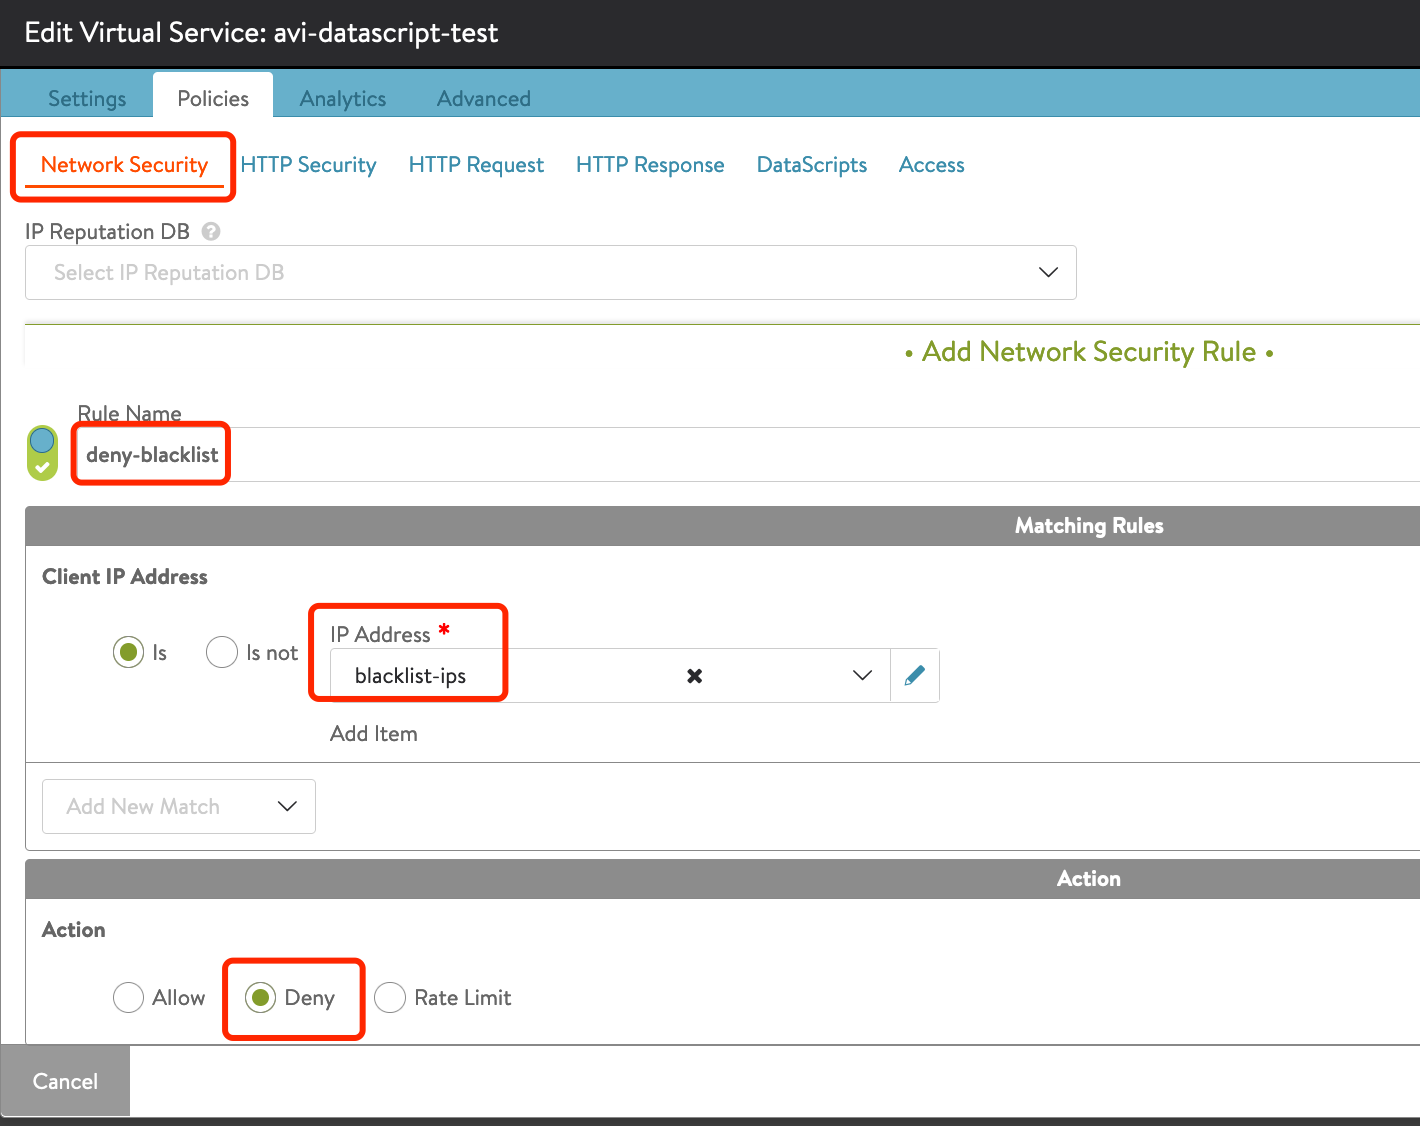
11. 全局黑名单
需求描述:
- 一些企业内部会部署威胁情报分析软件,这些软件可以发现一些恶意攻击,发现后希望其他安全软件可以对相关的 IP 进行拉黑,禁止这些 IP 访问内部业务系统。在 Avi 中可以直接使用 Network Security 策略+IP 组实现。
具体配置方式如下:
在 Avi 的 “Templates>Groups>IP Group” 中新建一个黑名单 IP 组。

然后编辑 Virtual Service,在 Network Security 中基于 IP 组添加 Deny 策略:
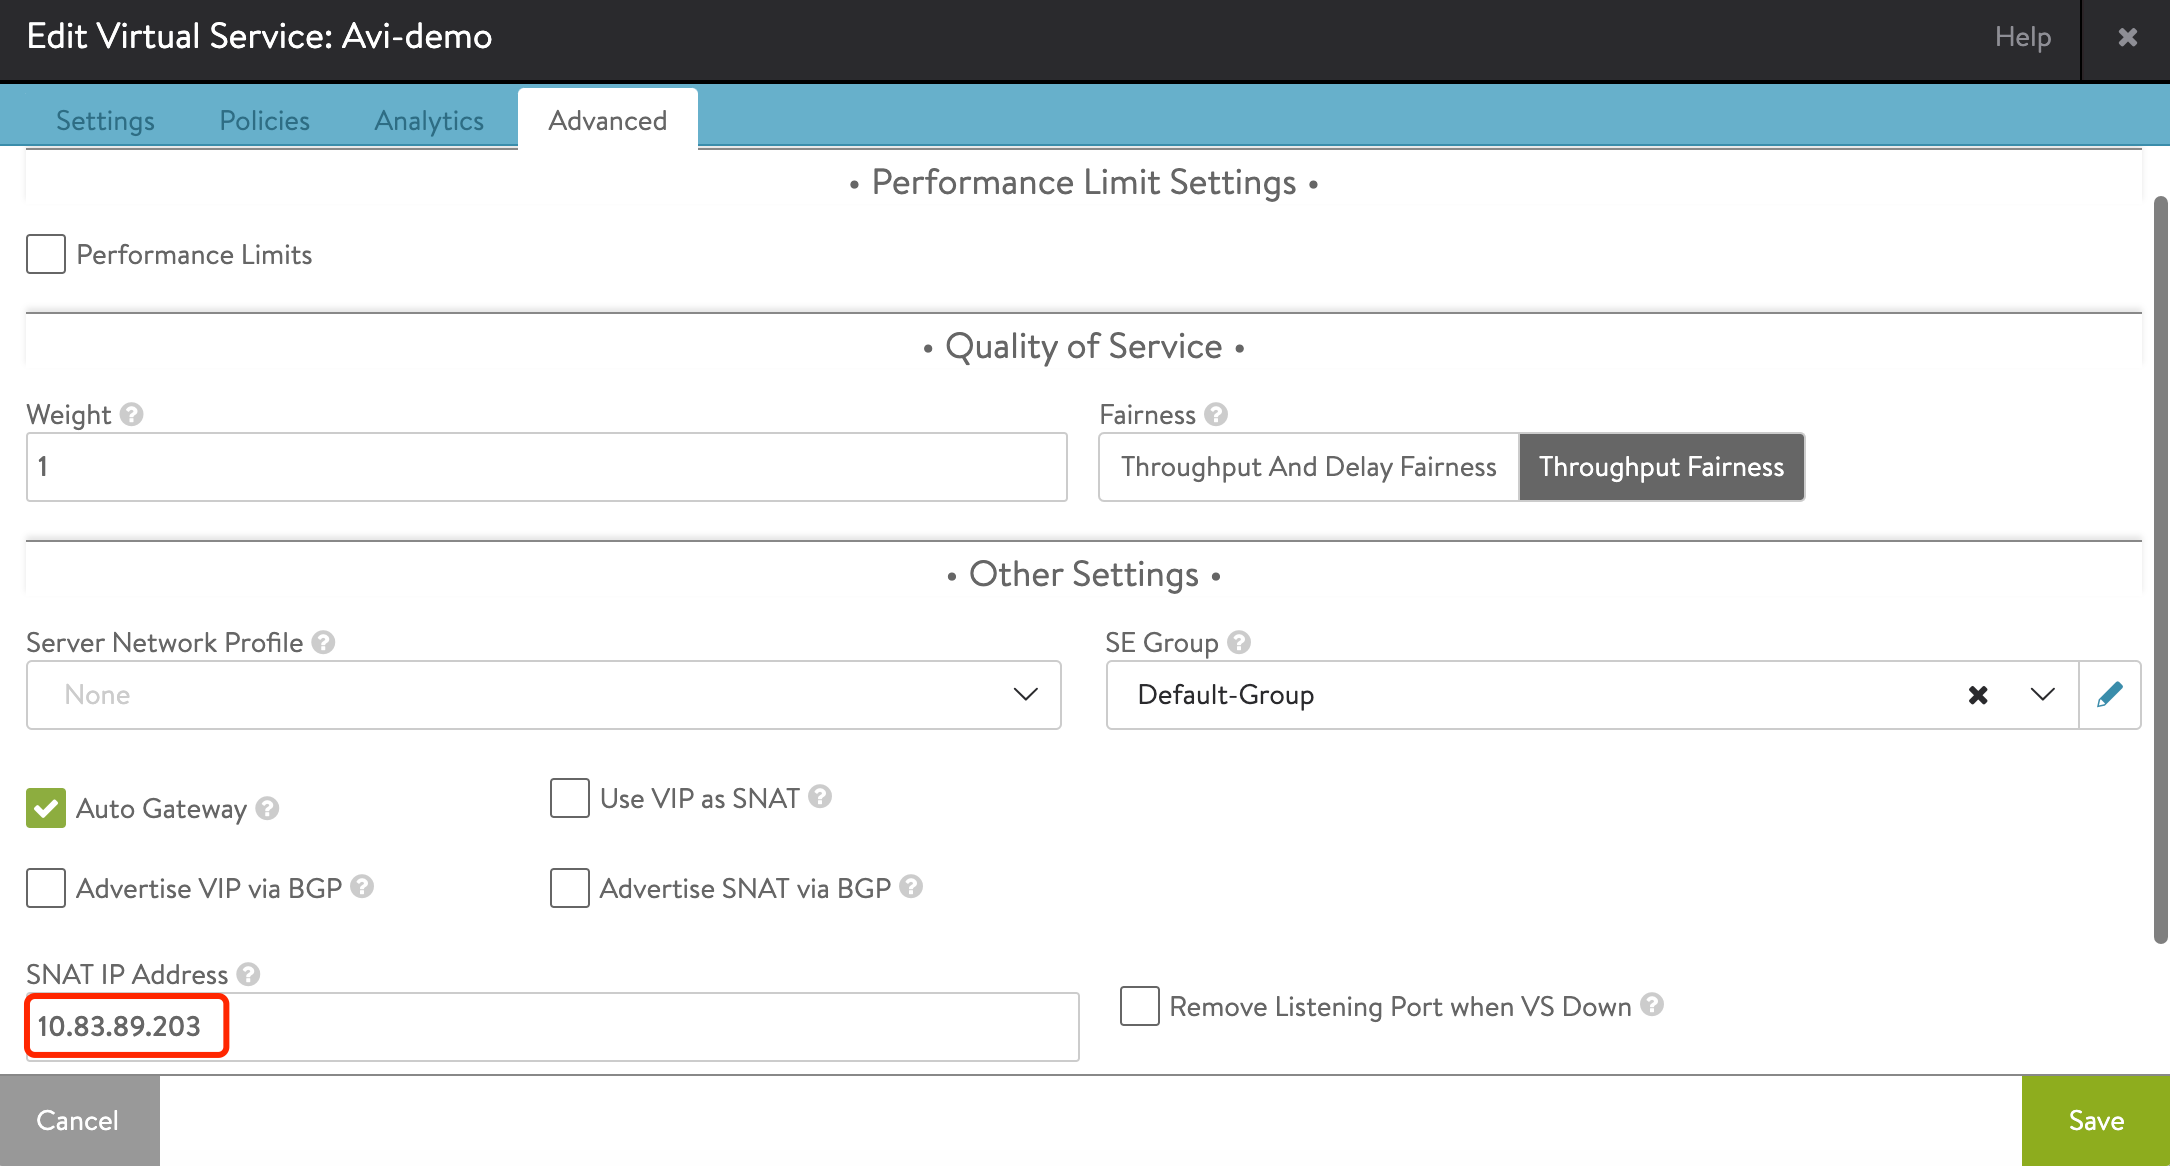
12. 设置自定义 SNAT 地址池
需求描述:
- 客户希望使用 VIP 作为 SNAT 地址;
- 默认 Avi 会使用每个 SE 的 Data NIC 来执行 SNAT 和后端 Server 连接,因此在使用 Avi 时默认就可以突破传统负载均衡器 65535 个端口(连接)的限制。如果客户有特殊需求,需要使用自定义 SNAT 地址池来满足超大并发需求,Avi 也支持手动指定 SNAT 地址池。
具体配置方式如下:
使用 VIP 进行SNAT
编辑 Virtual Service,在 Advanced 中勾选 “Use VIP as SNAT”:
注意:此选项仅支持 Active/Standby 高可用模式,不支持 N+M 或者 Active/Active。

自定义 SNAT 地址池
编辑 Virtual Service,在 Advanced 中设置 “SNAT IP address”,注意设置的 SNAT 地址池必须和 VIP 在同一个网段: