Prisma Cloud/Model Security CI/CD 集成
目录
依赖环境准备
Minio 配置
Minio 用于提供 S3 服务,存放模型文件。
在 Minio 中已经预先创建好了 bucket 并上传了模型文件:

创建 Minio 访问秘钥:

Harbor 配置
在 Harbor 中设置独立的仓库,存放流水线需要用到的 image:
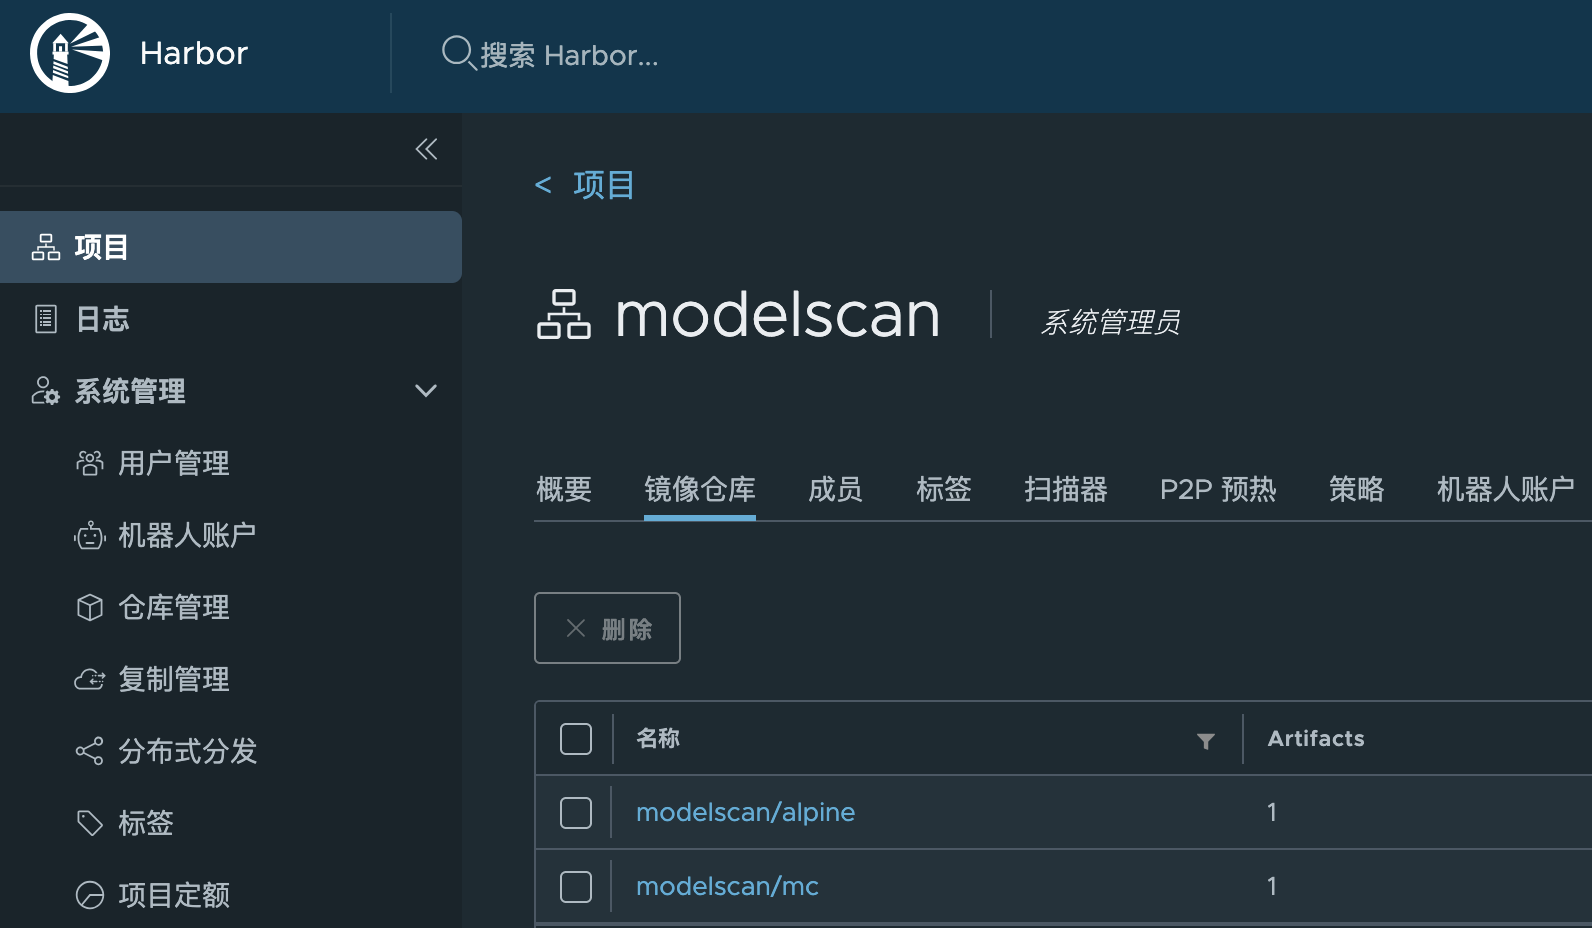
下载流水线必要的 image 并上传到私有仓库
docker pull minio/mc
docker pull alpine
docker pull dyadin/model-security
docker tag minio/mc harbor.halfcoffee.com/modelscan/mc
docker tag alpine  harbor.halfcoffee.com/modelscan/alpine
docker tag dyadin/model-security harbor.halfcoffee.com/modelscan/model-security
docker push harbor.halfcoffee.com/modelscan/mc
docker push harbor.halfcoffee.com/modelscan/alpine
docker push harbor.halfcoffee.com/modelscan/model-security
私有仓库拉取镜像(可选)
如果镜像仓库需要秘钥才能拉取镜像,需要在 Jenkins 中将 Harbor 的用户名密码添加到 Credentials 中。

然后在指定 docker image 时设置需要登录:
            agent {
                docker {
                    image 'harbor.halfcoffee.com/modelscan/mc'
                    registryCredentialsId 'harbor-credentials'
                    args '--entrypoint=""'
                }
            }
Jenkins 安装
镜像准备(可选)
默认 Jenkins 不含比较新的 blueocean、docker-workflow 插件,需要参考此文章来构建自定义 image,将这些包加入其中:
cat > Dockerfile << EOF
FROM jenkins/jenkins:jdk21
USER root
RUN apt-get update && apt-get install -y lsb-release ca-certificates curl && \
    install -m 0755 -d /etc/apt/keyrings && \
    curl -fsSL https://download.docker.com/linux/debian/gpg -o /etc/apt/keyrings/docker.asc && \
    chmod a+r /etc/apt/keyrings/docker.asc && \
    echo "deb [arch=$(dpkg --print-architecture) signed-by=/etc/apt/keyrings/docker.asc] \
    https://download.docker.com/linux/debian $(. /etc/os-release && echo \"$VERSION_CODENAME\") stable" \
    | tee /etc/apt/sources.list.d/docker.list > /dev/null && \
    apt-get update && apt-get install -y docker-ce-cli && \
    apt-get clean && rm -rf /var/lib/apt/lists/*
USER jenkins
RUN jenkins-plugin-cli --plugins "blueocean docker-workflow json-path-api"

EOF
docker build . -t dyadin/jenkins-blueocean:jdk21
已经基于 jdk21 版构建的成品镜像如下:
dyadin/jenkins-blueocean:jdk21
容器化部署 Jenkins
部署 Jenkins 需要两个容器:
- Jenkins-blueocean:Jenkins 主镜像,默认 8080 端口用于 web 访问,50000 用于客户端连接
- Jenkins-docker:Jenkins 流水线需要用到 Docker in Docker,此容器即负责此任务。
# 基础环境准备
mkdir jenkins
cd jenkins

# 创建 Docker compose 文件

cat > docker-compose.yaml << EOF

services:

  jenkins-docker:
    image: docker:dind
    container_name: jenkins-docker
    privileged: true
    networks:
      jenkins:
        aliases:
          - docker
    environment:
      DOCKER_TLS_CERTDIR: /certs
    volumes:
      - jenkins-docker-certs:/certs/client
      - jenkins-data:/var/jenkins_home
    ports:
      - "2376:2376"
    restart: unless-stopped
    extra_hosts:
      - "harbor.halfcoffee.com:10.10.50.16"
  jenkins-blueocean:
    image: dyadin/jenkins-blueocean:jdk21
    container_name: jenkins-blueocean
    restart: on-failure
    networks:
      - jenkins
    environment:
      DOCKER_HOST: tcp://docker:2376
      DOCKER_CERT_PATH: /certs/client
      DOCKER_TLS_VERIFY: 1
    ports:
      - "8080:8080"
      - "50000:50000"
    volumes:
      - jenkins-data:/var/jenkins_home
      - jenkins-docker-certs:/certs/client:ro
    depends_on:
      - jenkins-docker

networks:
  jenkins:
    name: jenkins

volumes:
  jenkins-data:
  jenkins-docker-certs:

EOF

# 启动 Jenkins
docker compose up -d
细节说明:
- 在新版的 Docker in Docker 下,如果使用 TCP 连接默认会开启证书验证,所以需要将 DinD 的证书挂载给 Jenkins(此处使用了共享卷,DinD 生成证书,Jenkins 直接以只读权限调用)
- 环境中使用了私有化部署 Harbor,为了使得 DinD 正常解析域名,可以在 Docker compose 中添加
extra_hosts参数来手动设置解析。
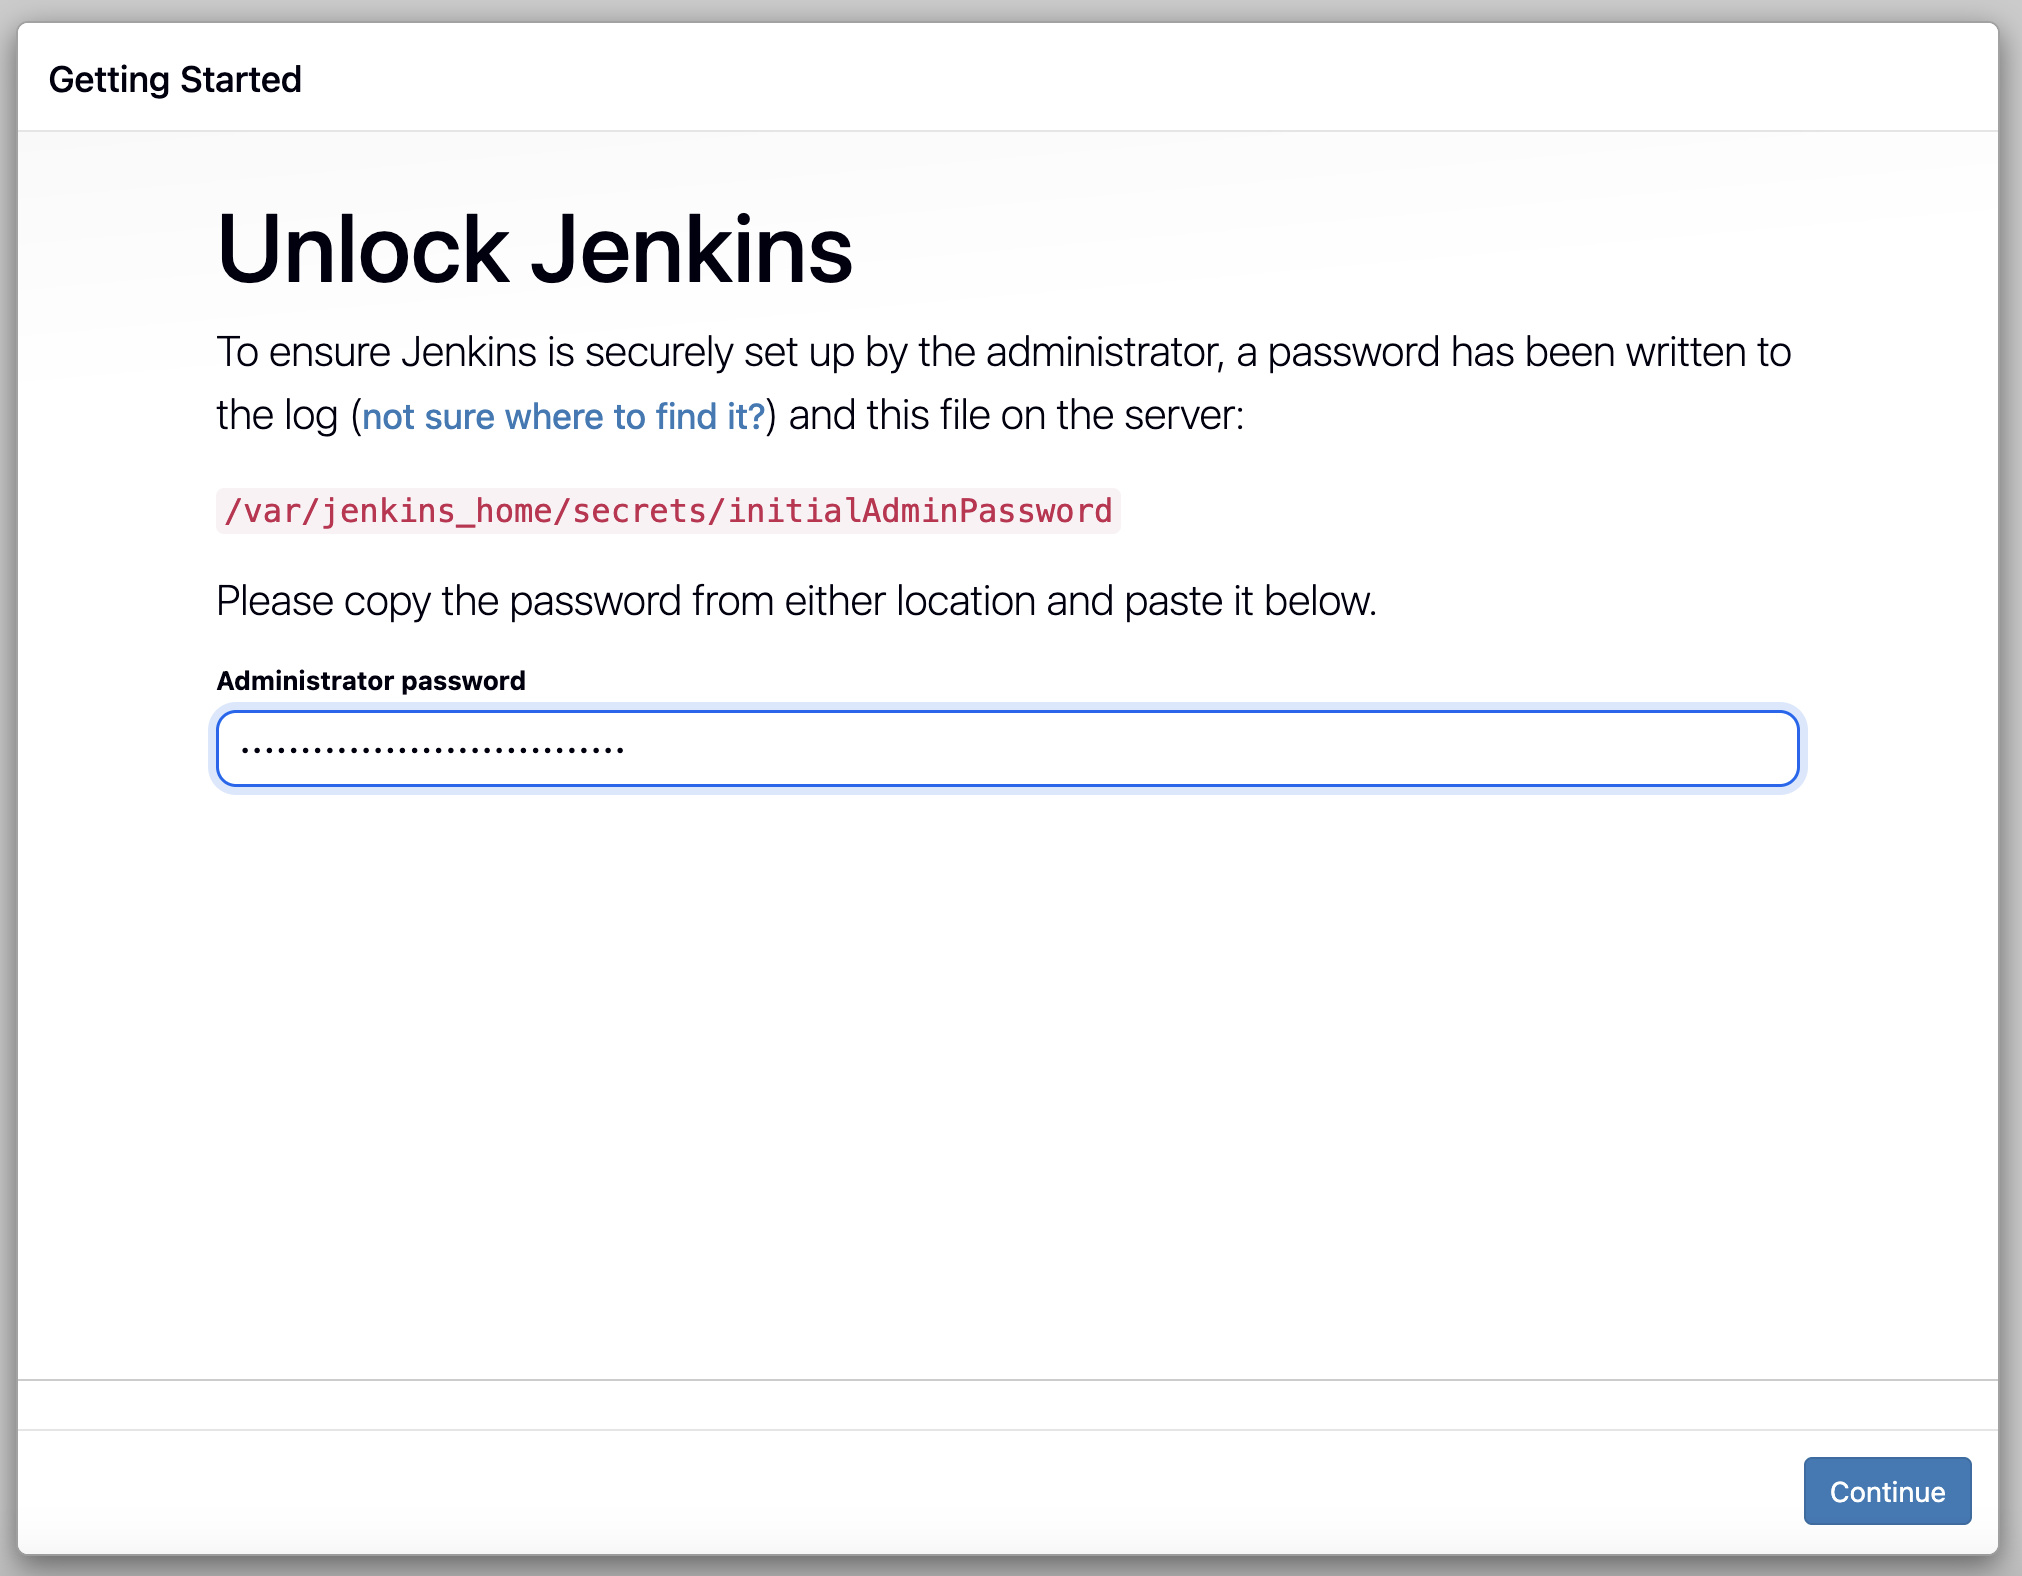
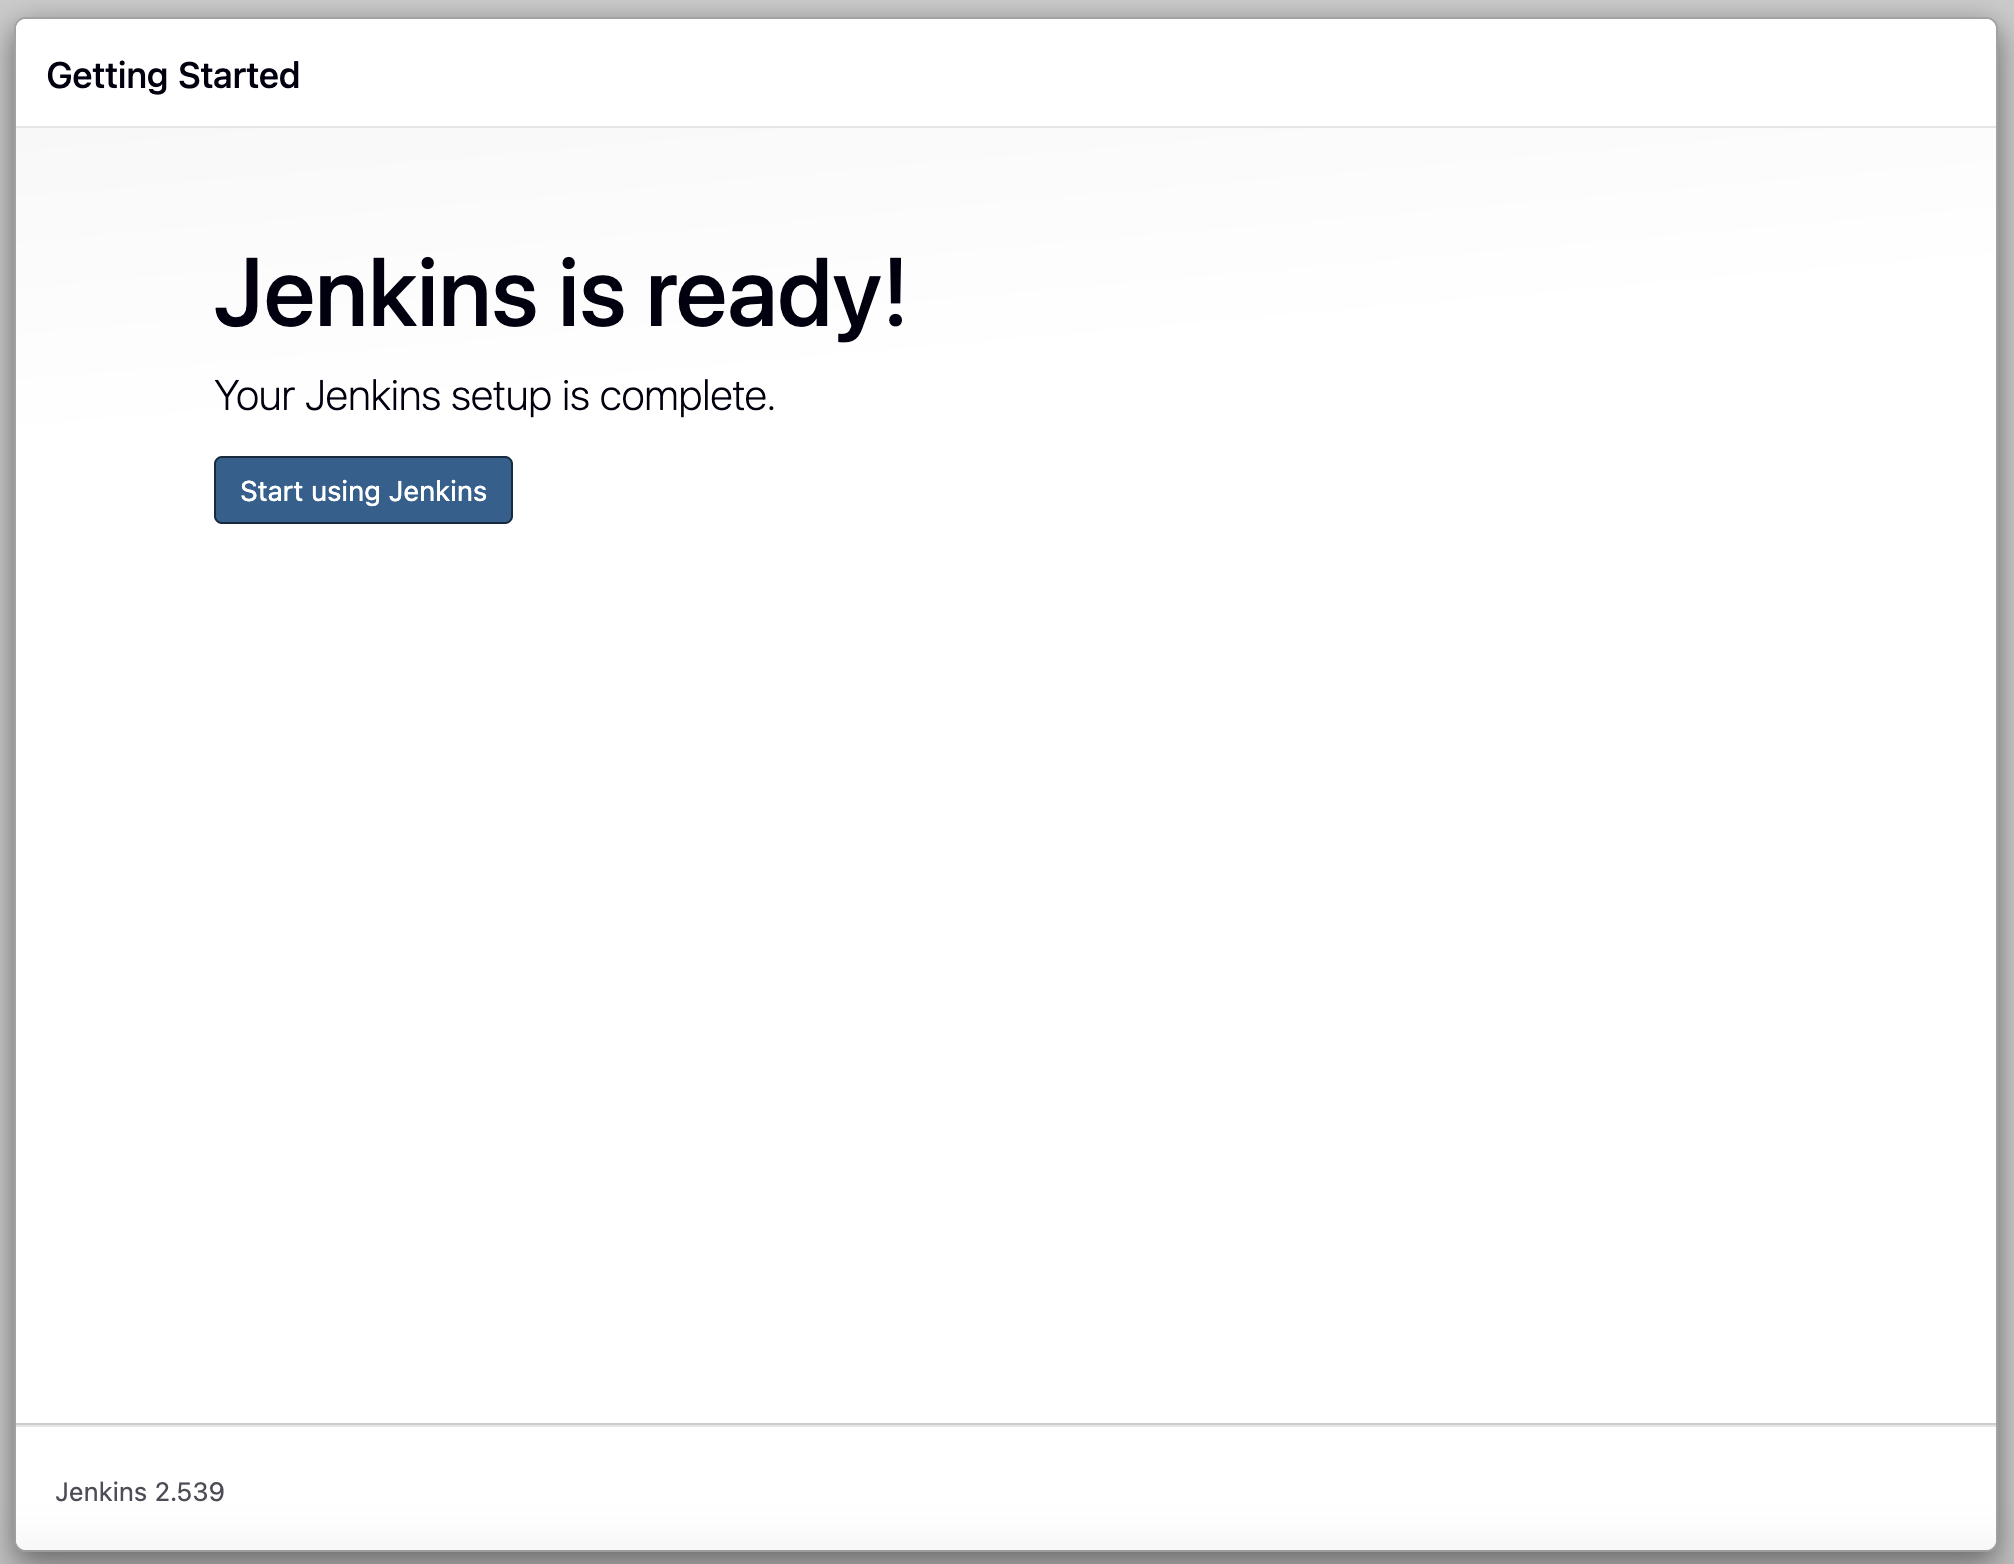
初始化 Jenkins
启动后用下列命令获得 admin 密码:
docker logs -f jenkins-blueocean
示例:
[LF]> Jenkins initial setup is required. An admin user has been created and a password generated.
[LF]> Please use the following password to proceed to installation:
[LF]>
[LF]> 19773f183f894ffc9c5693aadb6
[LF]>
[LF]> This may also be found at: /var/jenkins_home/secrets/initialAdminPassword
打开 Jenkins web 管理页:http://<jenkins-ip>:8080 然后使用上述密码登录:
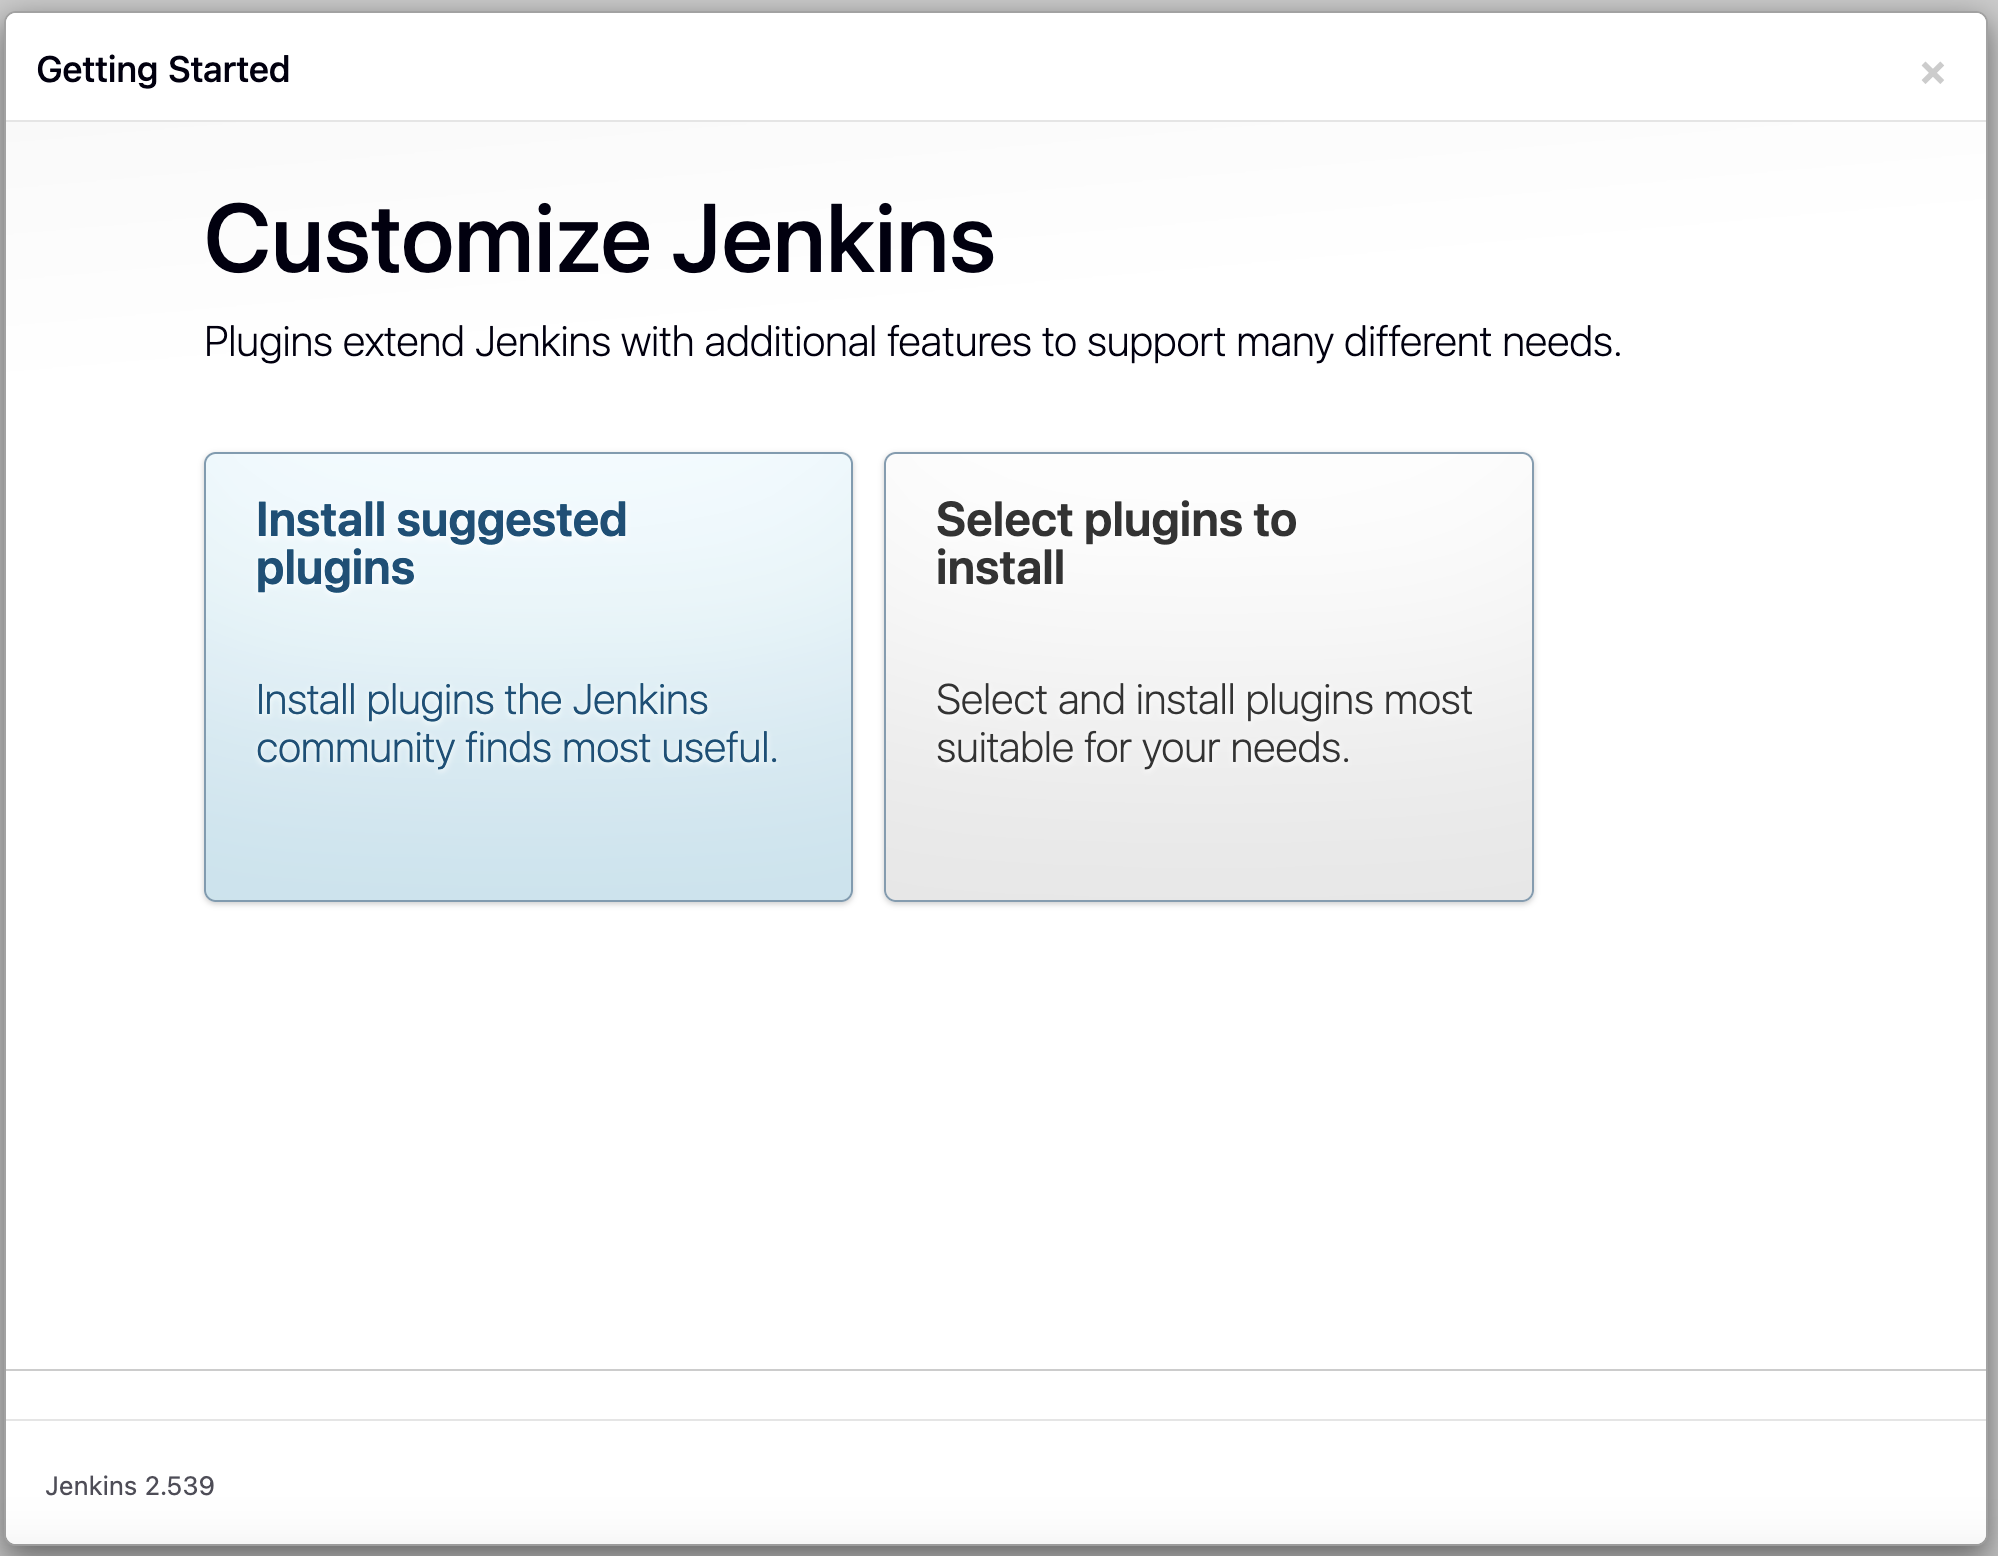
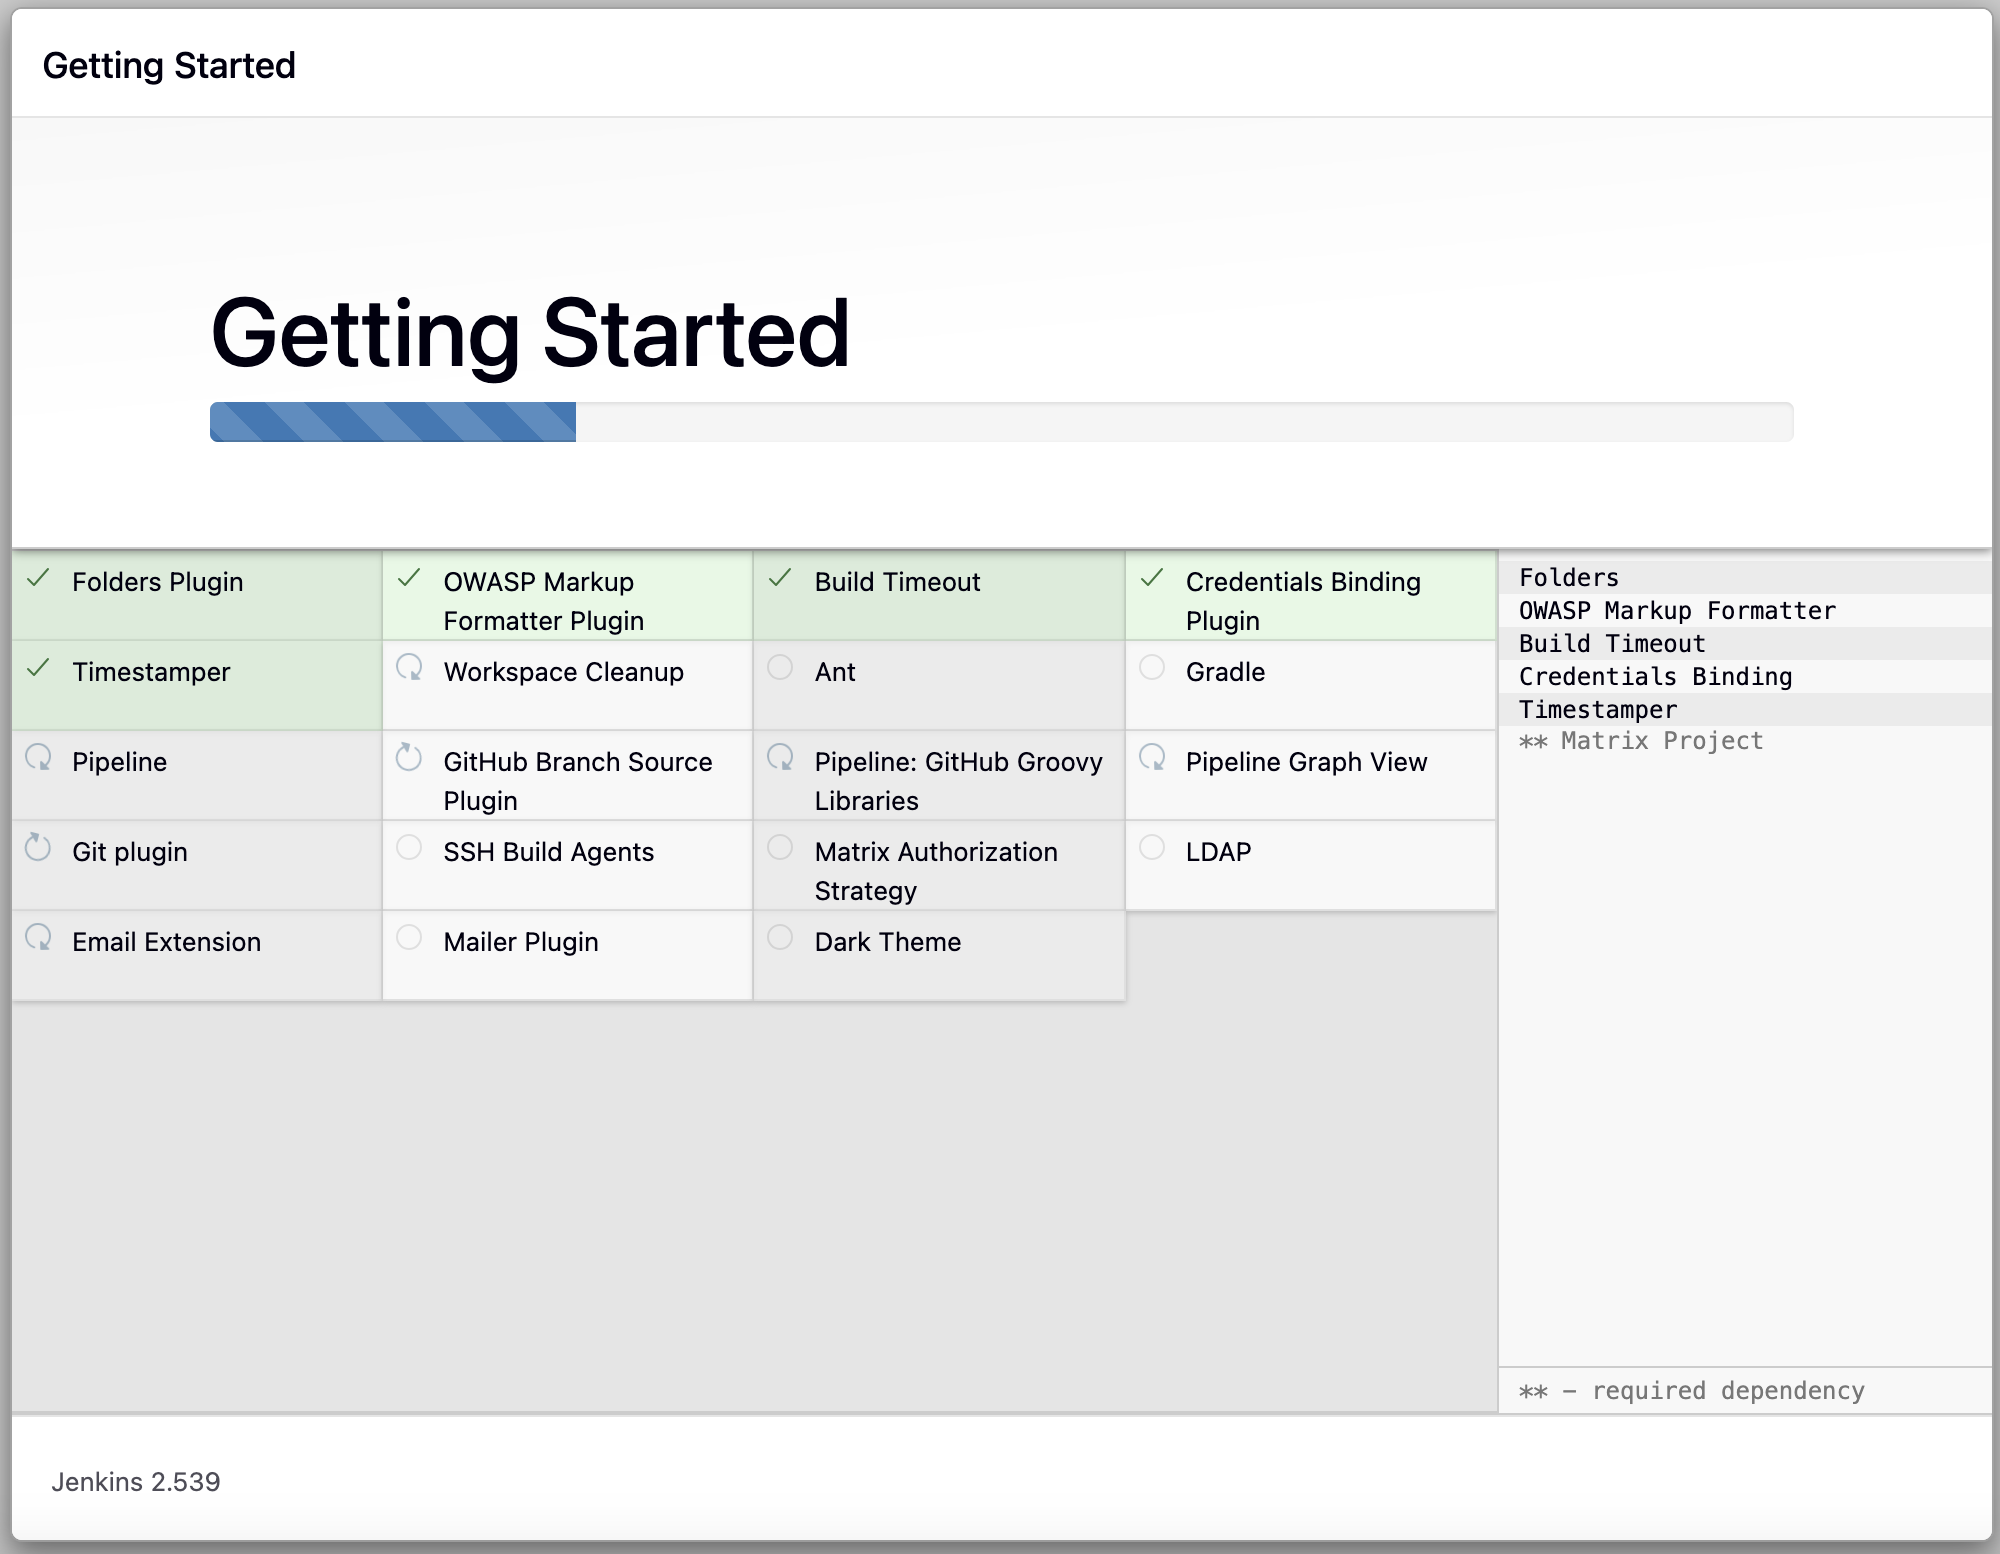
安装推荐的插件:
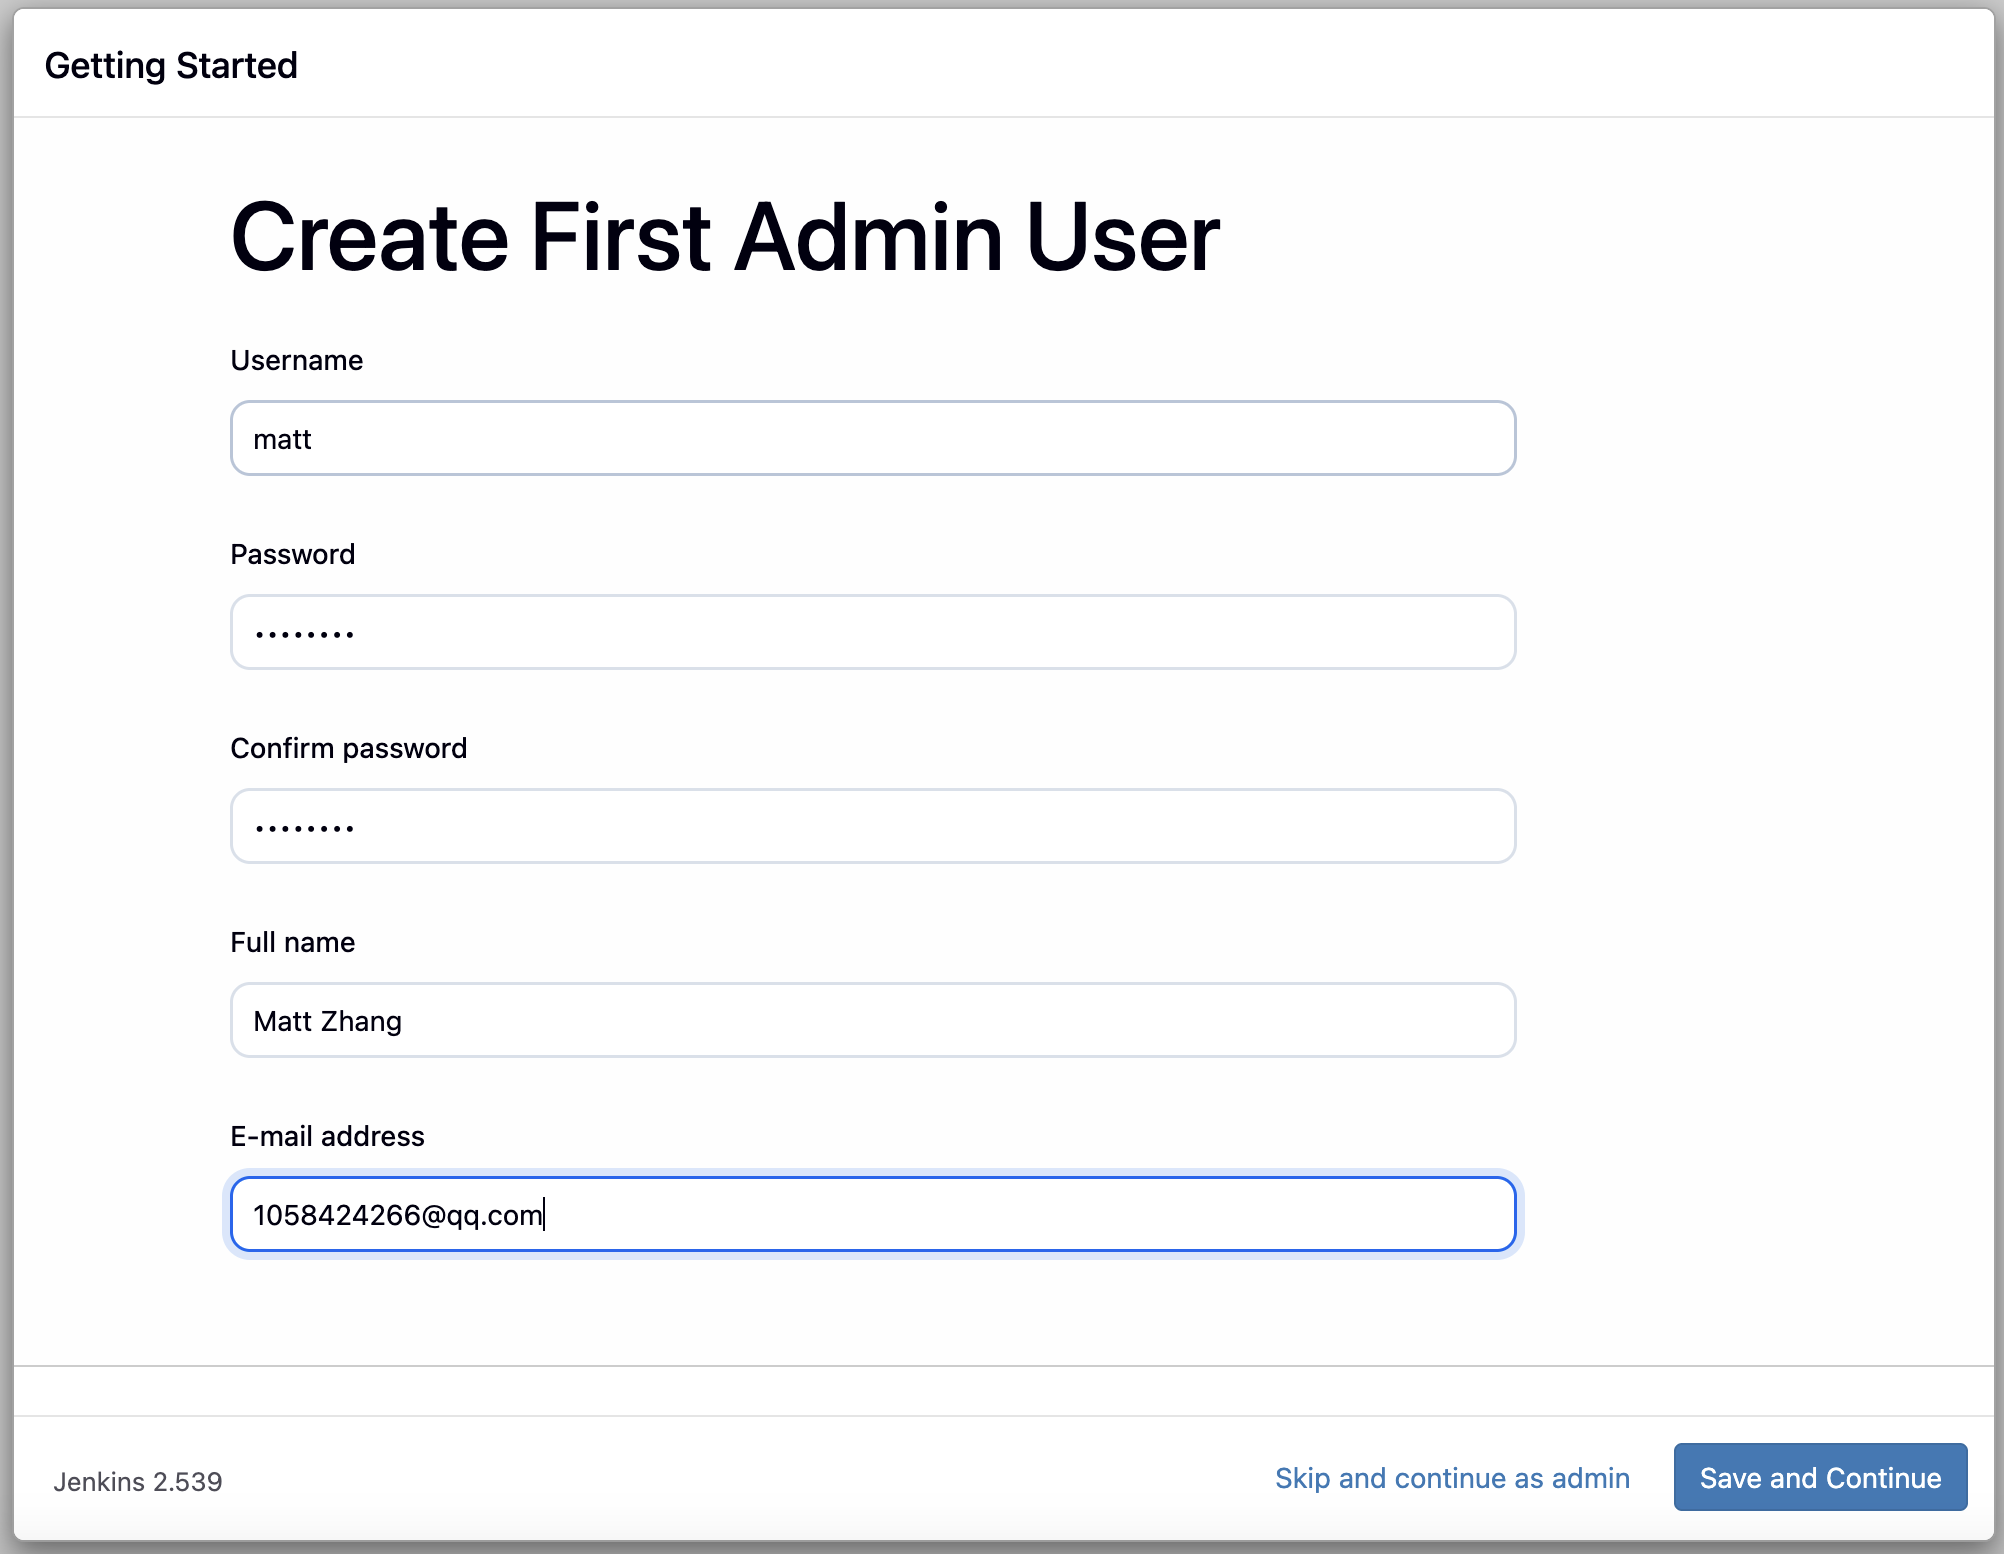
设置 Admin 用户:
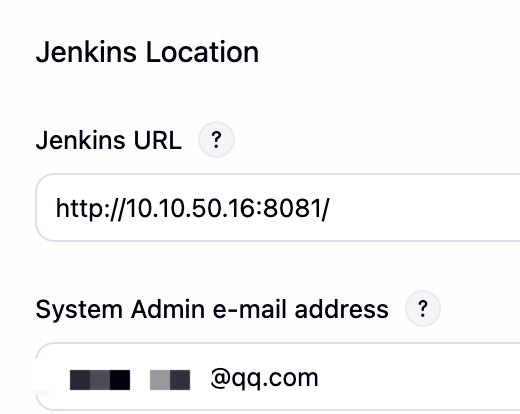
设置默认 URL(以实际为准进行配置):

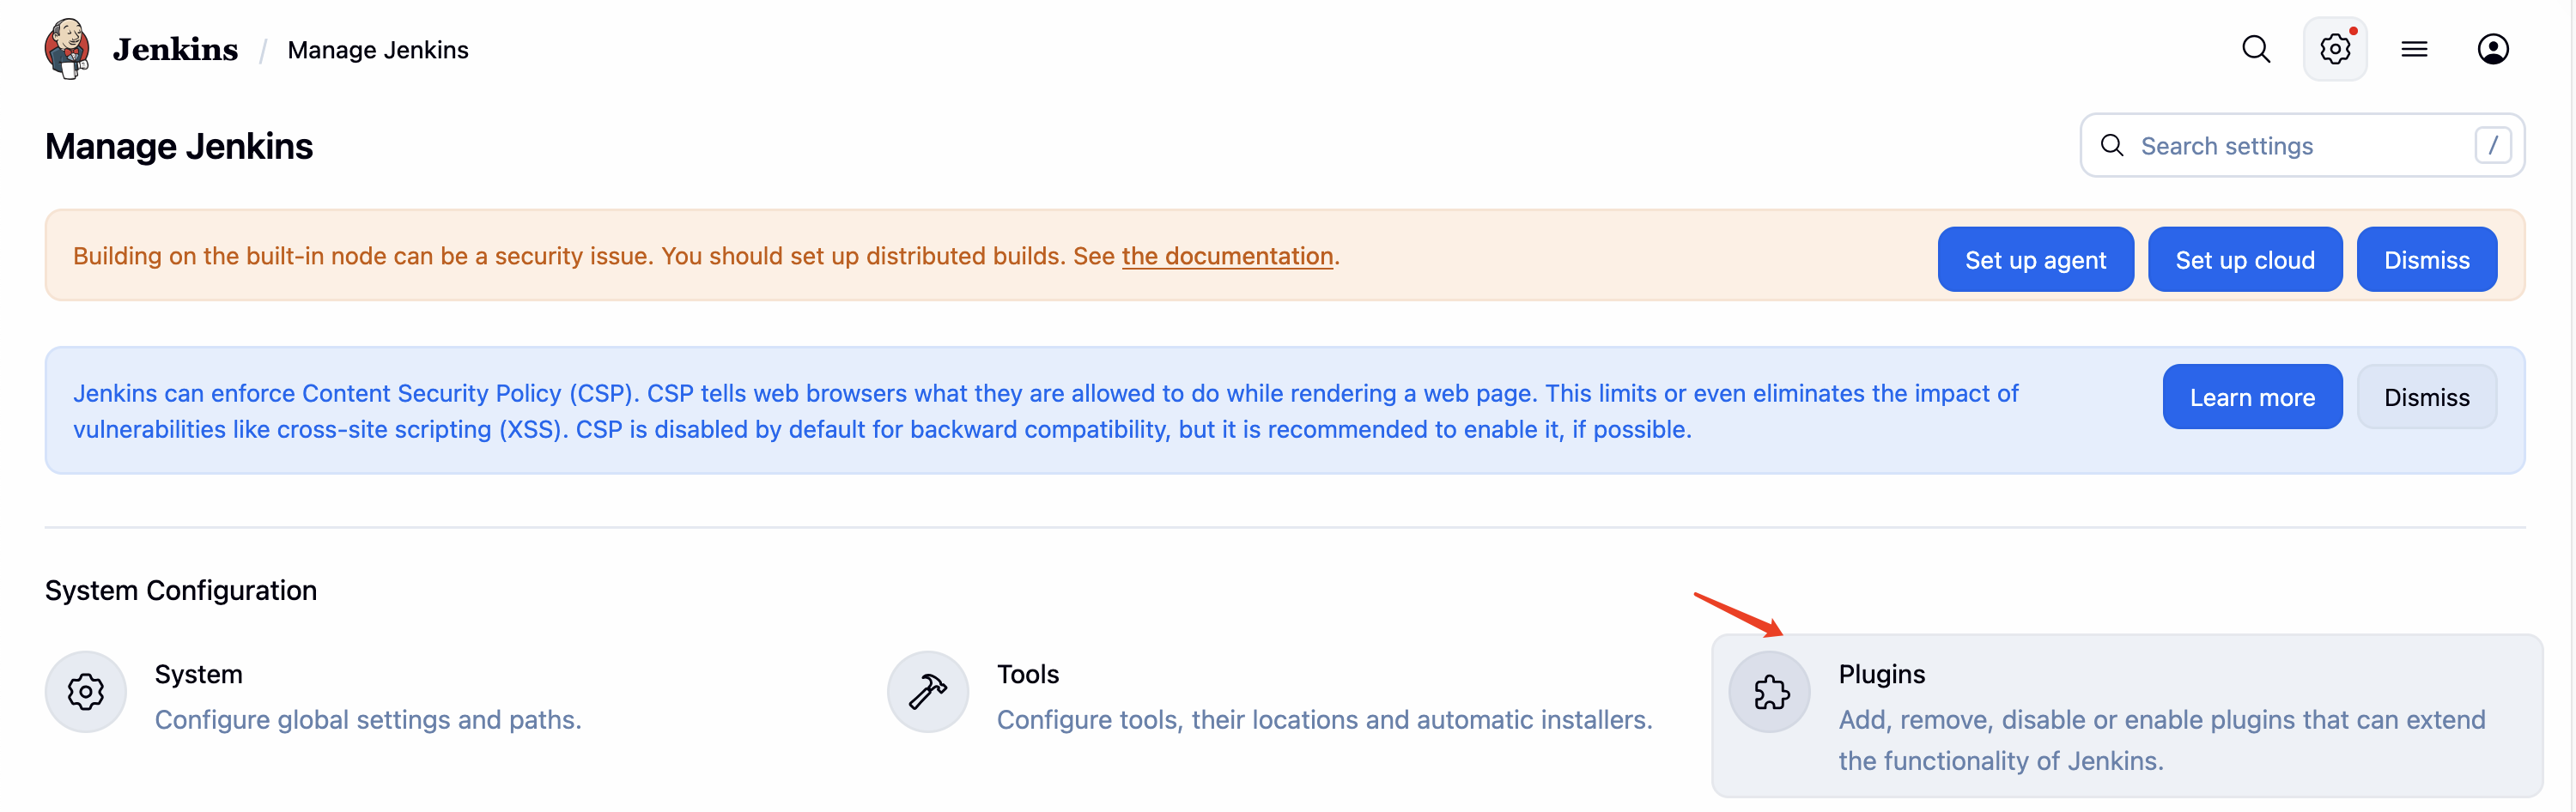
在此位置可以添加额外的 Plugin:
常见插件介绍如下:
- Localization: Chinese (Simplified)
- Git、Git Parameter:拉取 Git 仓库中的代码
- GitLab:集成 Gitlab,通过 webhook 触发构建,将构建状态返回给 Gitlab
- Config FIle Provider:用于创建 kubeconfig 文件,使得 Jenkins 可以连接到 k8s 集群
- SSH Agent (build):通过 ssh 远程执行命令
- Stage View:一步步的执行过程视图
- Role-based Authorization Strategy
- kubernetes:Kubernetes 对接
- docker:Docker 对接
- skip-certificate-check:禁用证书检查
- Artifact Manager on S3:与 S3 存储对接(兼容 Minio)
流水线创建
新建 Item

设置名称,类型选择 Pipeline:

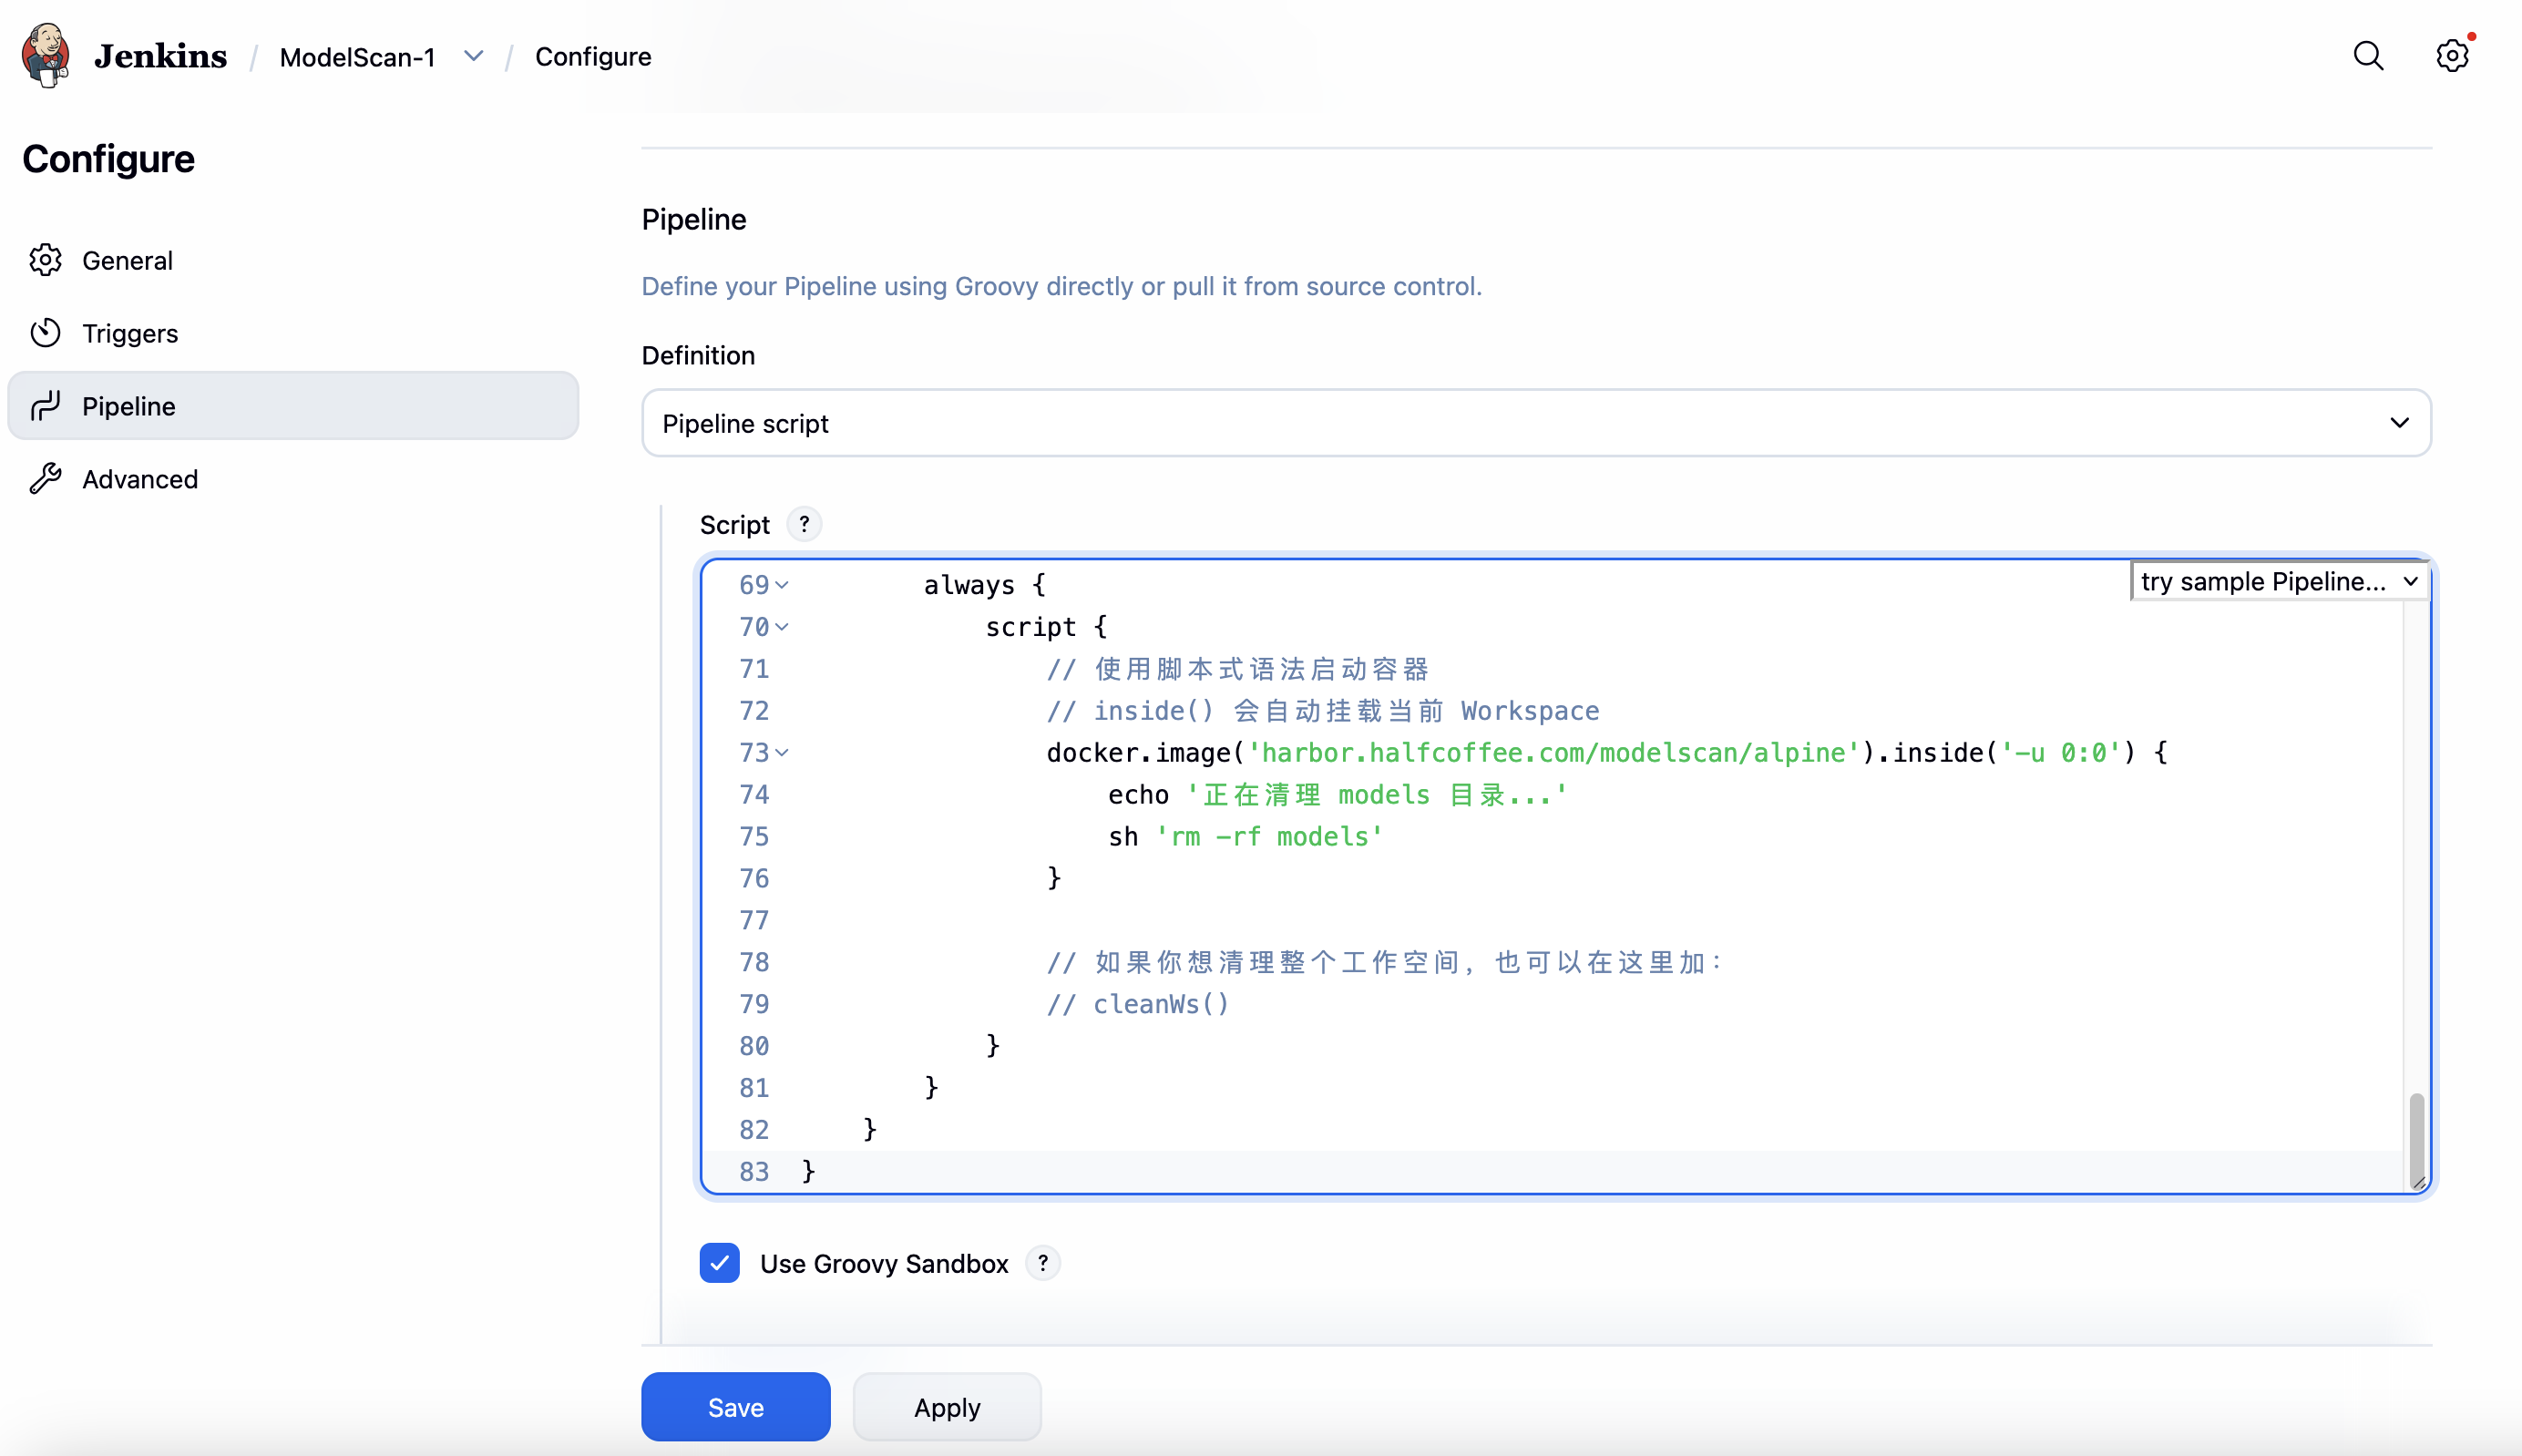
在 Pipeline 中填写下列配置。配置共有下列运行阶段:
- Hello:Hello World,此步骤可删除
- Download-Models:通过 Monio 的 mc 客户端容器从 Minio 拉去 S3 中存放的模型目录
- List-Models:使用
ls -l查看拉取的模型文件,方便排错,此步骤可删除 - Scan-Models:使用
pipeline {
    agent none
    environment {
        MINIO_HOST = 'http://10.10.50.16:9000'
        MINIO_ACCESS_KEY = 'XXXX'
        MINIO_SECRET_KEY = 'XXXX'
        MODEL_SECURITY_CLIENT_ID = '[email protected]'
        MODEL_SECURITY_CLIENT_SECRET = 'XXXX'
        TSG_ID = 'XXXX'
        SECURITY_GROUP_UUID = 'b4b56577-7793-41e1-a718-b6aaf12708f1'
    }

    stages {
        stage('Hello') {
            steps {
                echo 'Hello World'
            }
        }

        stage('Download-Models') {
            agent {
                docker {
                    image 'minio/mc'
                    args '--entrypoint=""'
                    reuseNode true
                }
            }
            environment {
                HOME = '.'
            }
            steps {
                sh '''
                  mc alias set minio ${MINIO_HOST} ${MINIO_ACCESS_KEY} ${MINIO_SECRET_KEY}
                  mc mb --ignore-existing minio/modelscan
                  mc cp --recursive minio/modelscan/safe models/
                  ls -l models/*
                '''
            }
        }
        stage('Scan-Models') {
            agent {
                docker {
                    image 'dyadin/model-security'
                    reuseNode true
                }
            }
            environment {
                MODEL_SECURITY_CLIENT_ID     = "${MODEL_SECURITY_CLIENT_ID}"
                MODEL_SECURITY_CLIENT_SECRET = "${MODEL_SECURITY_CLIENT_SECRET}"
                TSG_ID                       = "${TSG_ID}"
            }
            steps {
                sh """
                  model-security \
                    --base-url https://api.sase.paloaltonetworks.com/aims \
                    scan \
                    --security-group-uuid "${SECURITY_GROUP_UUID}" \
                    --model-path models \
                    --model-uri 's3://10.10.50.16:9000/modelscan/models' \
                    --model-name "production-classifier" \
                    --model-author "ml-team" \
                    --model-version "v2.1"
                """
            }
        }
    }
post {
        cleanup {
            node('') {
                sh 'rm -rf models || true'
            }
        }
    }
}
密钥存储优化(可选)
上面的流水线中密钥直接存储在 Pipeline 文件中,这种做法通常不安全,建议将其放在全局的 Credentials 中存储。
配置示例如下:

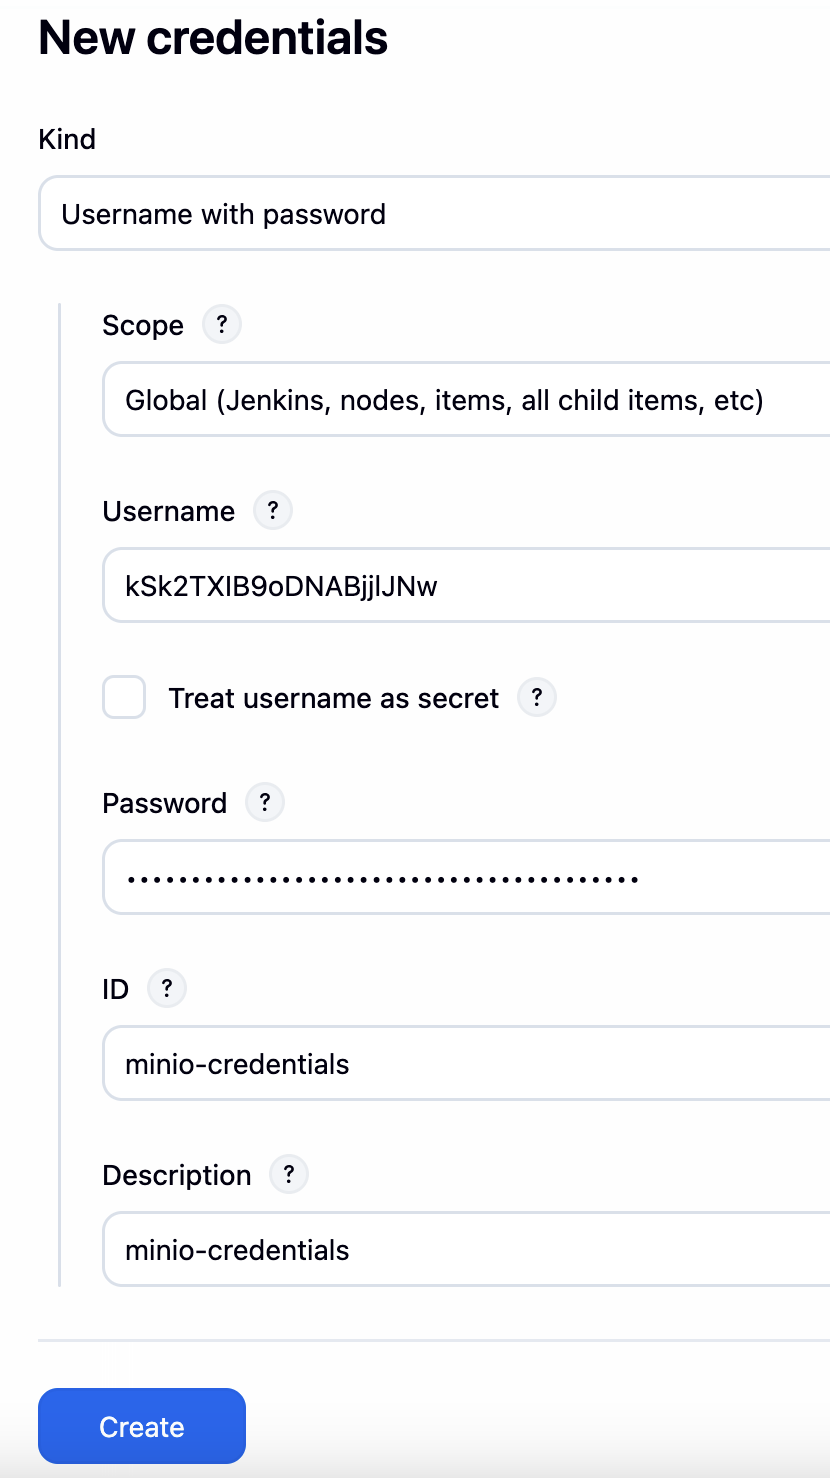
之后在 Pipeline 中调用即可:
...
            steps {
                // 使用 withCredentials 注入 MinIO 凭证
                withCredentials([usernamePassword(credentialsId: 'minio-credentials', usernameVariable: 'MINIO_ACCESS_KEY', passwordVariable: 'MINIO_SECRET_KEY')]) {
                    sh '''
                      mc alias set minio ${MINIO_HOST} ${MINIO_ACCESS_KEY} ${MINIO_SECRET_KEY}
                      mc mb --ignore-existing minio/modelscan
                      mc cp --recursive minio/modelscan/safe models/
                    '''
                }
使用同样的办法存储 model security 的凭据信息:

最终的 Pipeline 如下:
pipeline {
    agent none
    environment {
        MINIO_HOST = 'http://10.10.50.16:9000'
        TSG_ID = '1128077787'
        REGISTRY_URL = 'https://harbor.halfcoffee.com'
        MODELS_FOLDER= 'modelscan/unsafe'
        // Bucketname/foldername, also can be bucketname alone
    }

    stages {
        stage('Hello') {
            steps {
                echo 'Hello World'
            }
        }

        stage('Download-Models') {
            agent {
                docker {
                    image 'harbor.halfcoffee.com/modelscan/mc'
                    registryUrl "${REGISTRY_URL}"
                    registryCredentialsId 'harbor-credentials'
                    args '--entrypoint=""'
                }
            }
            environment {
                HOME = '.'
            }
            steps {
                withCredentials([usernamePassword(credentialsId: 'minio-credentials', usernameVariable: 'MINIO_ACCESS_KEY', passwordVariable: 'MINIO_SECRET_KEY')]) {
                    sh '''
                      mc alias set minio ${MINIO_HOST} ${MINIO_ACCESS_KEY} ${MINIO_SECRET_KEY}
                      mc mb --ignore-existing minio/modelscan
                      mc cp --recursive minio/${MODELS_FOLDER} models/
                      ls -l models/*
                    '''
                }
            }
        }
        stage('Scan-Models') {
            agent {
                docker {
                    image 'harbor.halfcoffee.com/modelscan/model-security'
                    registryUrl "${REGISTRY_URL}"
                    registryCredentialsId 'harbor-credentials'
                }
            }
            steps {
                withCredentials([usernamePassword(credentialsId: 'model-security-credentials', usernameVariable: 'MODEL_SECURITY_CLIENT_ID', passwordVariable: 'MODEL_SECURITY_CLIENT_SECRET')]) {
                    sh """
                      model-security \
                        --base-url https://api.sase.paloaltonetworks.com/aims \
                        scan \
                        --security-group-uuid b4b56577-7793-41e1-a718-b6aaf12708f1 \
                        --model-path models \
                        --model-uri 's3://${MINIO_HOST}/modelscan/models' \
                        --model-name "production-classifier" \
                        --model-author "ml-team" \
                        --model-version "v2.1"
                    """

                }
            }
        }
    }

    post {
        cleanup {
            node('') {
                sh 'rm -rf models || true'
            }
        }
    }
}
邮件告警(可选)
如果使用 QQ 邮箱,参考此方法设置授权码:
https://wx.mail.qq.com/list/readtemplate?name=app_intro.html#/agreement/authorizationCode
所需的细节配置如下:
SMTP_SERVER=smtp.qq.com
SMTP_PORT=587
SMTP_USERNAME=[email protected]
SMTP_PASSWORD=XXX
SMTP_USE_TLS=true
在 Jenkins 中设置发送人:
在 Jenkins 的 Extended E-mail Notification 中设置相应的值:

同时 Document Type 设置为 HTML

最终的 Pipeline 如下:
pipeline {
    agent none
    environment {
        MINIO_HOST = 'http://<>MINIO_IP>:9000'
        TSG_ID = 'YOUR_TSG_ID'
        REGISTRY_URL = 'https://<registry-url>'
        MODELS_FOLDER= 'modelscan/unsafe'
        // Bucket name/folder name, also can be bucket name alone
        EMAIL_RECIPIENTS = '<[email protected]>'
        SECURITY_GROUP_UUID = 'YOUR_SECURITY_GROUP_UUID'
    }

    stages {
        stage('Hello') {
            steps {
                echo 'Hello World'
            }
        }

        stage('Download-Models') {
            agent {
                docker {
                    image '<registry-url>/modelscan/mc'
                    registryUrl "${REGISTRY_URL}"
                    registryCredentialsId 'harbor-credentials'
                    args '--entrypoint=""'
                }
            }
            environment {
                HOME = '.'
            }
            steps {
                withCredentials([usernamePassword(credentialsId: 'minio-credentials', usernameVariable: 'MINIO_ACCESS_KEY', passwordVariable: 'MINIO_SECRET_KEY')]) {
                    sh '''
                      mc alias set minio ${MINIO_HOST} ${MINIO_ACCESS_KEY} ${MINIO_SECRET_KEY}
                      mc mb --ignore-existing minio/modelscan
                      mc cp --recursive minio/${MODELS_FOLDER} models/
                      ls -l models/*
                    '''
                }
            }
        }
        stage('Scan-Models') {
            agent {
                docker {
                    image '<registry-url>/modelscan/model-security'
                    registryUrl "${REGISTRY_URL}"
                    registryCredentialsId 'harbor-credentials'
                }
            }
            steps {
                withCredentials([usernamePassword(credentialsId: 'model-security-credentials', usernameVariable: 'MODEL_SECURITY_CLIENT_ID', passwordVariable: 'MODEL_SECURITY_CLIENT_SECRET')]) {
                    sh """
                    model-security \
                        --base-url https://api.sase.paloaltonetworks.com/aims \
                        scan \
                        --security-group-uuid "${SECURITY_GROUP_UUID}" \
                        --model-path models \
                        --model-uri 's3://10.10.50.16:9000/modelscan/models' \
                        --model-name "production-classifier" \
                        --model-author "ml-team" \
                        --model-version "v2.1" | tee scan_results.log 2>&1
                    """
                    sh '''
                    echo "Scan completed. Results saved to scan_results.log"
                    '''

                    // Obtain Access Token
                    sh '''
                    ACCESS_TOKEN=\$(curl -s -d "grant_type=client_credentials&scope=tsg_id:${TSG_ID}" \
                        -u "${MODEL_SECURITY_CLIENT_ID}:${MODEL_SECURITY_CLIENT_SECRET}" \
                        -H "Content-Type: application/x-www-form-urlencoded" \
                        -X POST https://auth.apps.paloaltonetworks.com/oauth2/access_token | \
                        grep -oP '"access_token":\\s*"\\K[^"]+')

                    echo "Access token obtained"

                    # Extract UUID from scan_results.log
                    SCAN_UUID=$(grep -oP '"uuid":\\s*"\\K[^"]+' scan_results.log | head -1)

                    if [ -n "\$SCAN_UUID" ] && [ -n "\$ACCESS_TOKEN" ]; then
                        echo "Fetching violations for scan UUID: \$SCAN_UUID"
                        curl -s -X GET "https://api.sase.paloaltonetworks.com/aims/data/v1/scans/\${SCAN_UUID}/rule-violations?skip=0&limit=100" \
                        -H "Authorization: Bearer \$ACCESS_TOKEN" \
                        -H "Content-Type: application/json" | jq '.' > scan_violations.json
                        echo "Violations saved to scan_violations.json"
                    else
                        echo "Could not retrieve scan UUID or access token" > scan_violations.json
                    fi
                    '''
                }
            }
        }
    }

    post {
        always {
            node('') {
                script {
                    if (fileExists('scan_results.log')) {
                        def log = readFile('scan_results.log')
                        // Parse the JSON content from the log
                        def evalOutcome = sh(
                          script: """
                               grep -oP '"eval_outcome":\\s*"\\K[^"]+' scan_results.log || echo "Unknown Status"
                           """,
                        returnStdout: true
                    ).trim()
                        emailext (
                            subject: "Model Security Scan - Build #${env.BUILD_NUMBER} - ${evalOutcome ?: 'Unknown Status'}",
                            to: "${EMAIL_RECIPIENTS}",
                            attachmentsPattern: 'scan_results.log,scan_violations.json',
                            mimeType: 'text/html',
                            body: """
                                <h3>Build Info</h3>
                                <ul>
                                    <li>Status: <strong>${evalOutcome ?: 'Unknown Status'}</strong></li>
                                    <li>Build Number: ${env.BUILD_NUMBER}</li>
                                    <li>Build URL: <a href="${env.BUILD_URL}">${env.BUILD_URL}</a></li>
                                </ul>
                                <h3>Scan result</h3>
                                <pre>${log.take(5000)}</pre>
                                <p><em>Please see the attachments for complete logs.</em></p>
                            """
                        )
                    }
                }
            }
        }
        cleanup {
            node('') {
                sh 'rm -rf models scan_results.log scan_violations.json || true'
            }
        }
    }
}
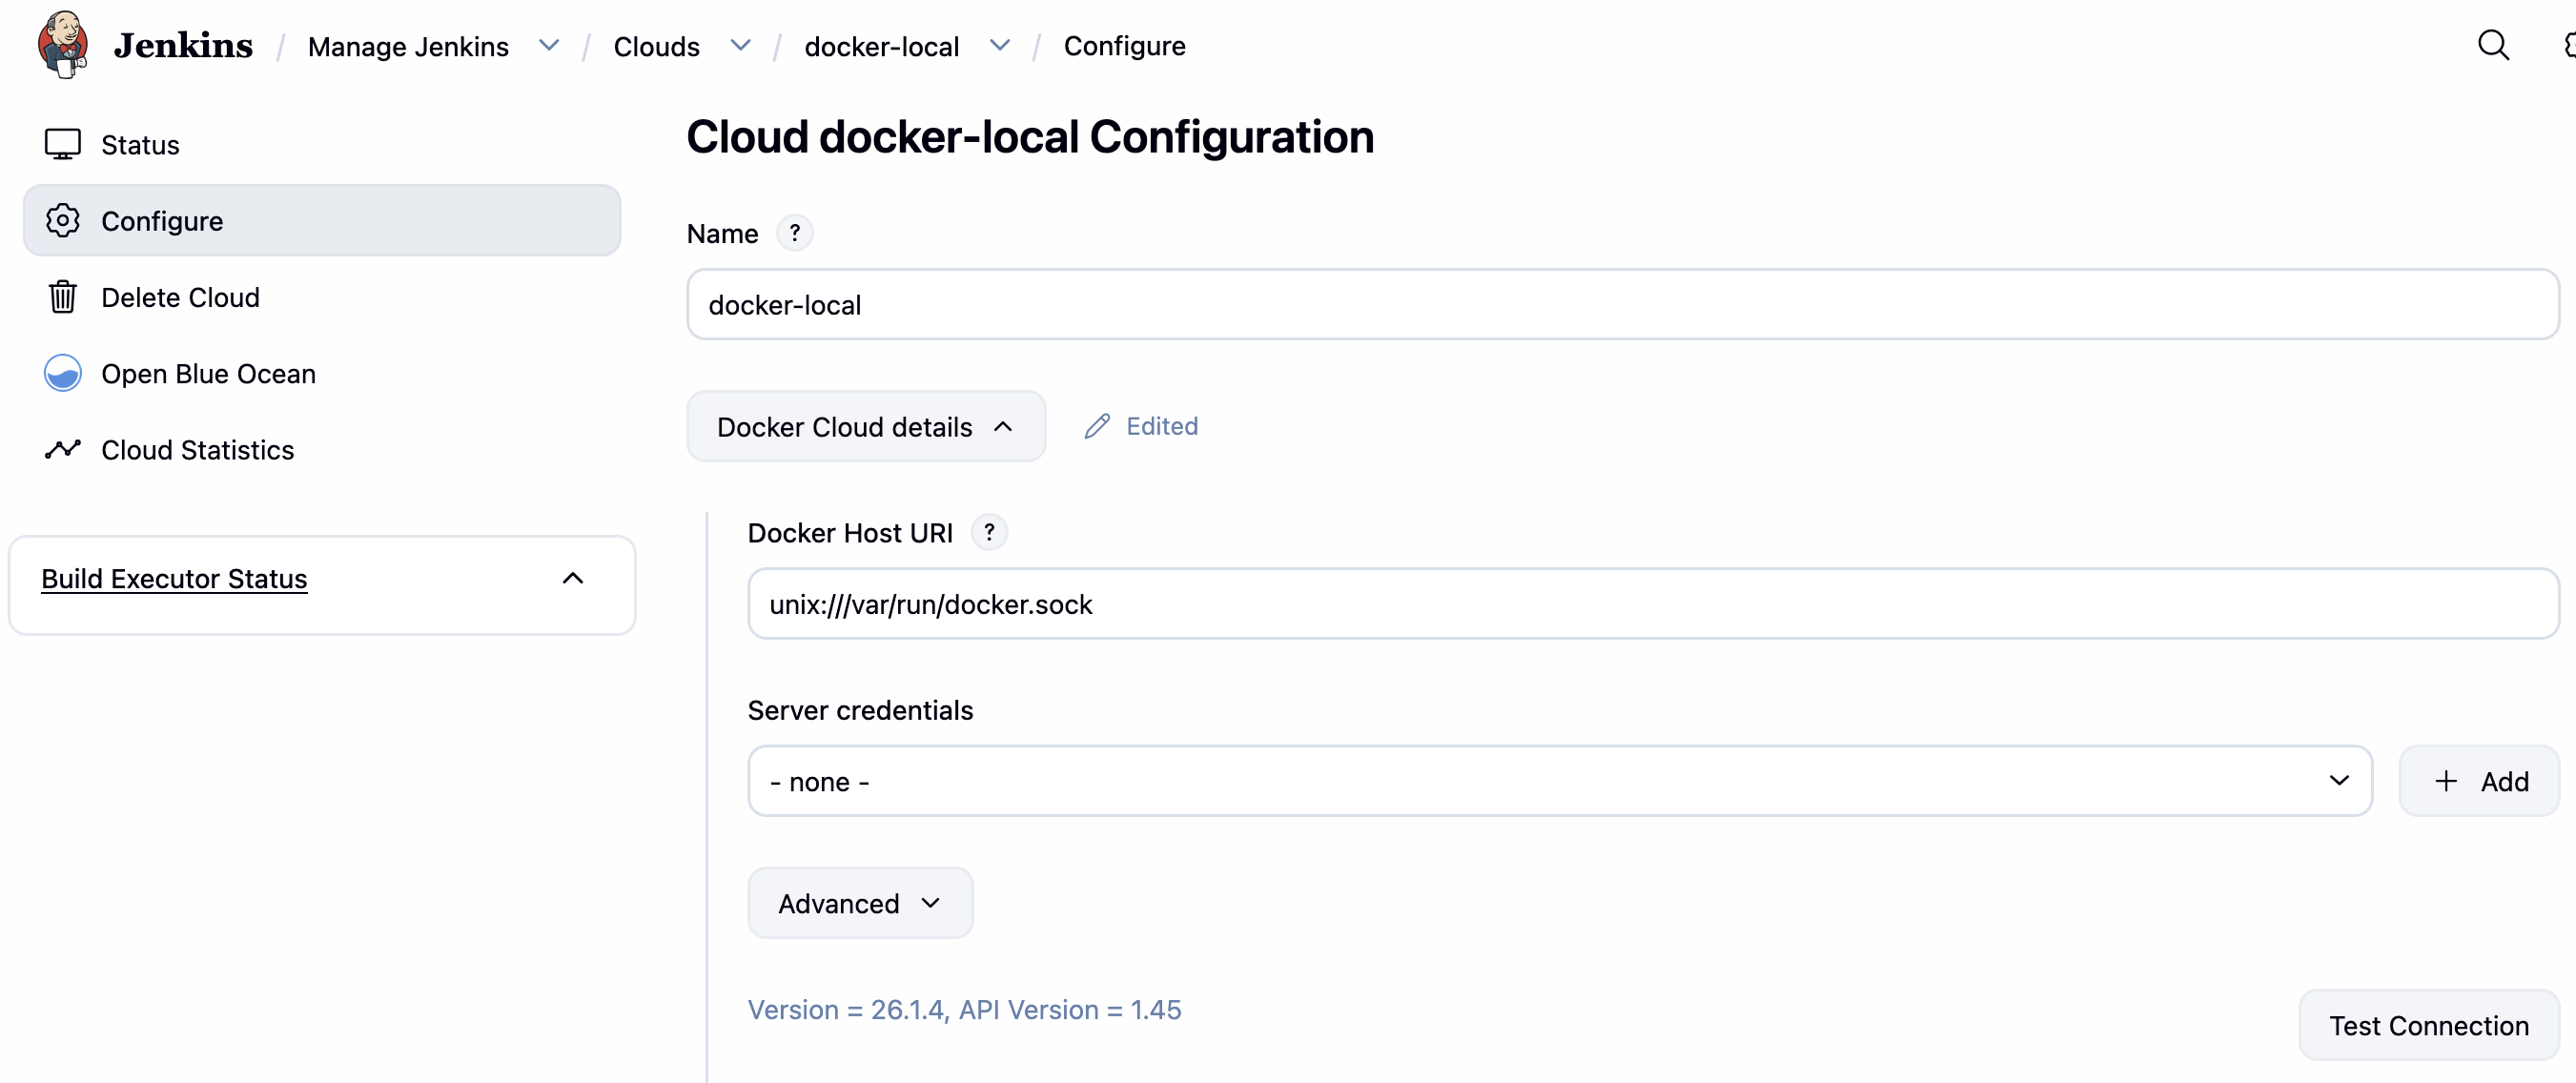
将 Jenkins 宿主机添加为 docker 主机(测试有问题)
前面使用 dind 进行 Agent 运行节点,也可以把 Jenkins 宿主机加为额外的节点,来做 CD 相关工作。
# 修改 docker-compose.yaml 配置,添加 /var/run/docker.sock 映射
  jenkins-blueocean:
    image: dyadin/jenkins-blueocean:jdk21
    container_name: jenkins-blueocean
    restart: on-failure
    networks:
      - jenkins
    environment:
      DOCKER_HOST: tcp://docker:2376
      DOCKER_CERT_PATH: /certs/client
      DOCKER_TLS_VERIFY: 1
    ports:
      - "8081:8080"
      - "50000:50000"
    volumes:
      - jenkins-data:/var/jenkins_home
      - jenkins-docker-certs:/certs/client:ro
      - /var/run/docker.sock:/var/run/docker.sock

# 宿主机上添加权限
sudo chmod o+w /var/run/docker.sock
修改完成后在 Cloud 位置添加 Docker:
ssh 对接
# 创建对接秘钥
ssh-keygen -t rsa -b 4096 -C "jenkins-deploy-key"
创建完后把公钥放在被访问服务器的 ~/.ssh/authorized_keys 中
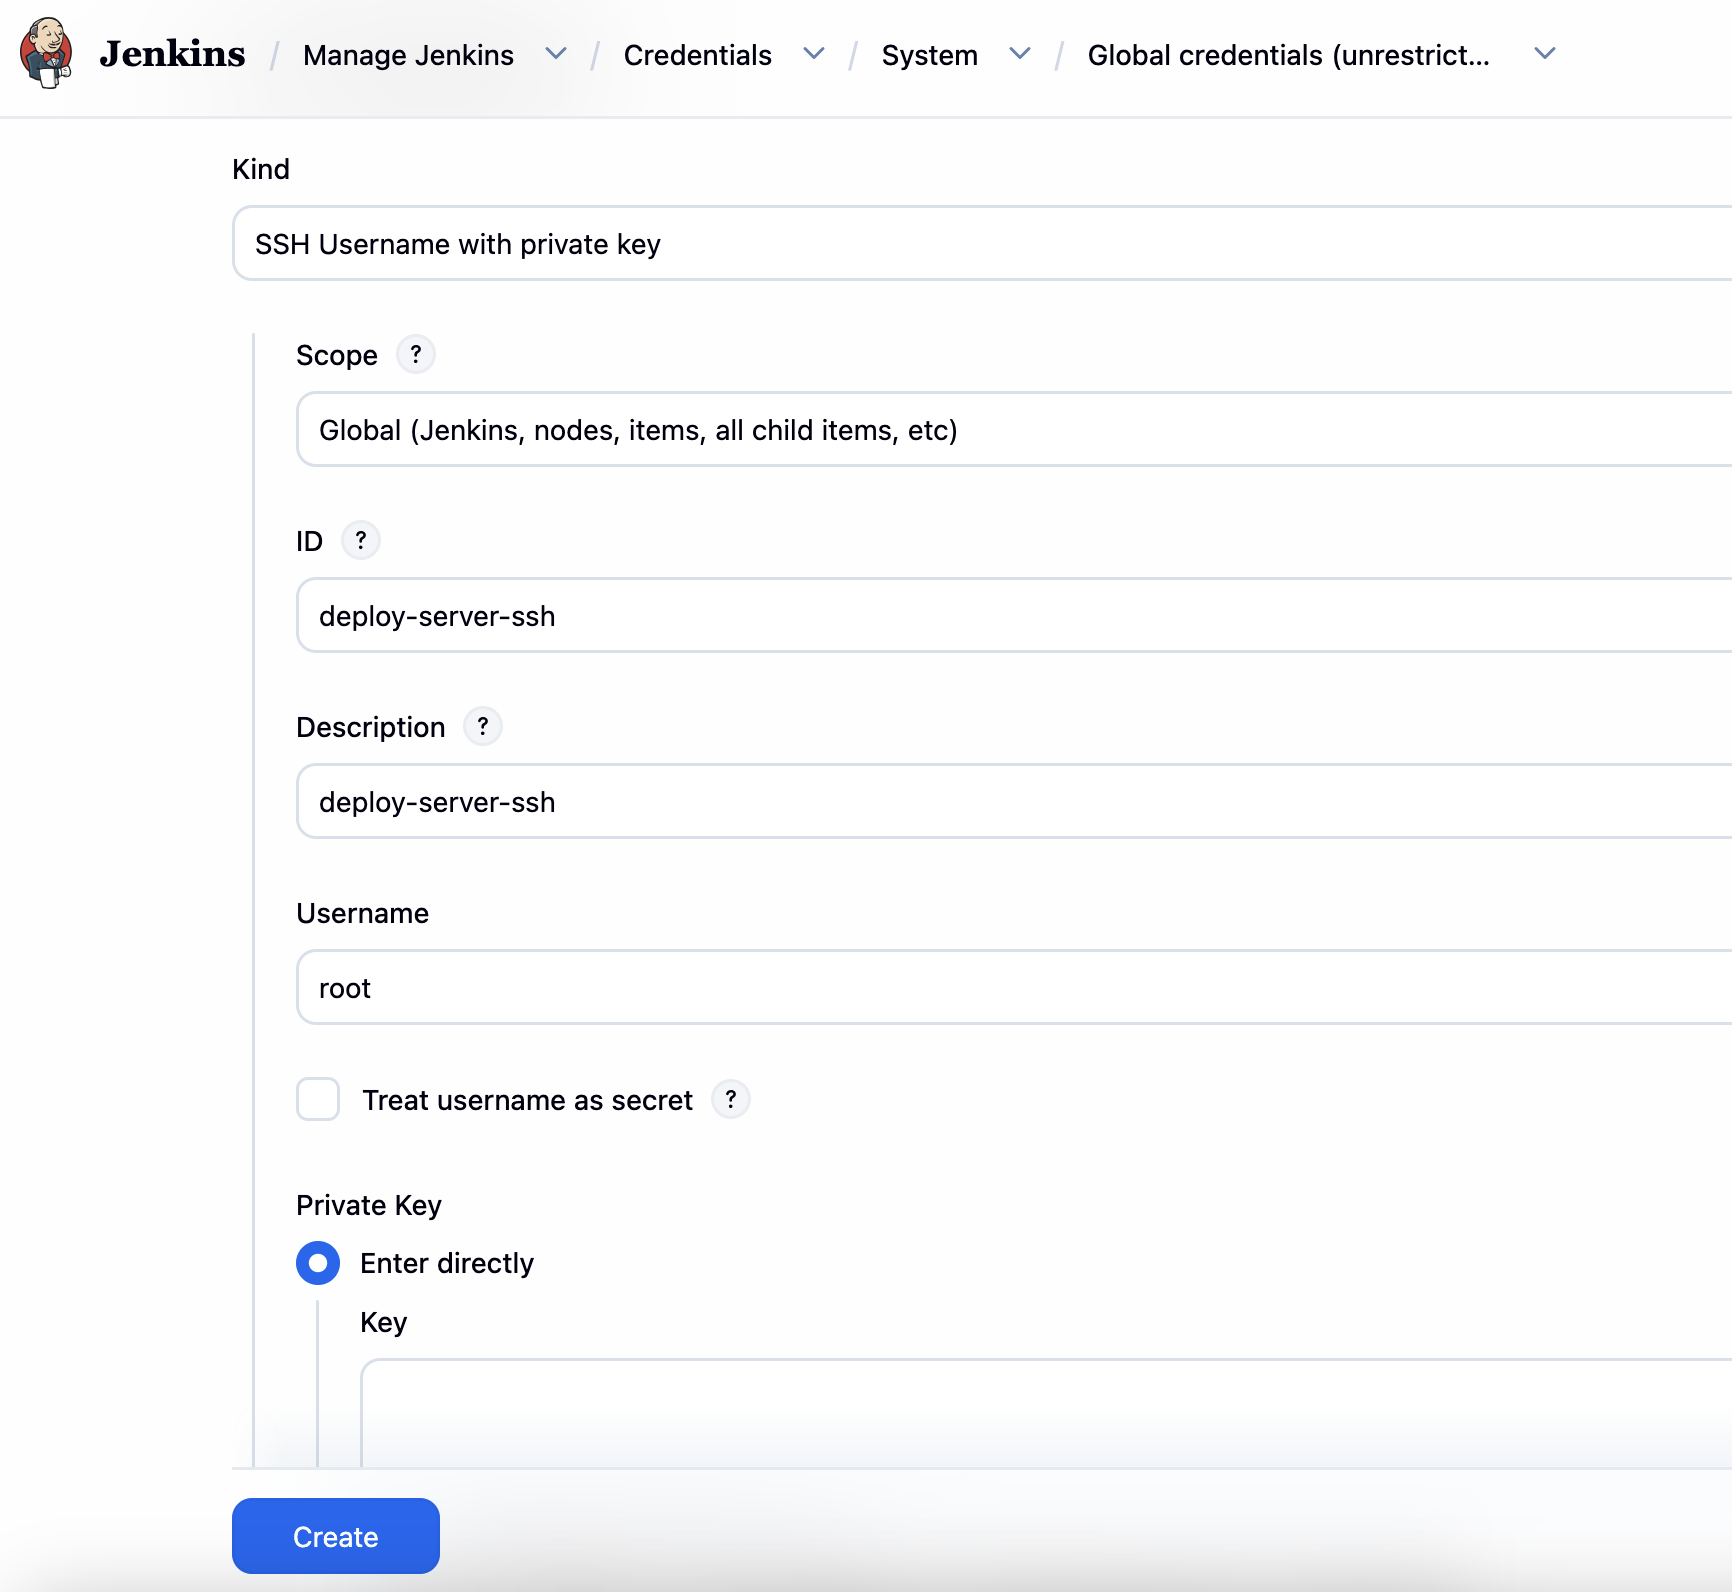
把私钥放在 Jenkins Credentials 中。
Prisma Cloud Compute 对接
参考文章:https://docs.prismacloud.io/en/compute-edition/31/admin-guide/continuous-integration/jenkins-plugin
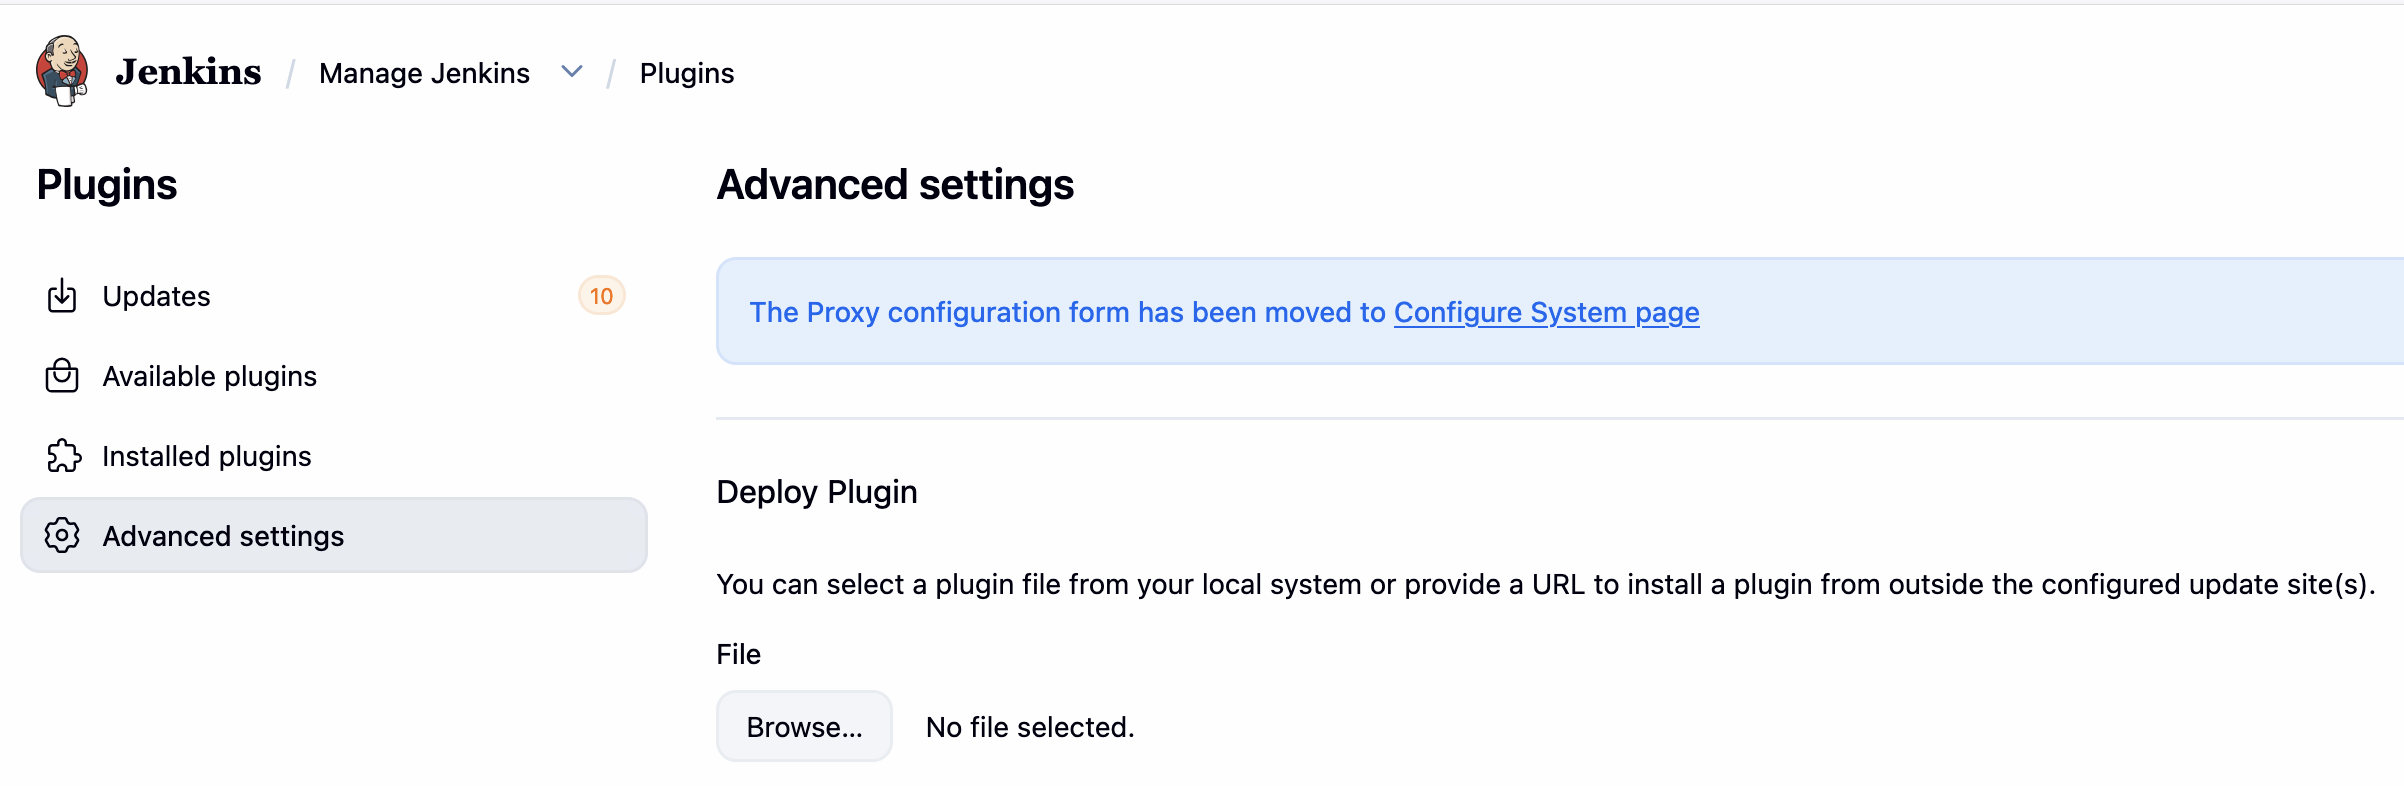
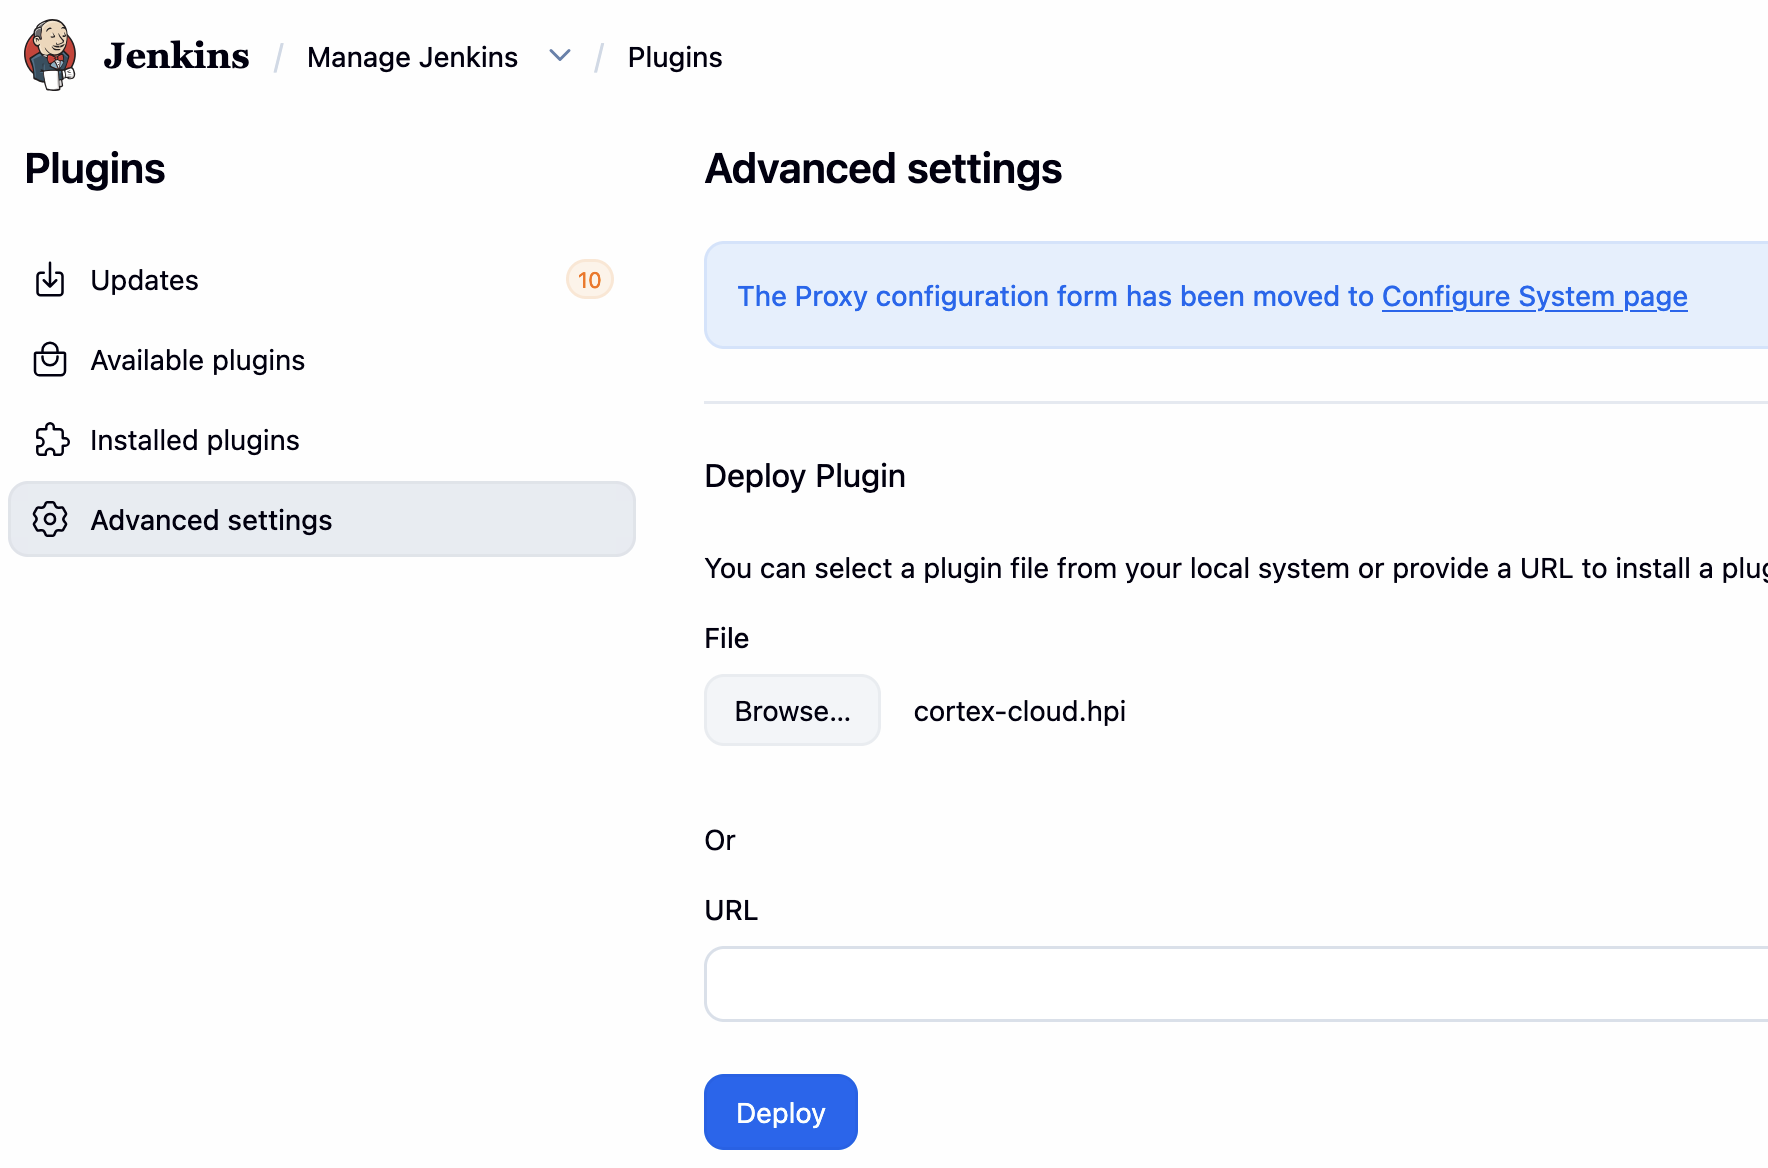
下载 Jenkins 对接插件:
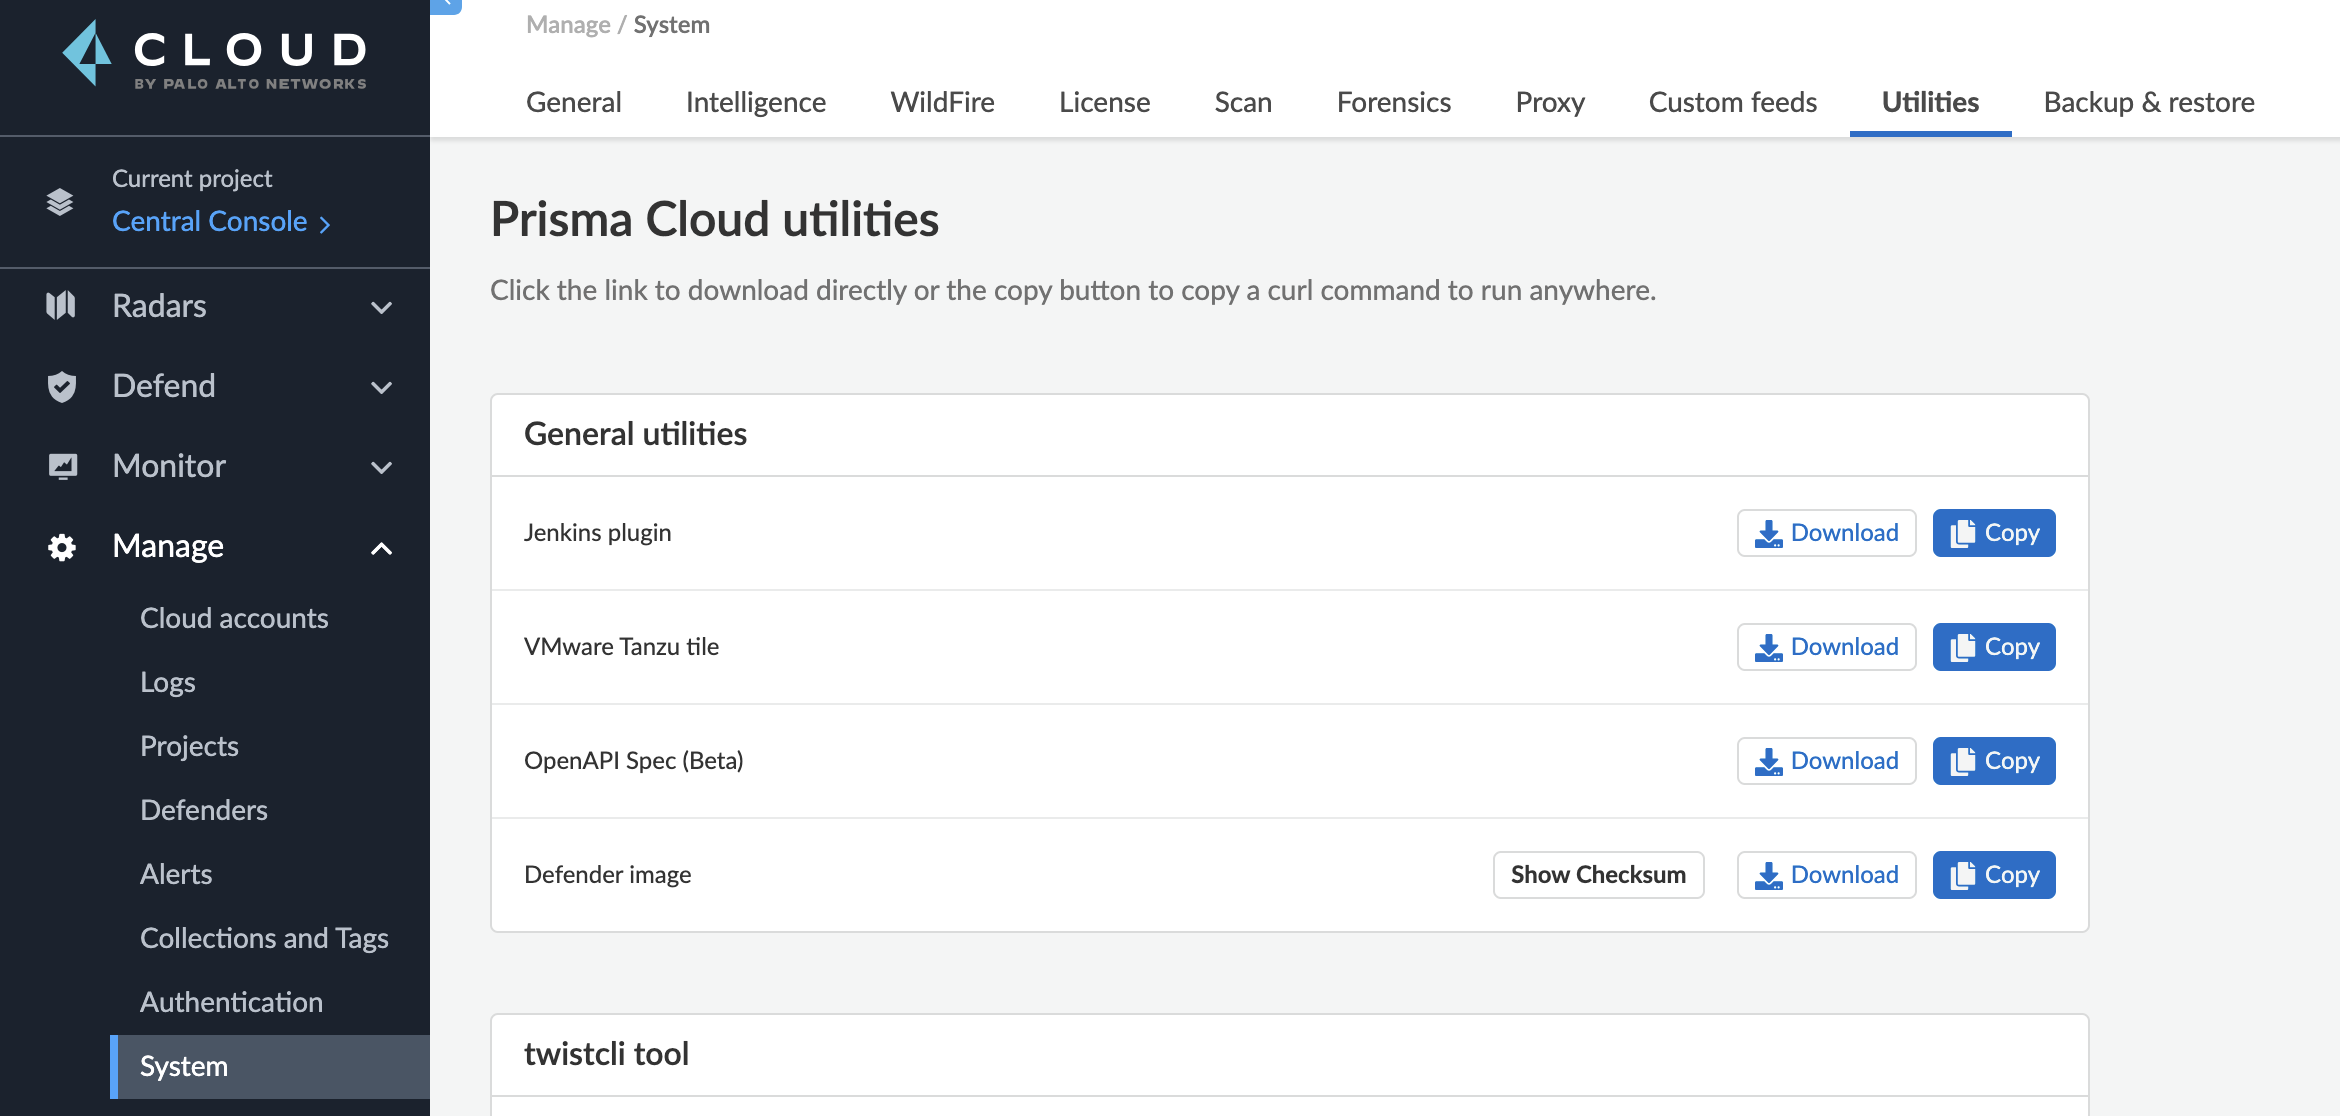
将 .hpi 文件拷贝到 Jenkins 安装目录的 plugins 下( /var/jenkins_home/plugins) (也可以在 Jenkins>Plugins>Advanced Settings 中上传安装):
docker cp prisma-cloud-jenkins-plugin.hpi ade683e10c20:/var/jenkins_home/plugins

# Successfully copied 69.2MB to ade683e10c20:/var/jenkins_home/plugins

docker compose down
docker compose up -d
安装完毕后检查:

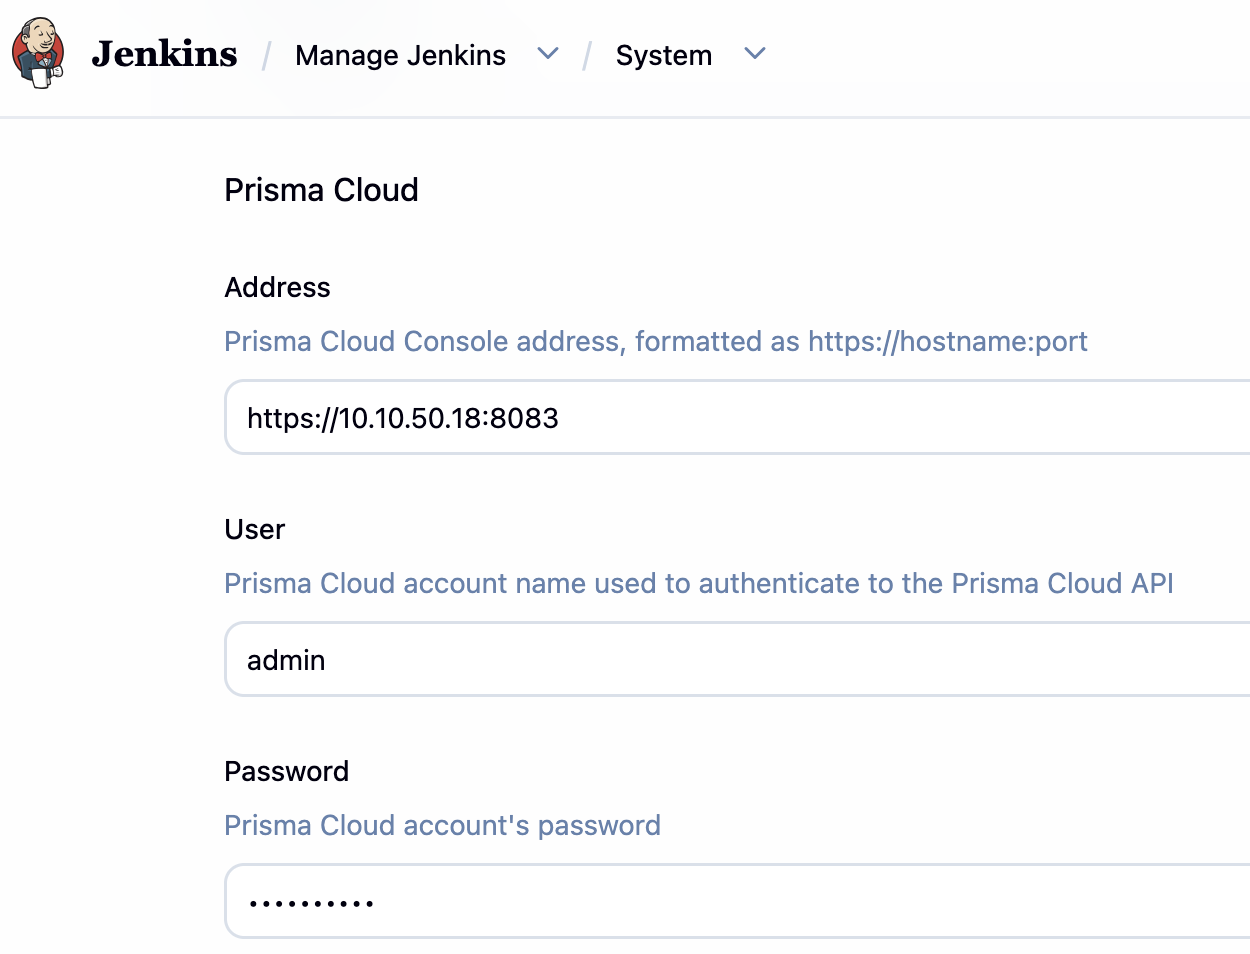
在 Jenkins 中添加 Prisma Cloud 凭证:
Jenkins 文件
核心步骤:
- Scan:扫描并记录结果,即使过程失败了也运行后续的步骤
- 其中 ca、cert、key 来自 docker in docker 的配置(参见部署 Jenkins 时的 Volume)
- 因为本实验环境中通过 docker in docker 来运行 Jenkins 任务,所以 dockerAddress 需要用远程的 URL(docker 为短域名,2376 为默认的端口)
- image 表示要扫描的镜像,此处为了方便测试先在 list-files 步骤拉取了一个镜像,然后在 scan 环节扫描镜像
- twistlockPublish:将检测到的结果发布在 Jenkins 的 UI 中
pipeline {
    agent none
    environment {
        REGISTRY_URL = 'https://harbor.halfcoffee.com'
    }

    stages {
        stage('List-files') {
            agent {
                docker {
                    image 'harbor.halfcoffee.com/modelscan/alpine'
                    reuseNode true
                }
            }
            steps {
                sh 'ls -l'
            }
        }
        stage('Scan') {
            agent any
            steps {
            catchError(buildResult: 'FAILURE', stageResult: 'FAILURE'){
                // Scan the image
                prismaCloudScanImage ca: '/certs/client/ca.pem',
                cert: '/certs/client/cert.pem',
                dockerAddress: 'https://docker:2376',
                image: 'harbor.halfcoffee.com/modelscan/alpine*',
                key: '/certs/client/key.pem',
                logLevel: 'debug',
                podmanPath: '',
                // The project field below is only applicable if you are using Prisma Cloud Compute Edition and have set up projects (multiple consoles) on Prisma Cloud.
                project: '',
                resultsFile: 'prisma-cloud-scan-results.json',
                ignoreImageBuildTime:true
            }
            }
        }
            stage('cat-result') {
            agent {
                docker {
                    image 'harbor.halfcoffee.com/modelscan/alpine'
                    reuseNode true
                }
            }
            steps {
                sh 'cat prisma-cloud-scan-results.json'
            }
        }
    stage('twistlockPublish') {
        agent any
        steps {prismaCloudPublish resultsFilePattern: 'prisma-cloud-scan-results.json'}
    }
    }

    post {
        cleanup {
            node('') {
                sh 'rm -rf *.json || true'
            }
        }
    }
}
运行结果
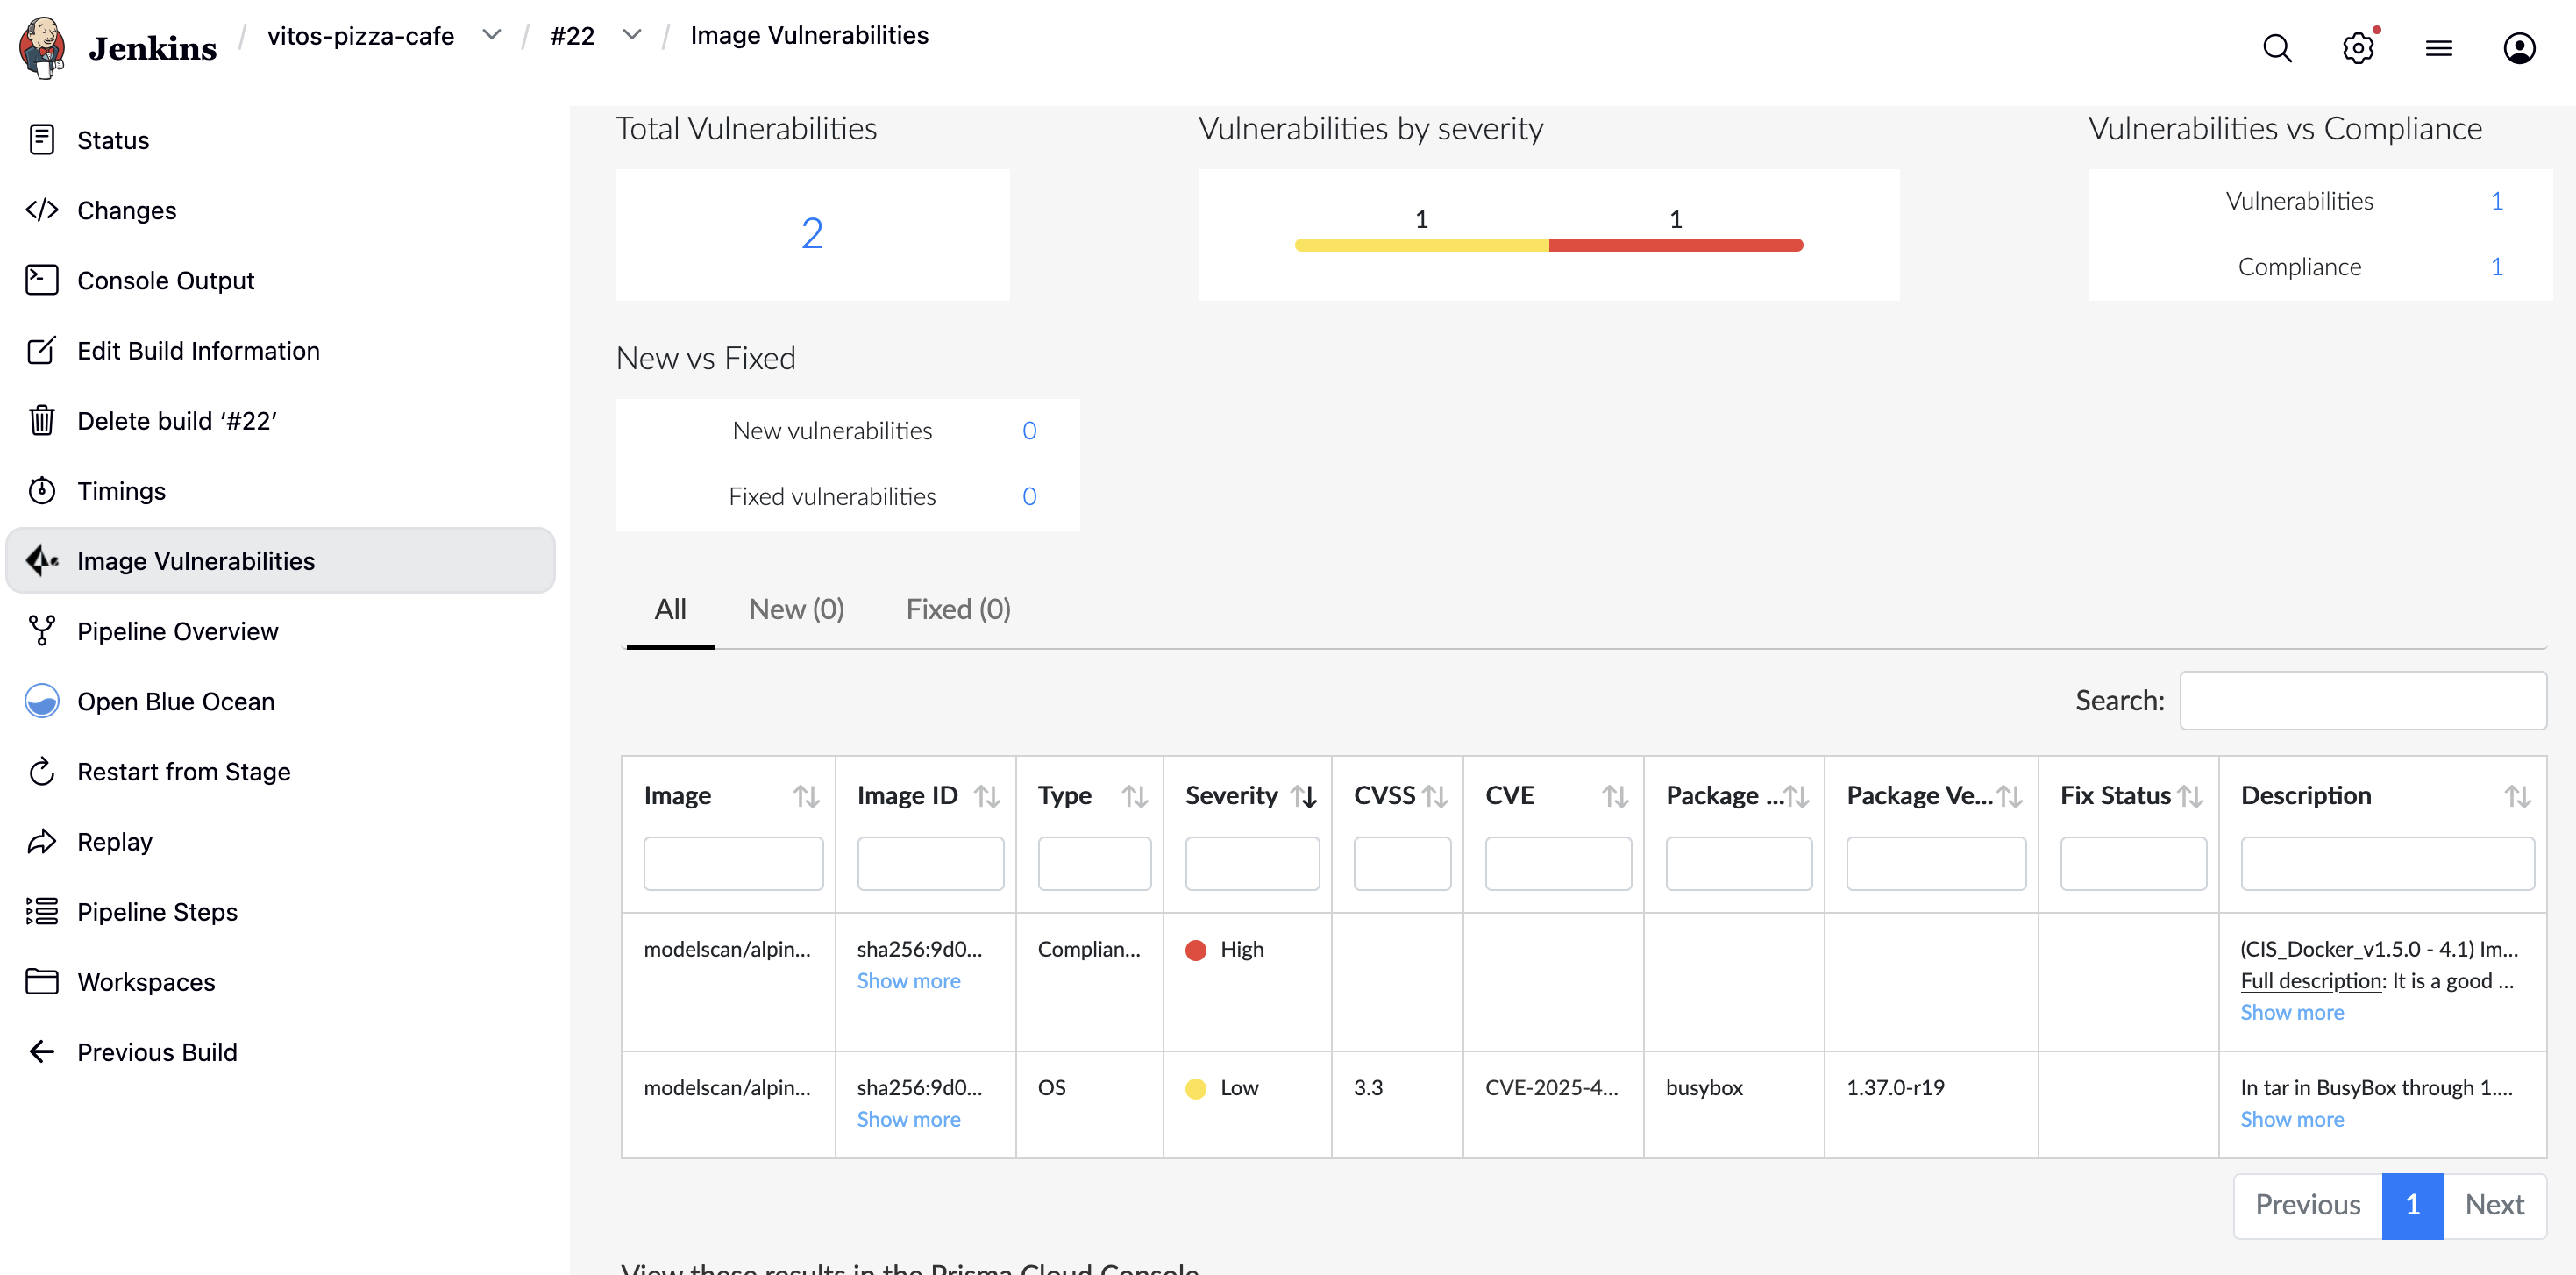
策略配置:
- 合规策略:在初次扫描时发现结果是 PASS 的,但是详细结果中有一条违反了 CIS non-root 规则。其原因是默认规则仅针对这些检测做 Alert,将其改为 Fail 后再次检查结果就会变为 FAILED(相当于流水线里进行了加固)

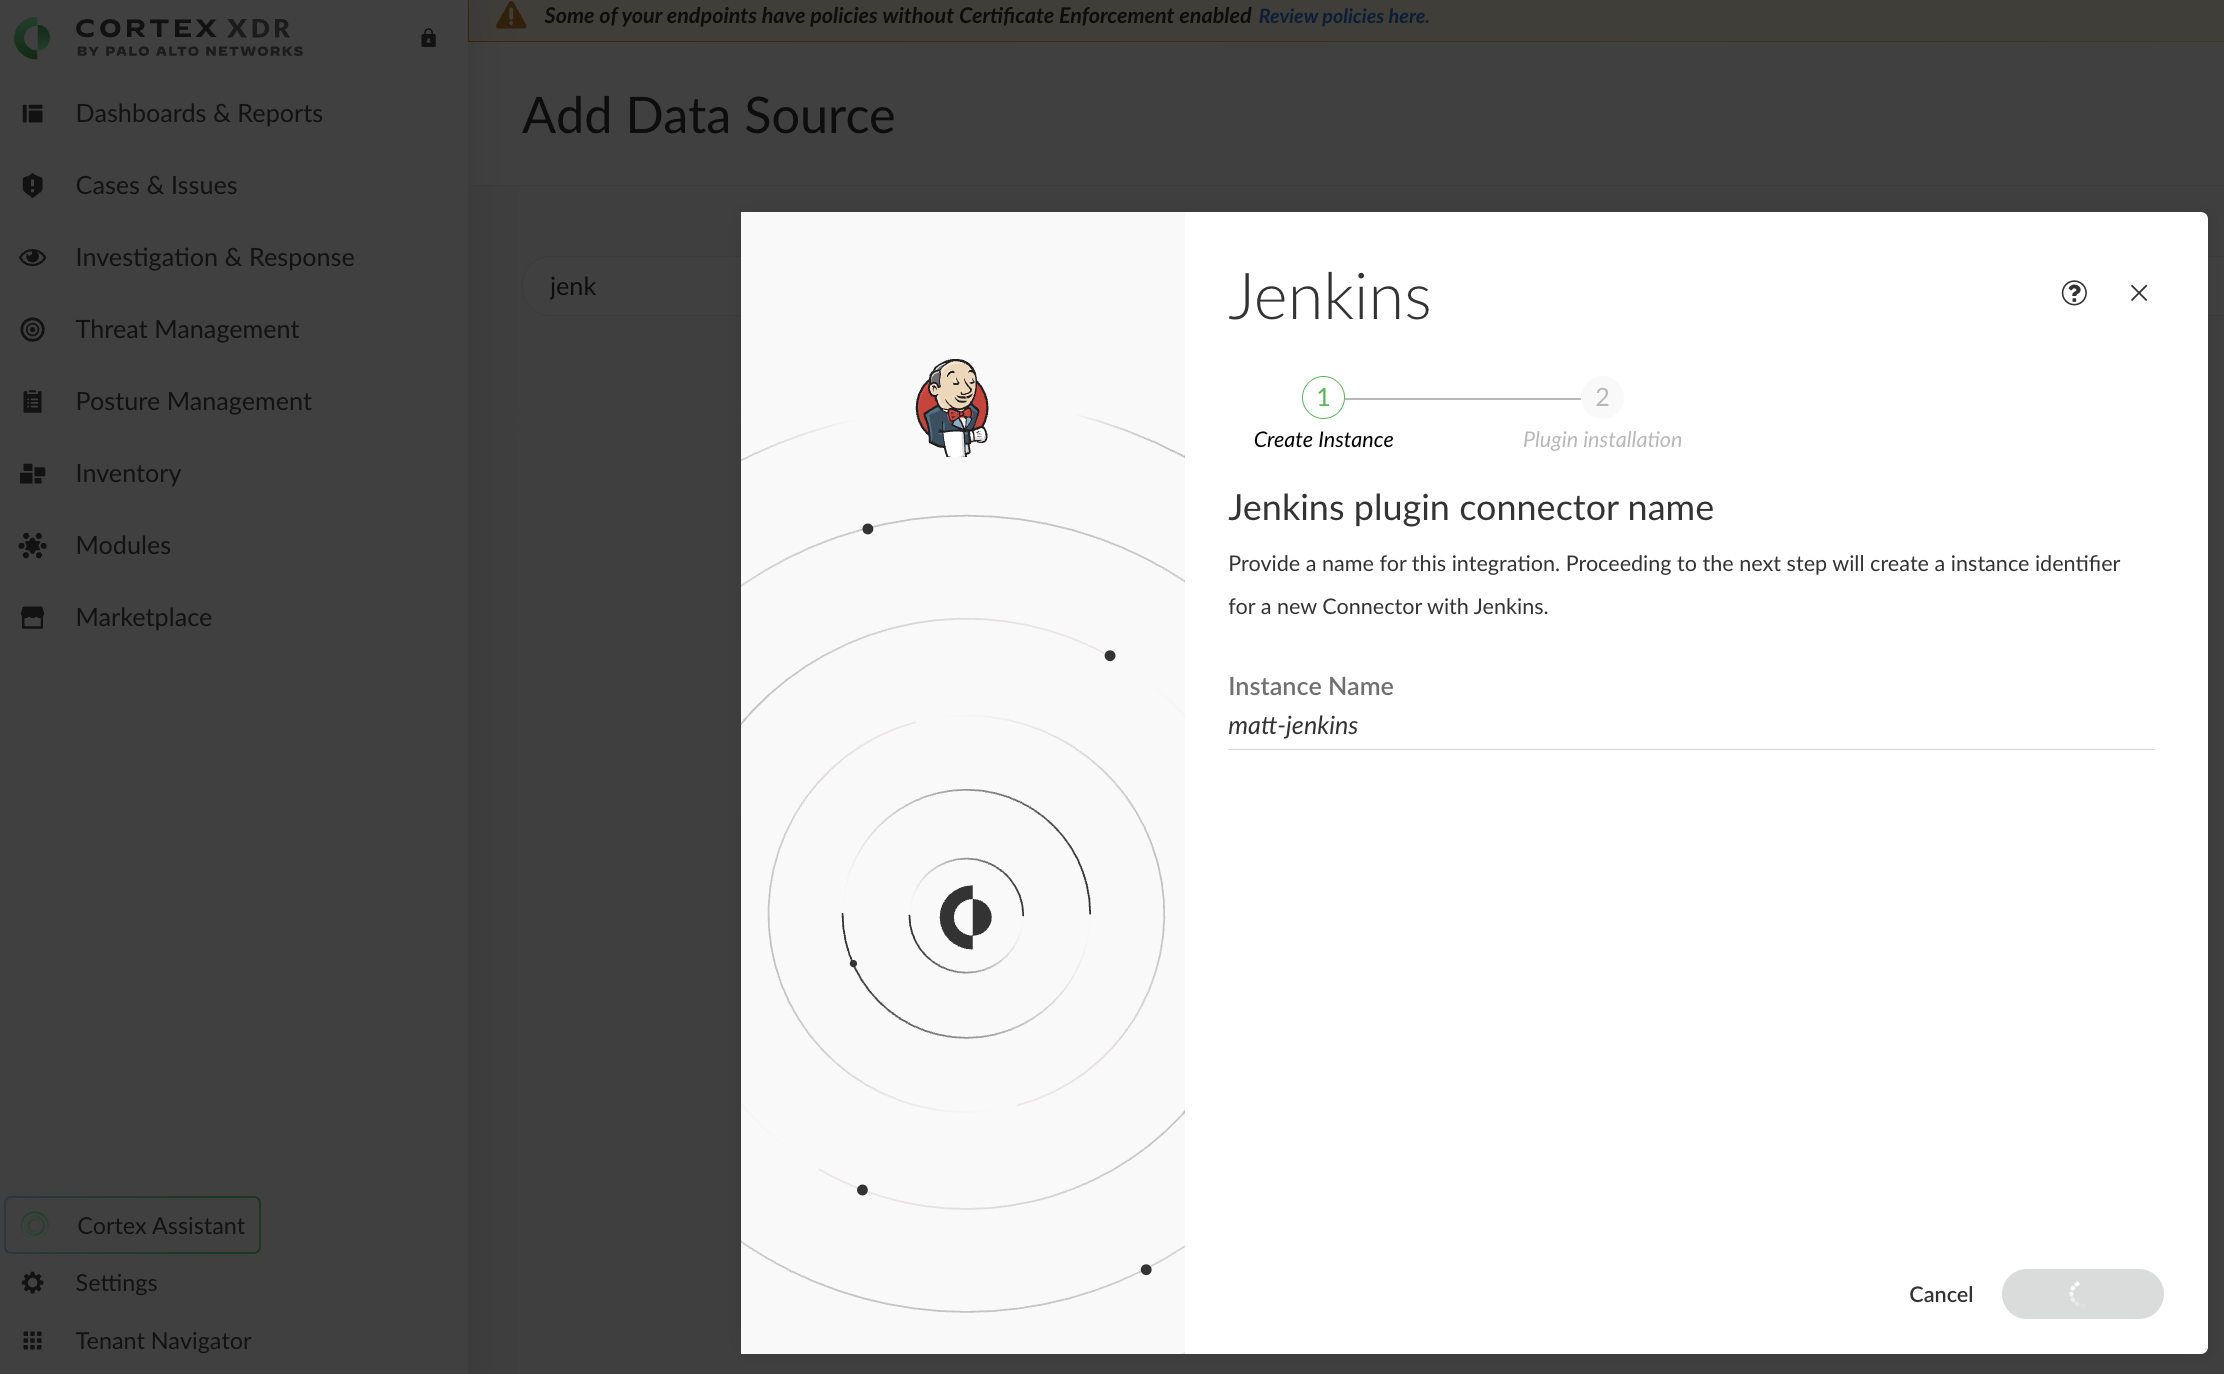
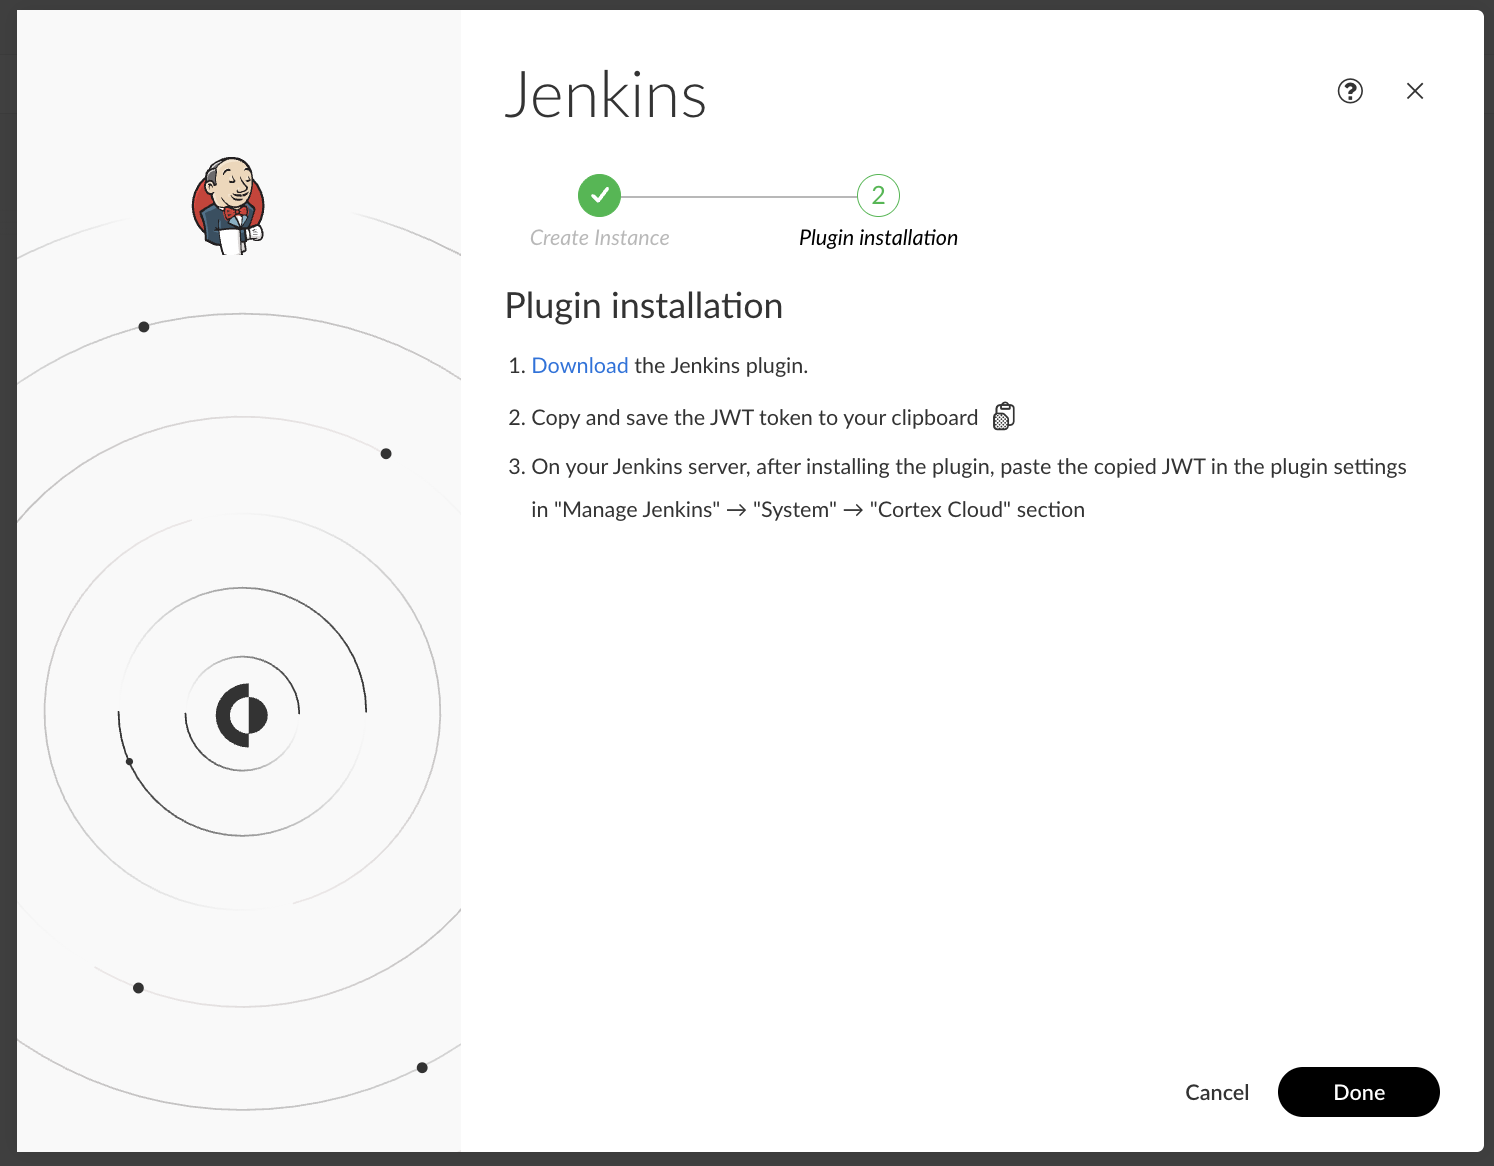
Cortex 对接
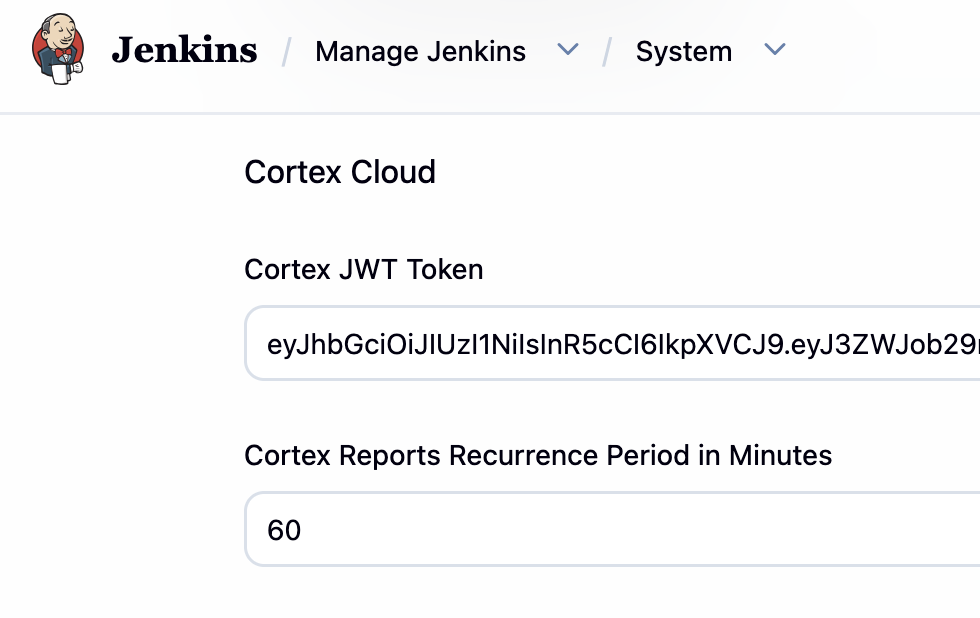
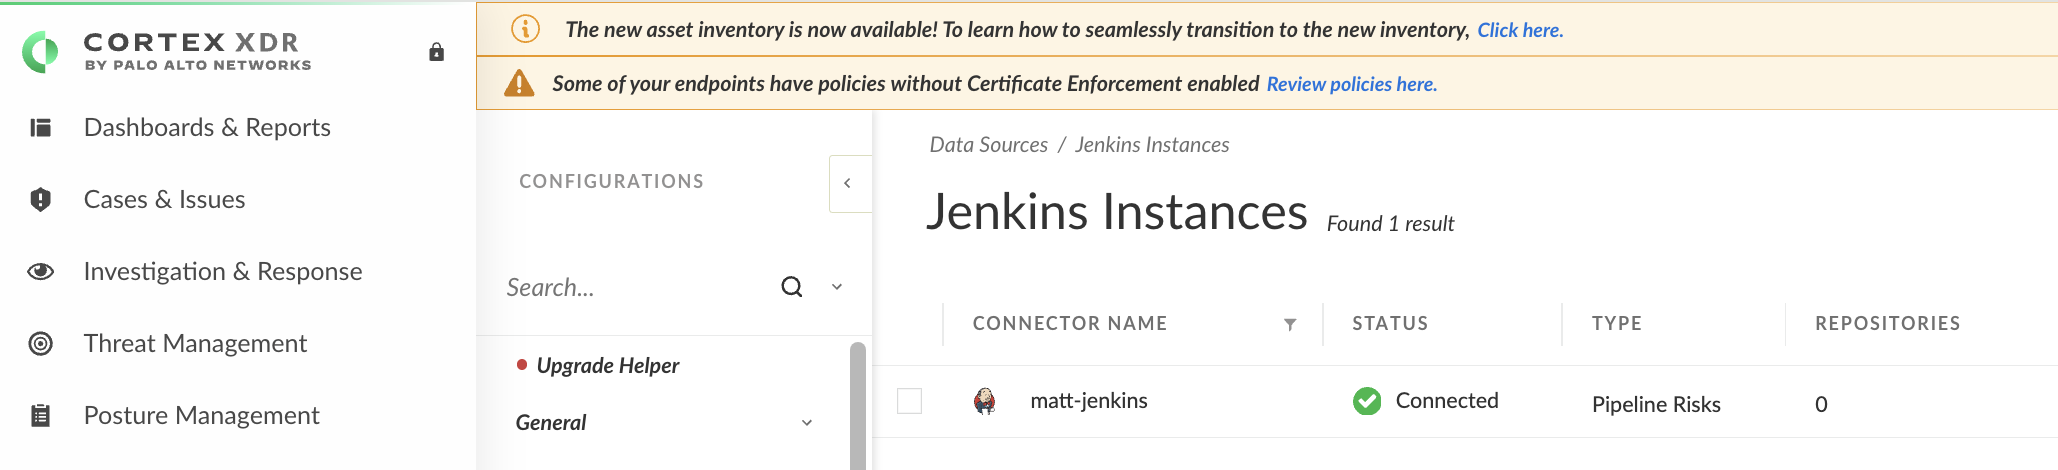
该插件用于收集 Jenkins 的配置和运行信息,将其发送给 Cortex Cloud 进行检查(类似于 CSPM)。
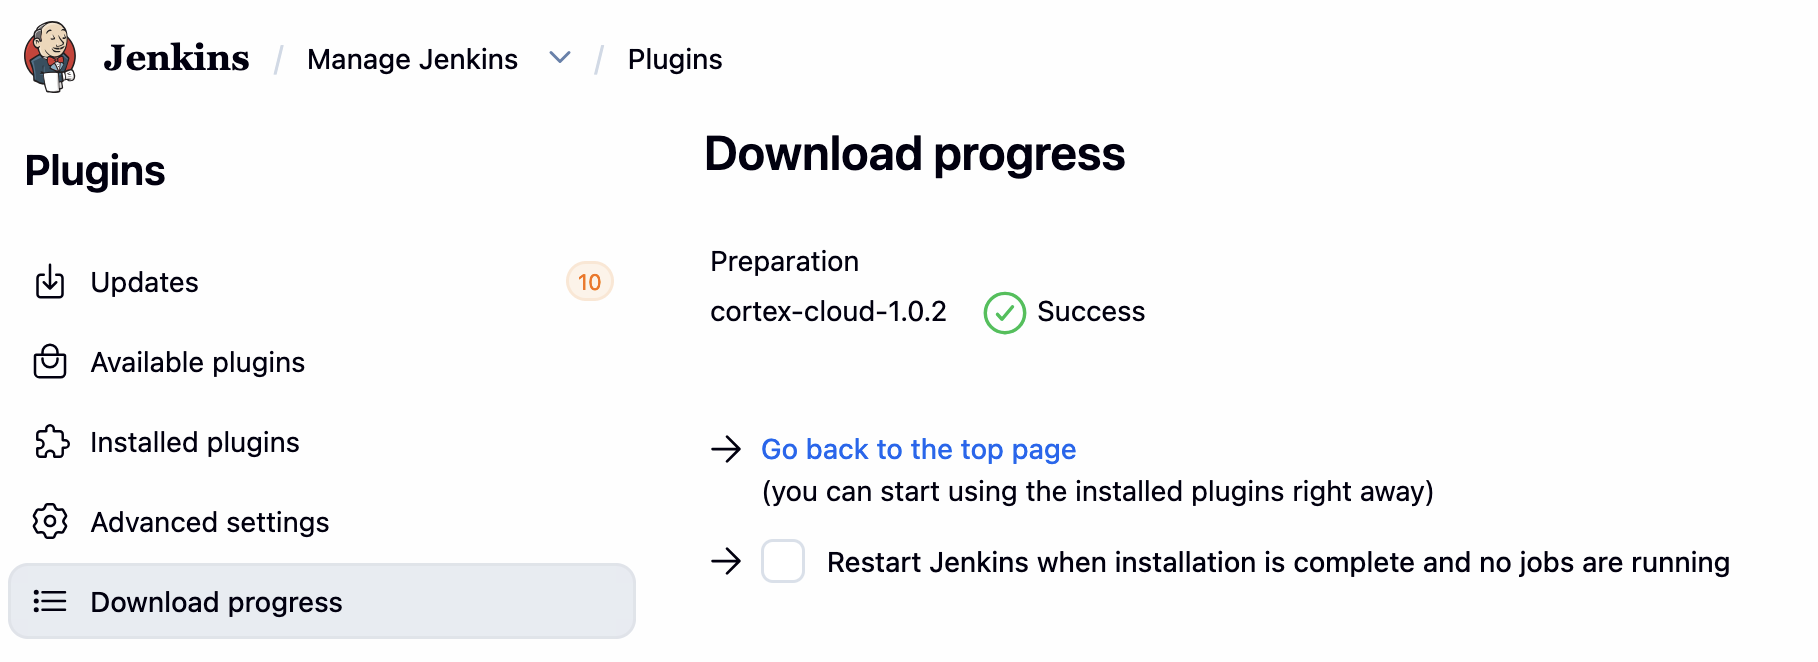
添加数据源,设置 Jenkins,然后下载对接插件:
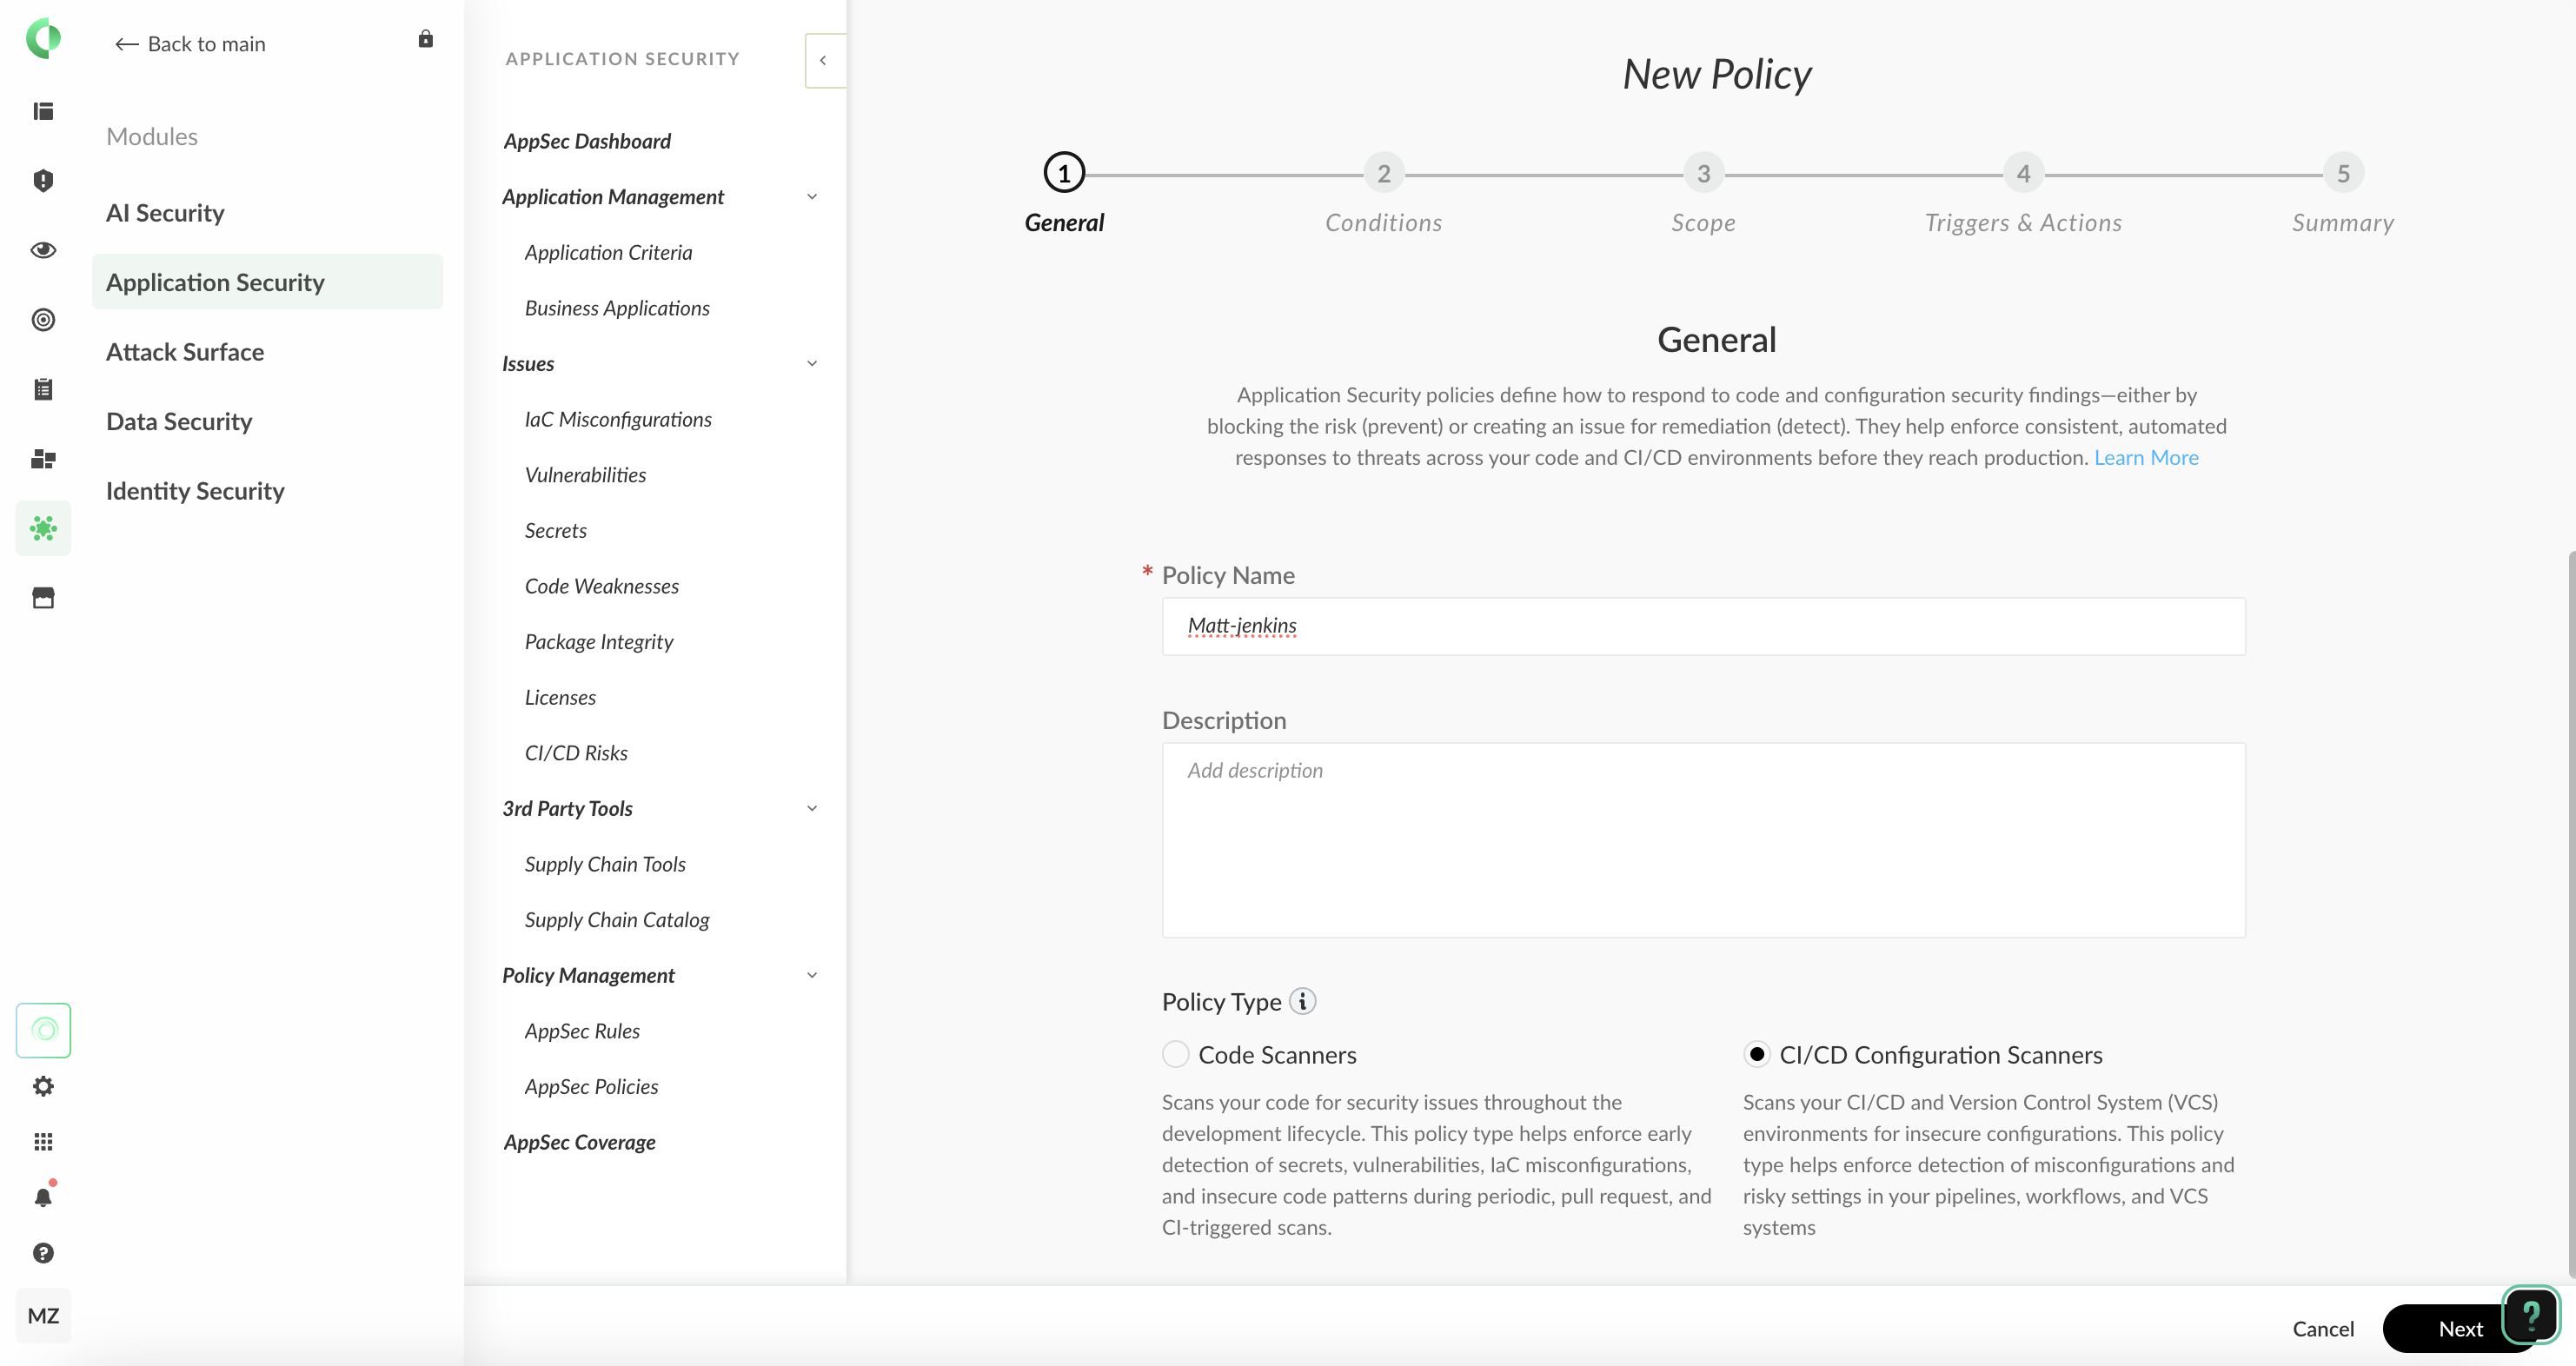
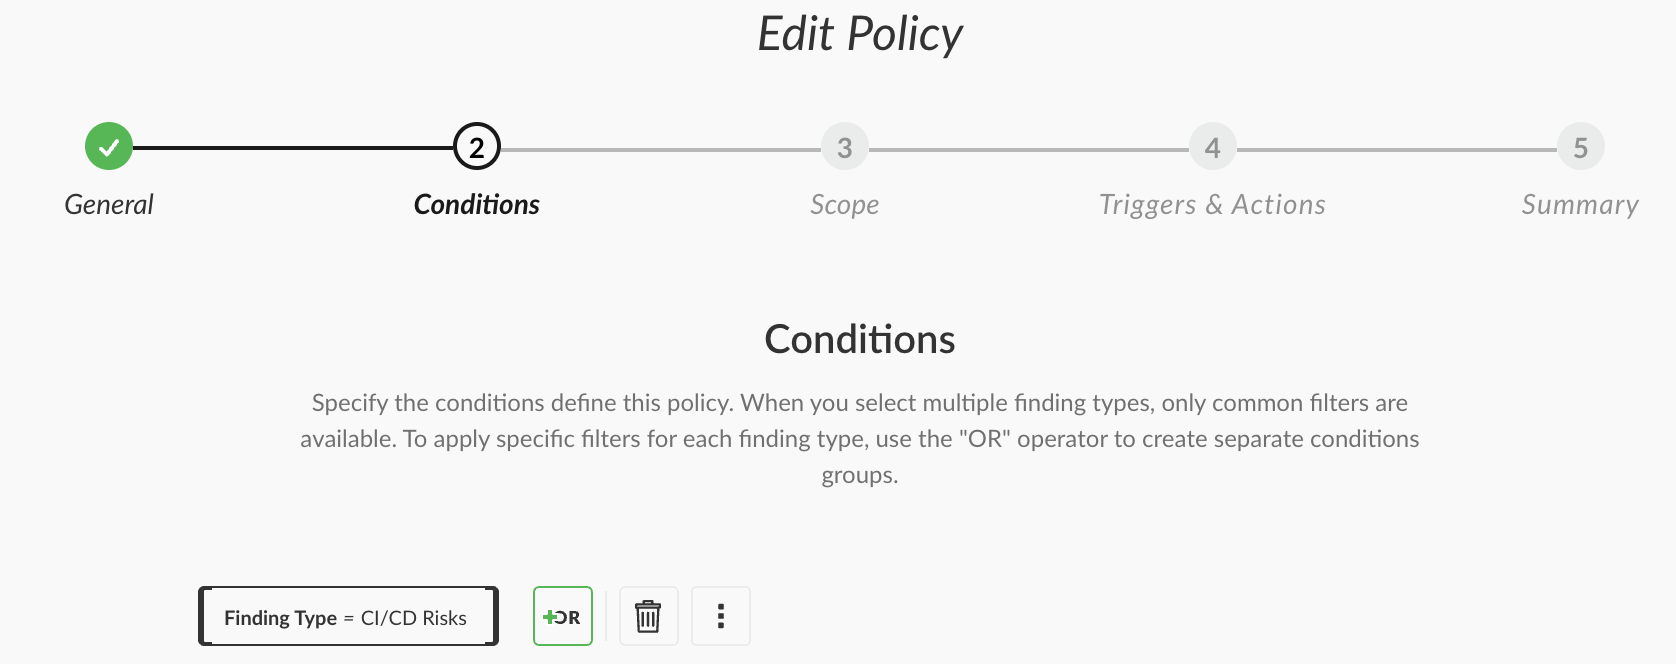
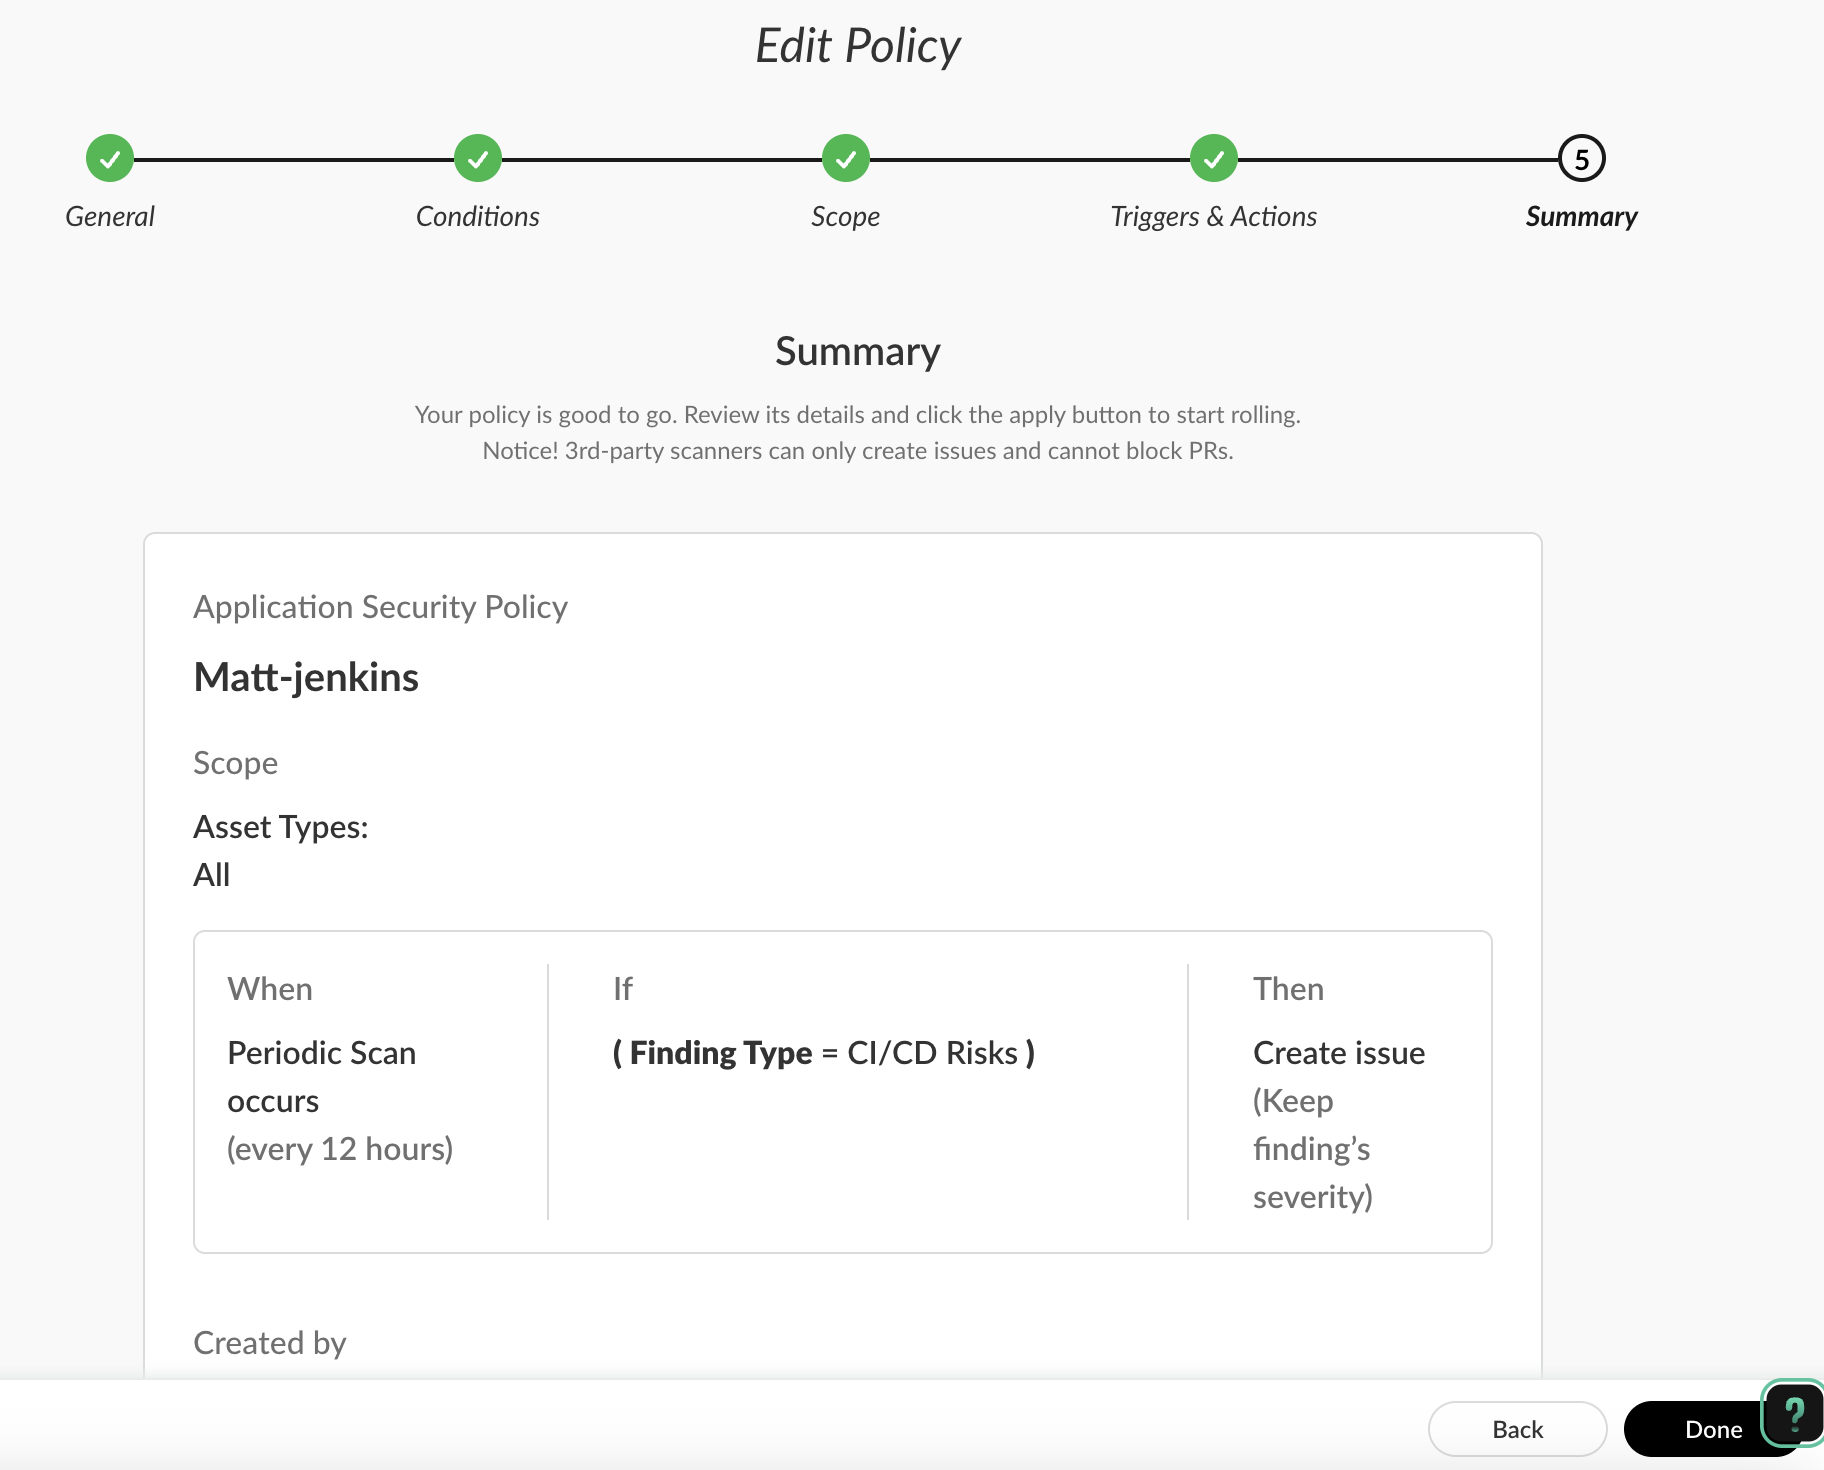
在 Modules>Application Security>Policy Management>AppSec Policies中添加 Jenkins 的检测策略:
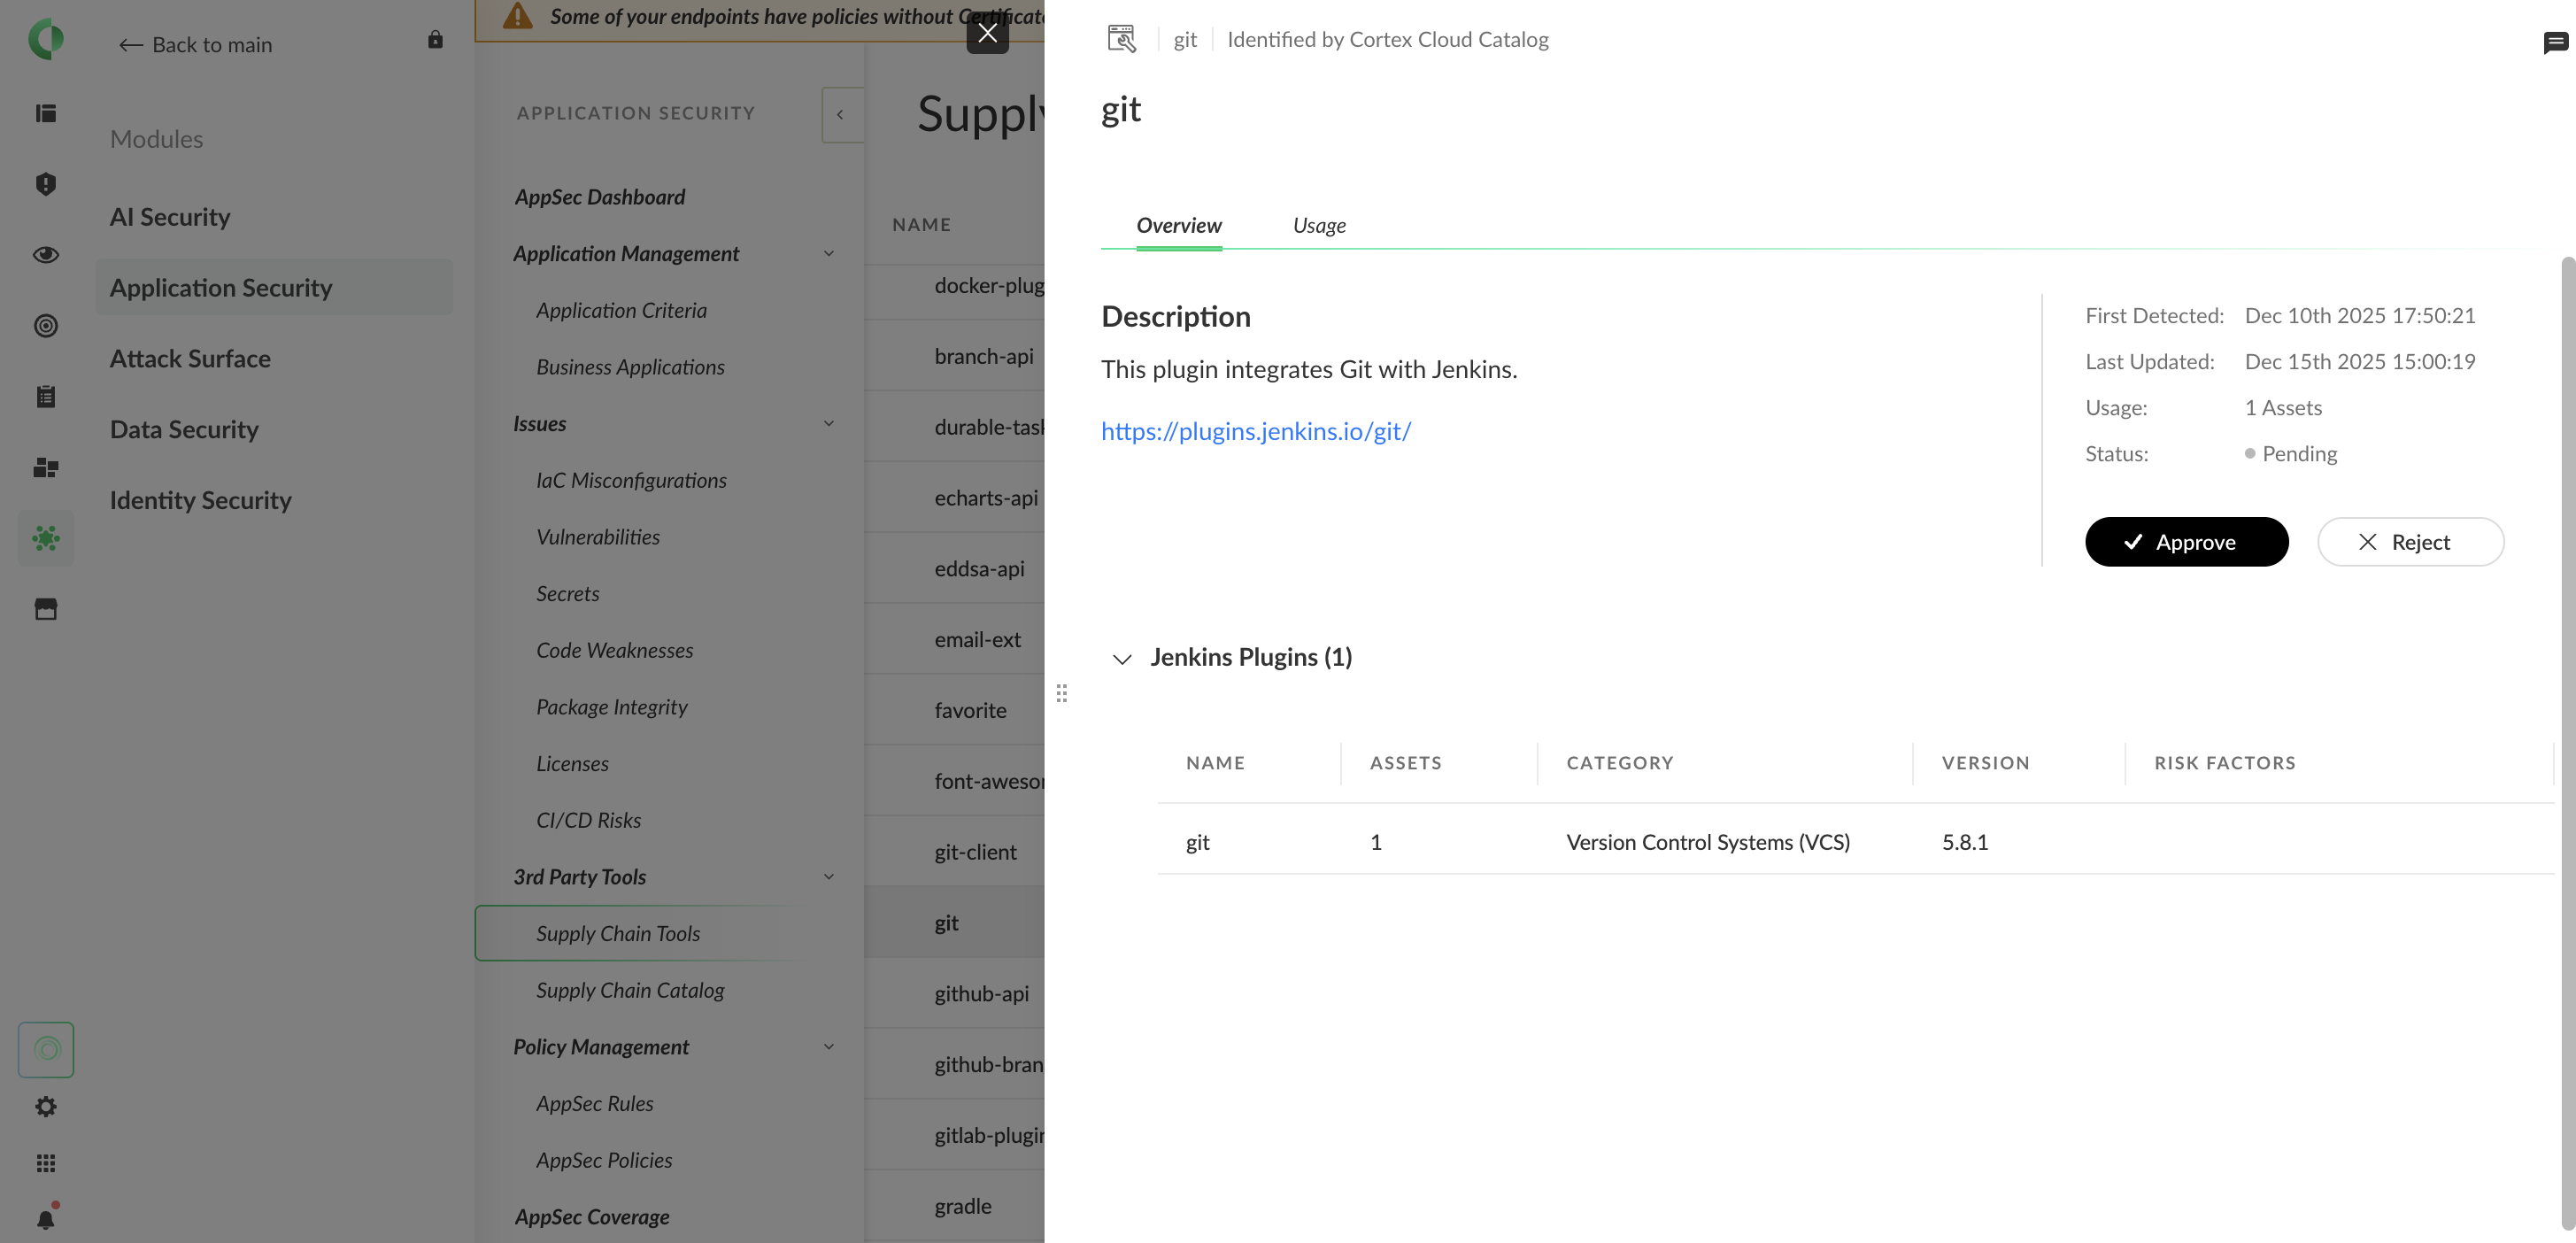
供应链工具清单
对接完成后,在下列菜单中可以看到完整的供应链清单:
Cortexcli 容器
FROM ubuntu:24.04
RUN apt-get update; apt-get install -y libhyperscan-dev ca-certificates  && \
    apt-get autoremove -y && \
    apt-get clean && \
    rm -rf /var/lib/apt/lists/* /root/.cache &&\
    useradd -m -u 1005 -s /sbin/nologin cortex
WORKDIR /app
COPY --chmod=0755 cortexcli /app
USER cortex
ENV PATH="/app:${PATH}"
CMD ["cortexcli"]
Gitlab 安装
Gitlab 初始化
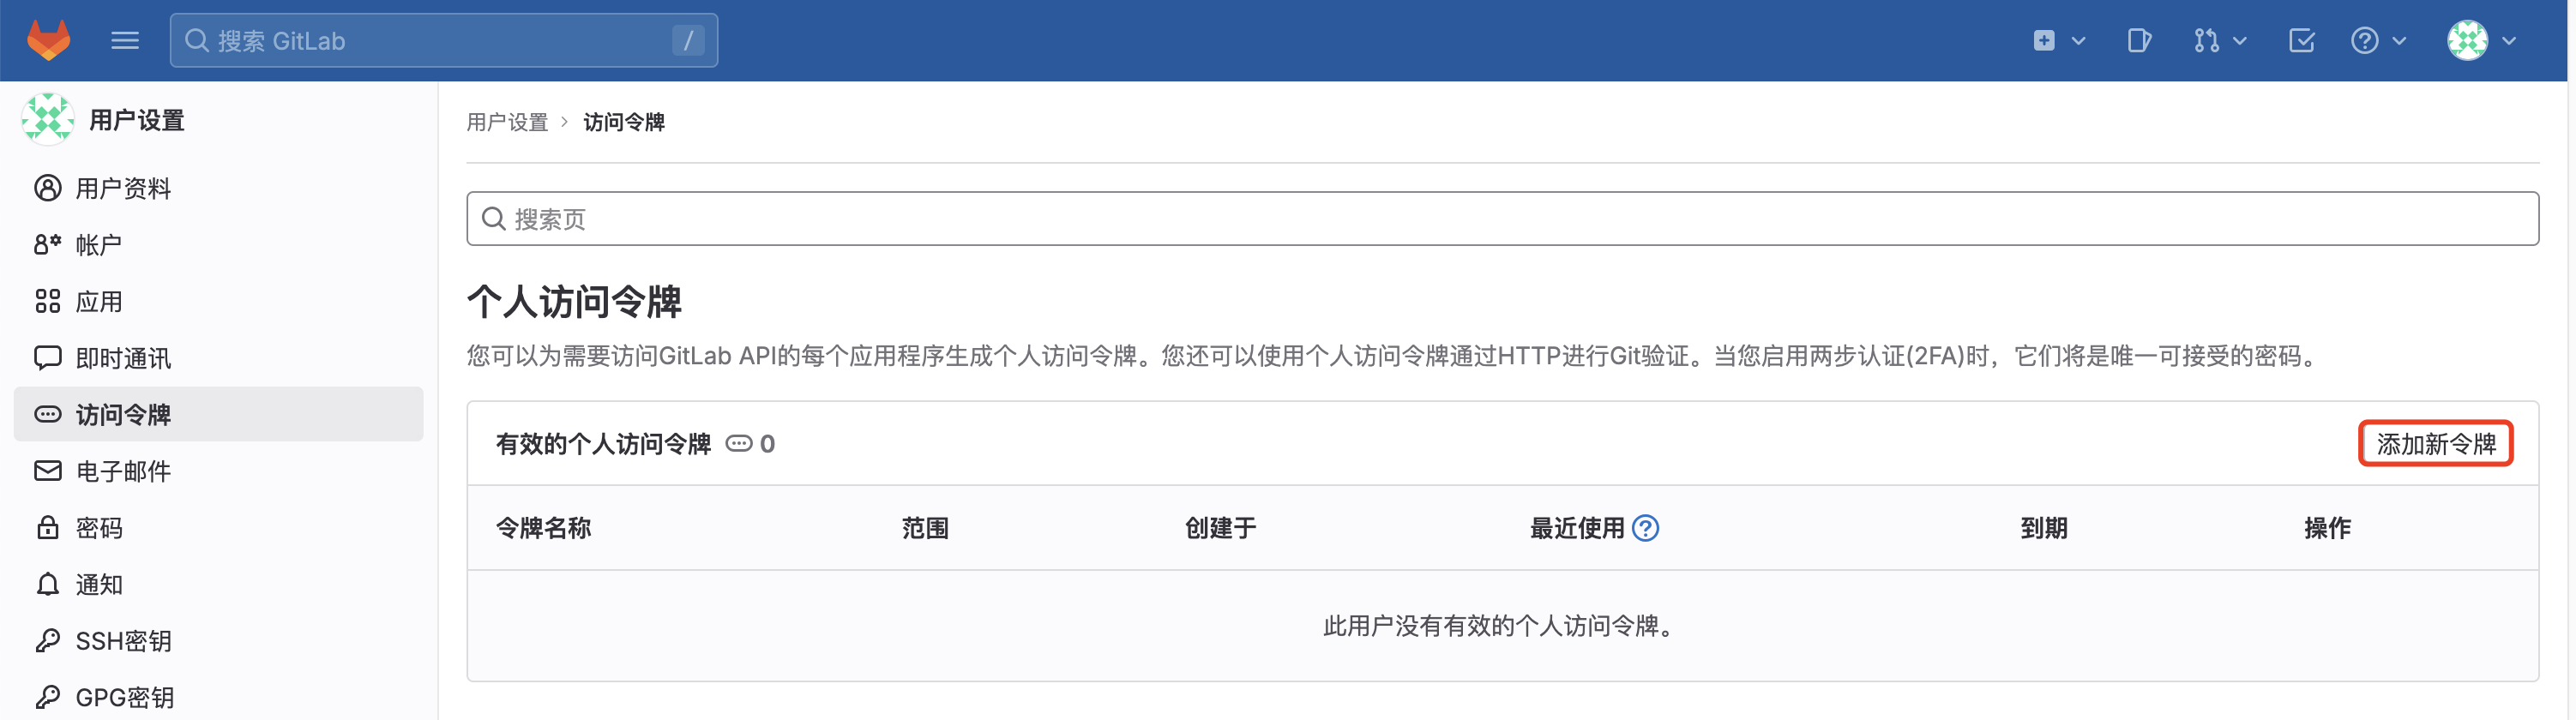
为项目设置令牌:


Jenkins 对接 Gitlab(可选)
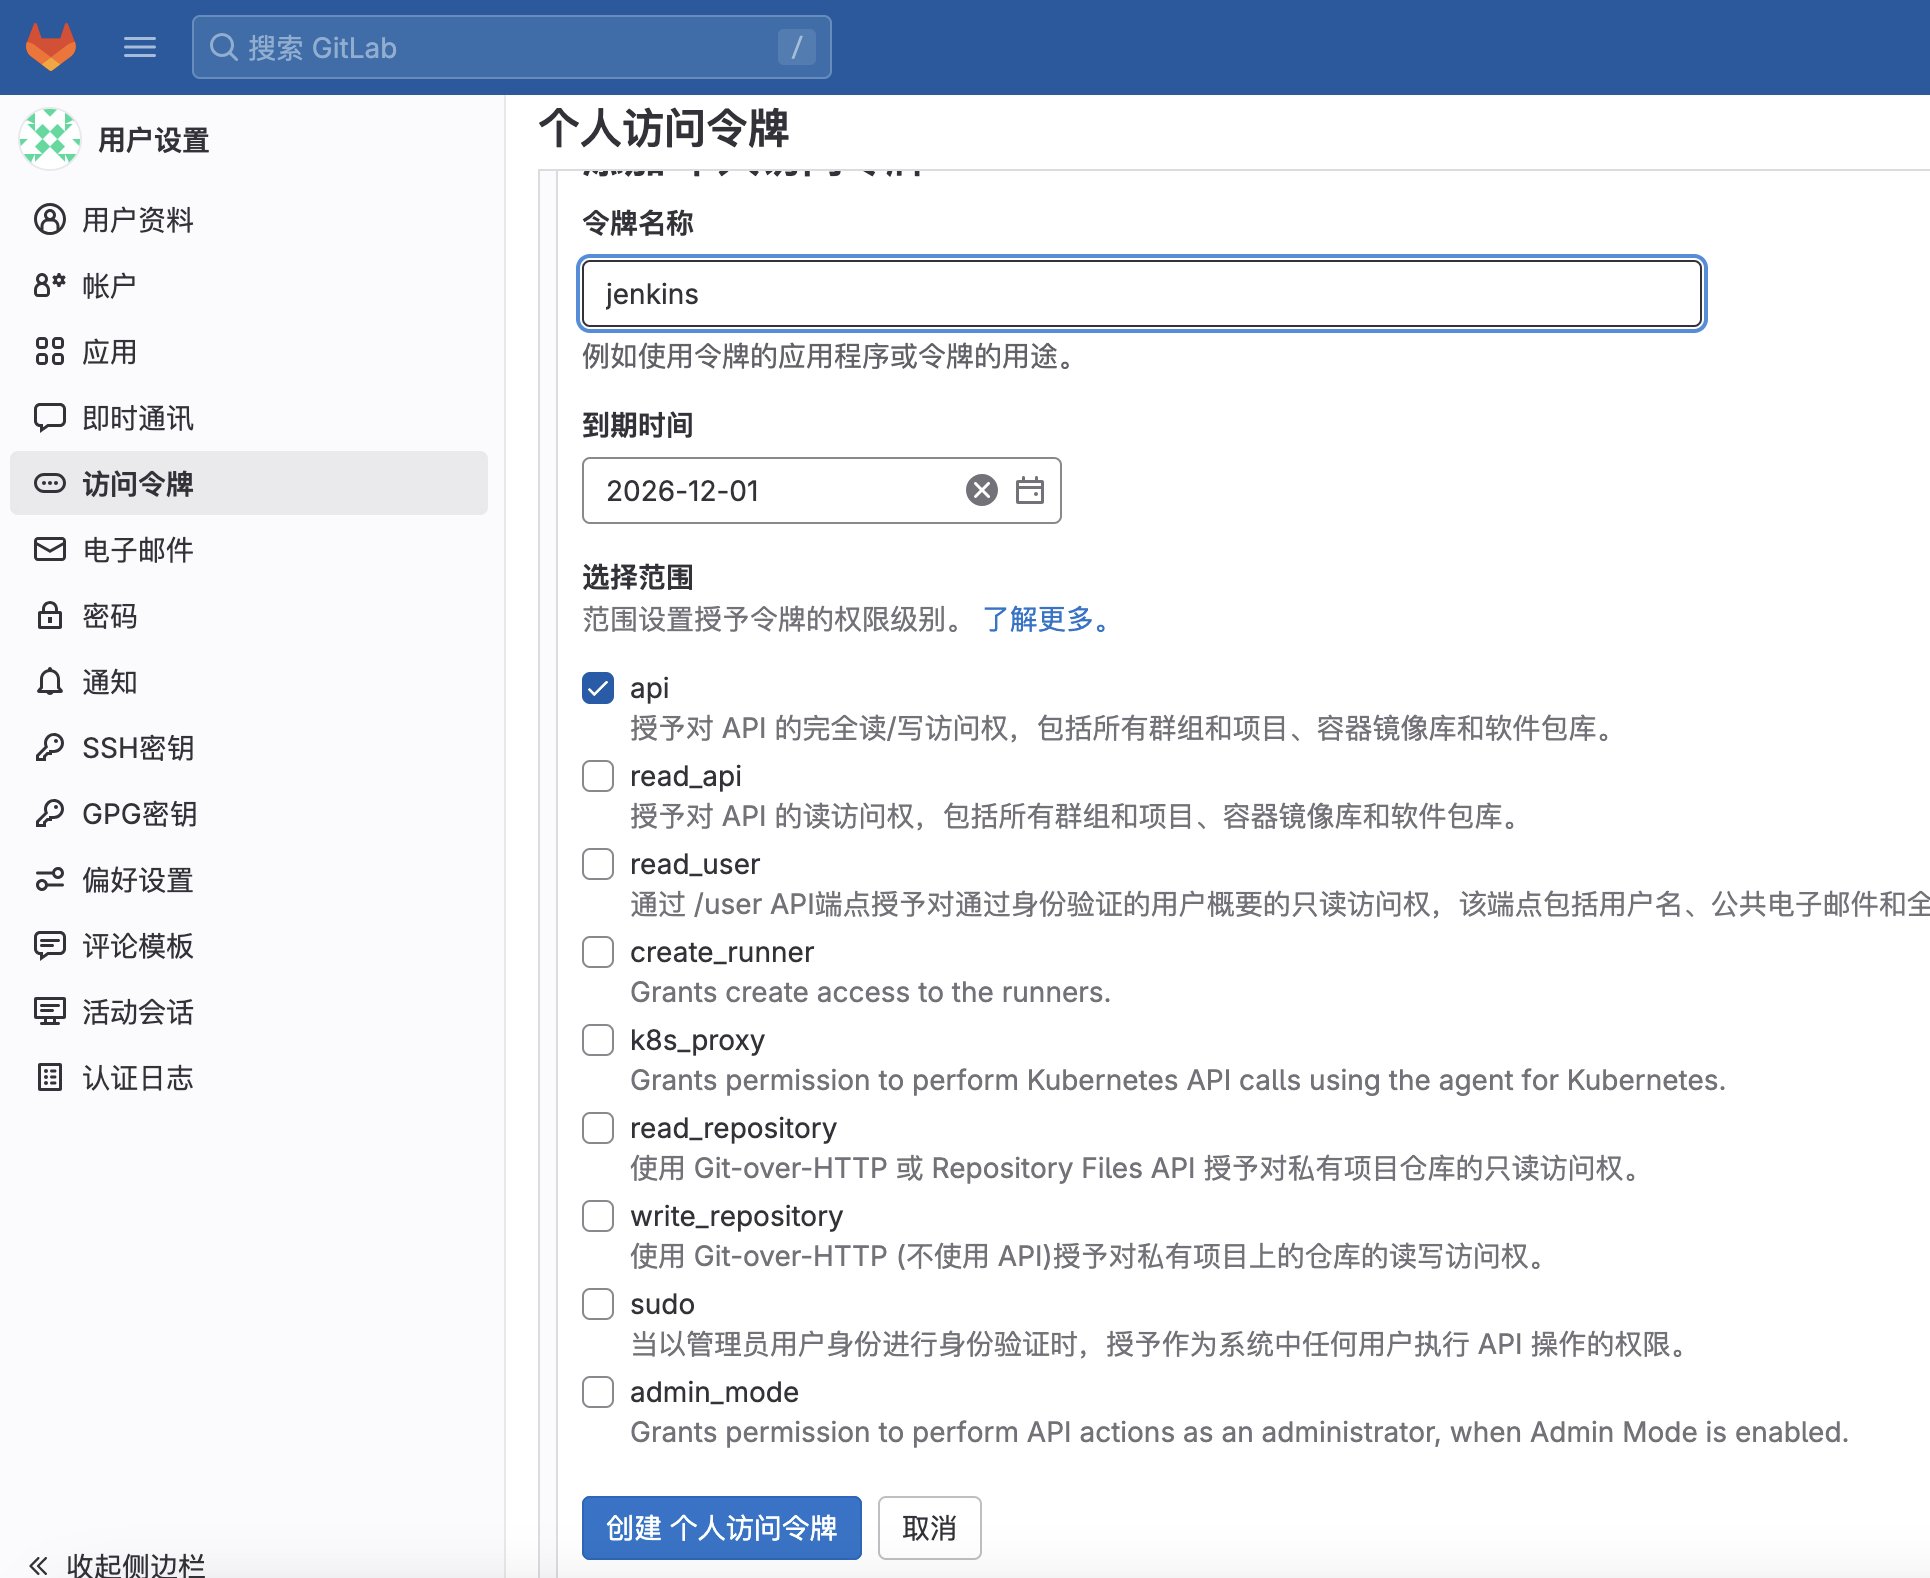
设置全局令牌
在下列位置设置全局令牌,方便 Jenkins 对接。
设置名称和权限:
Jenkins侧配置
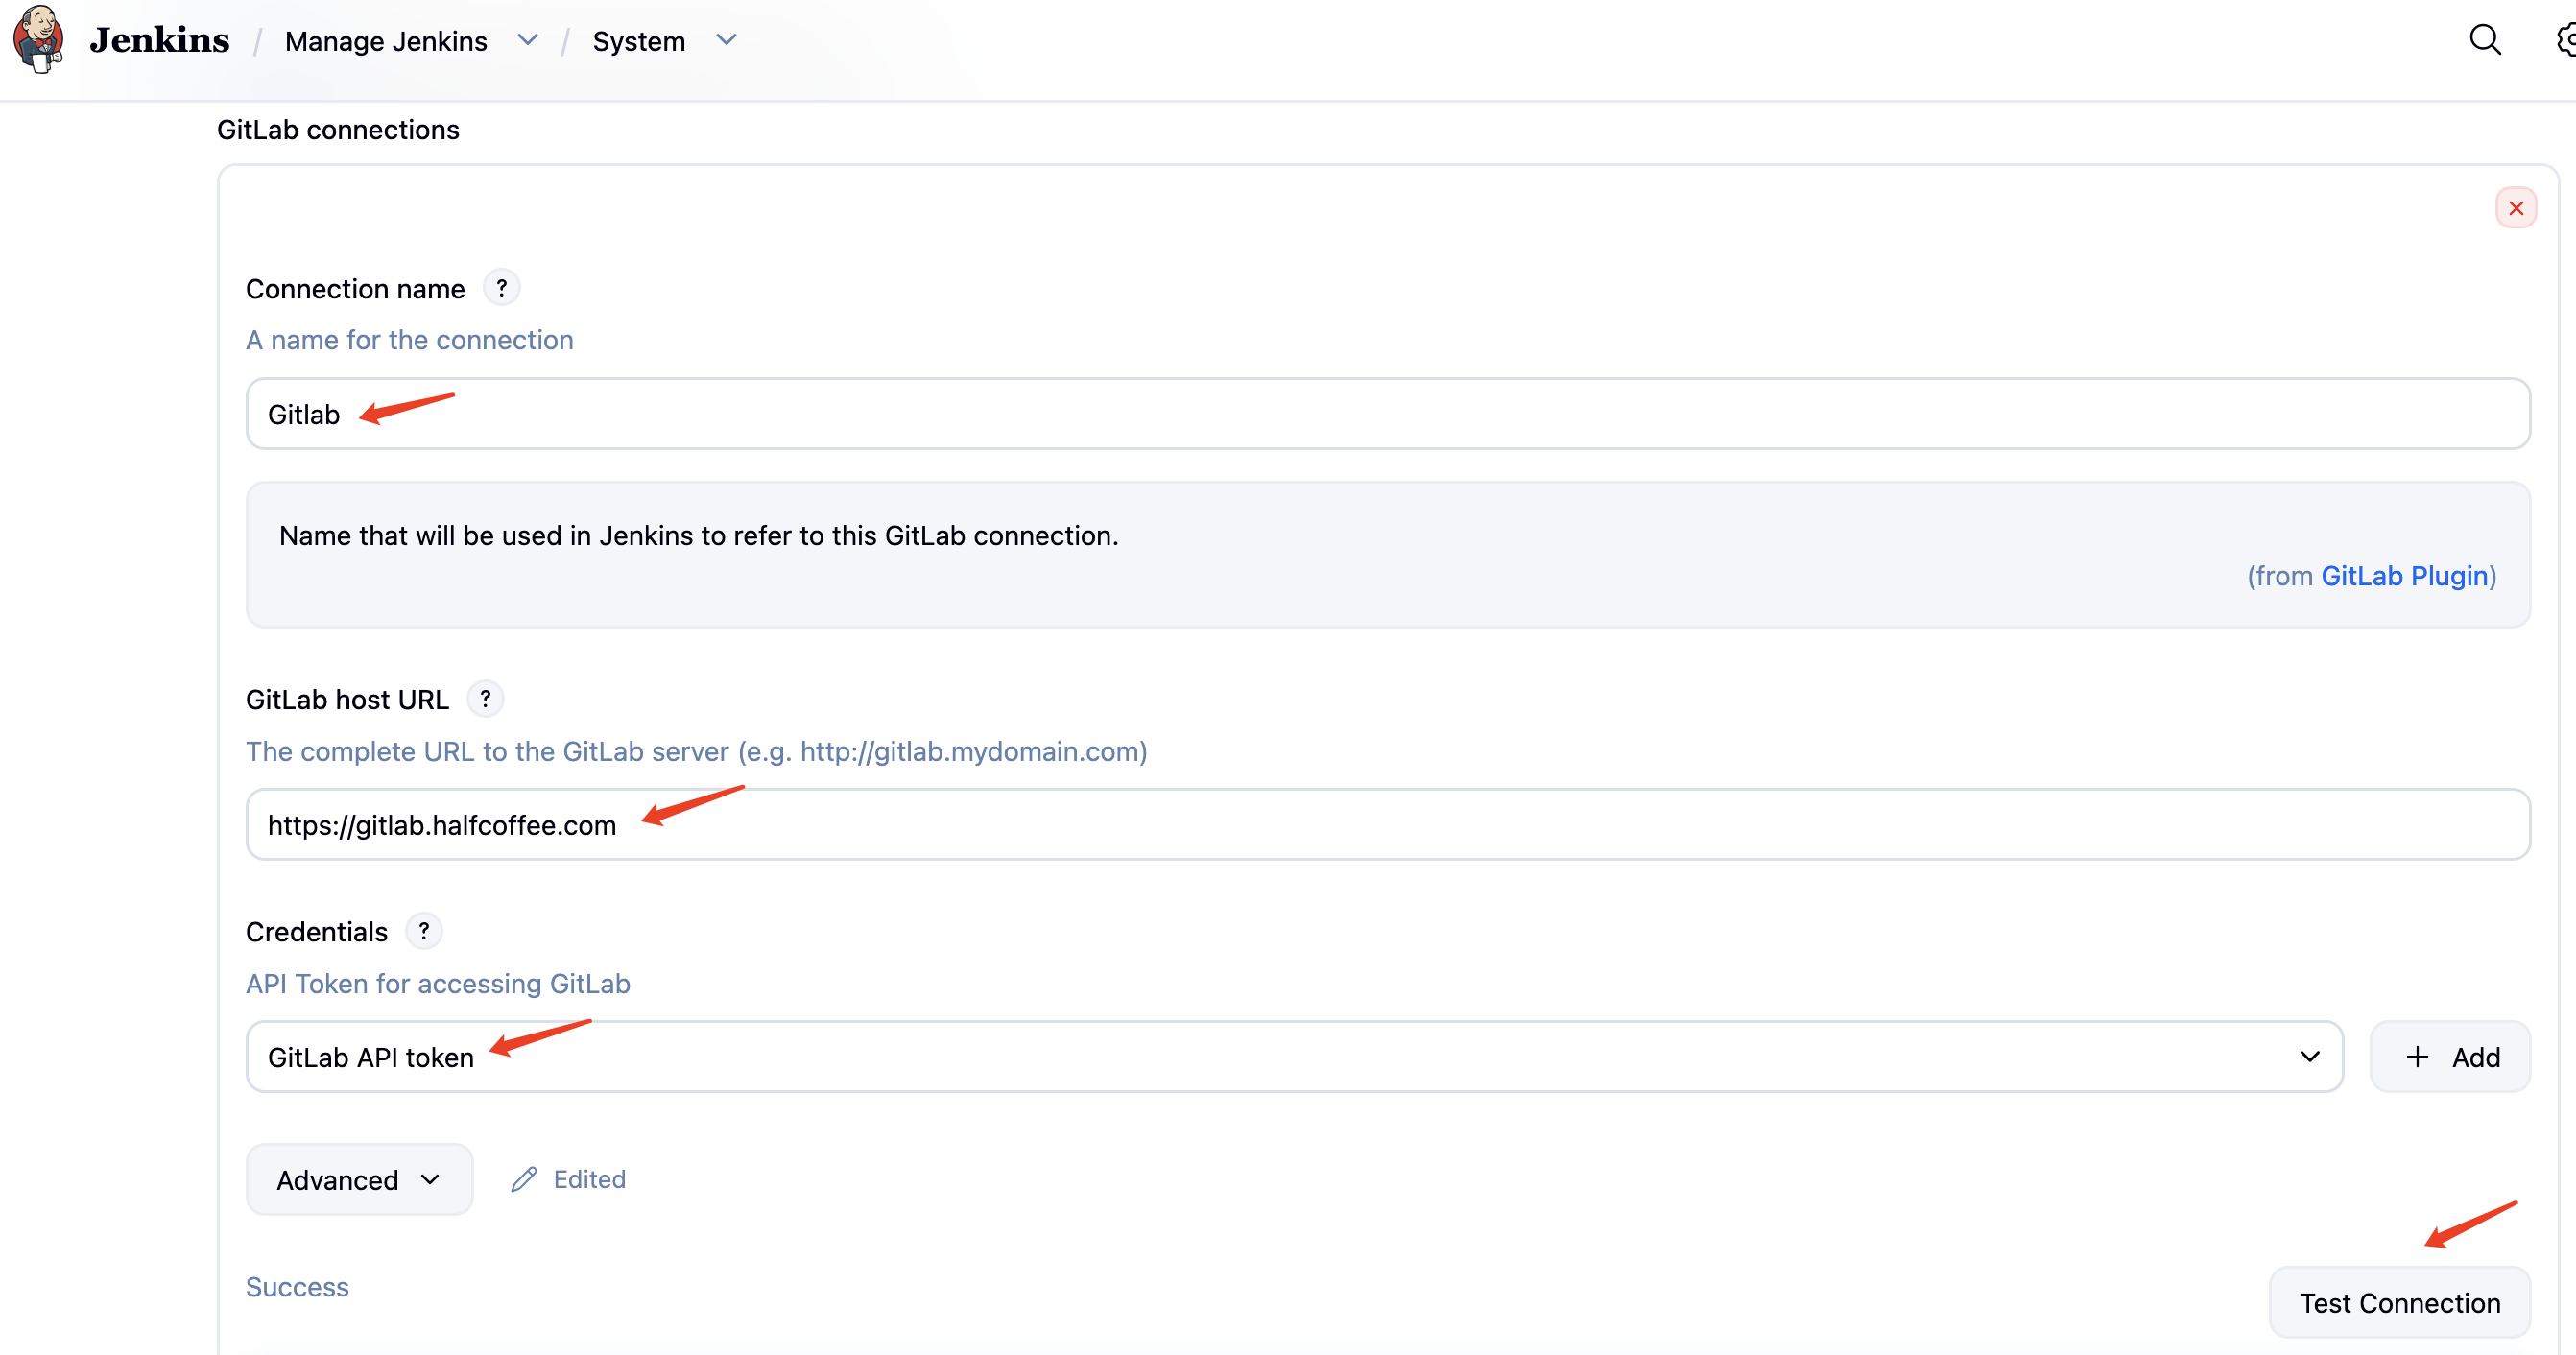
在 Jenkins 的下列位置设置 Gitlab 对接http://<jenkins-ip>:8080/manage/configure#gitlab

免密登录
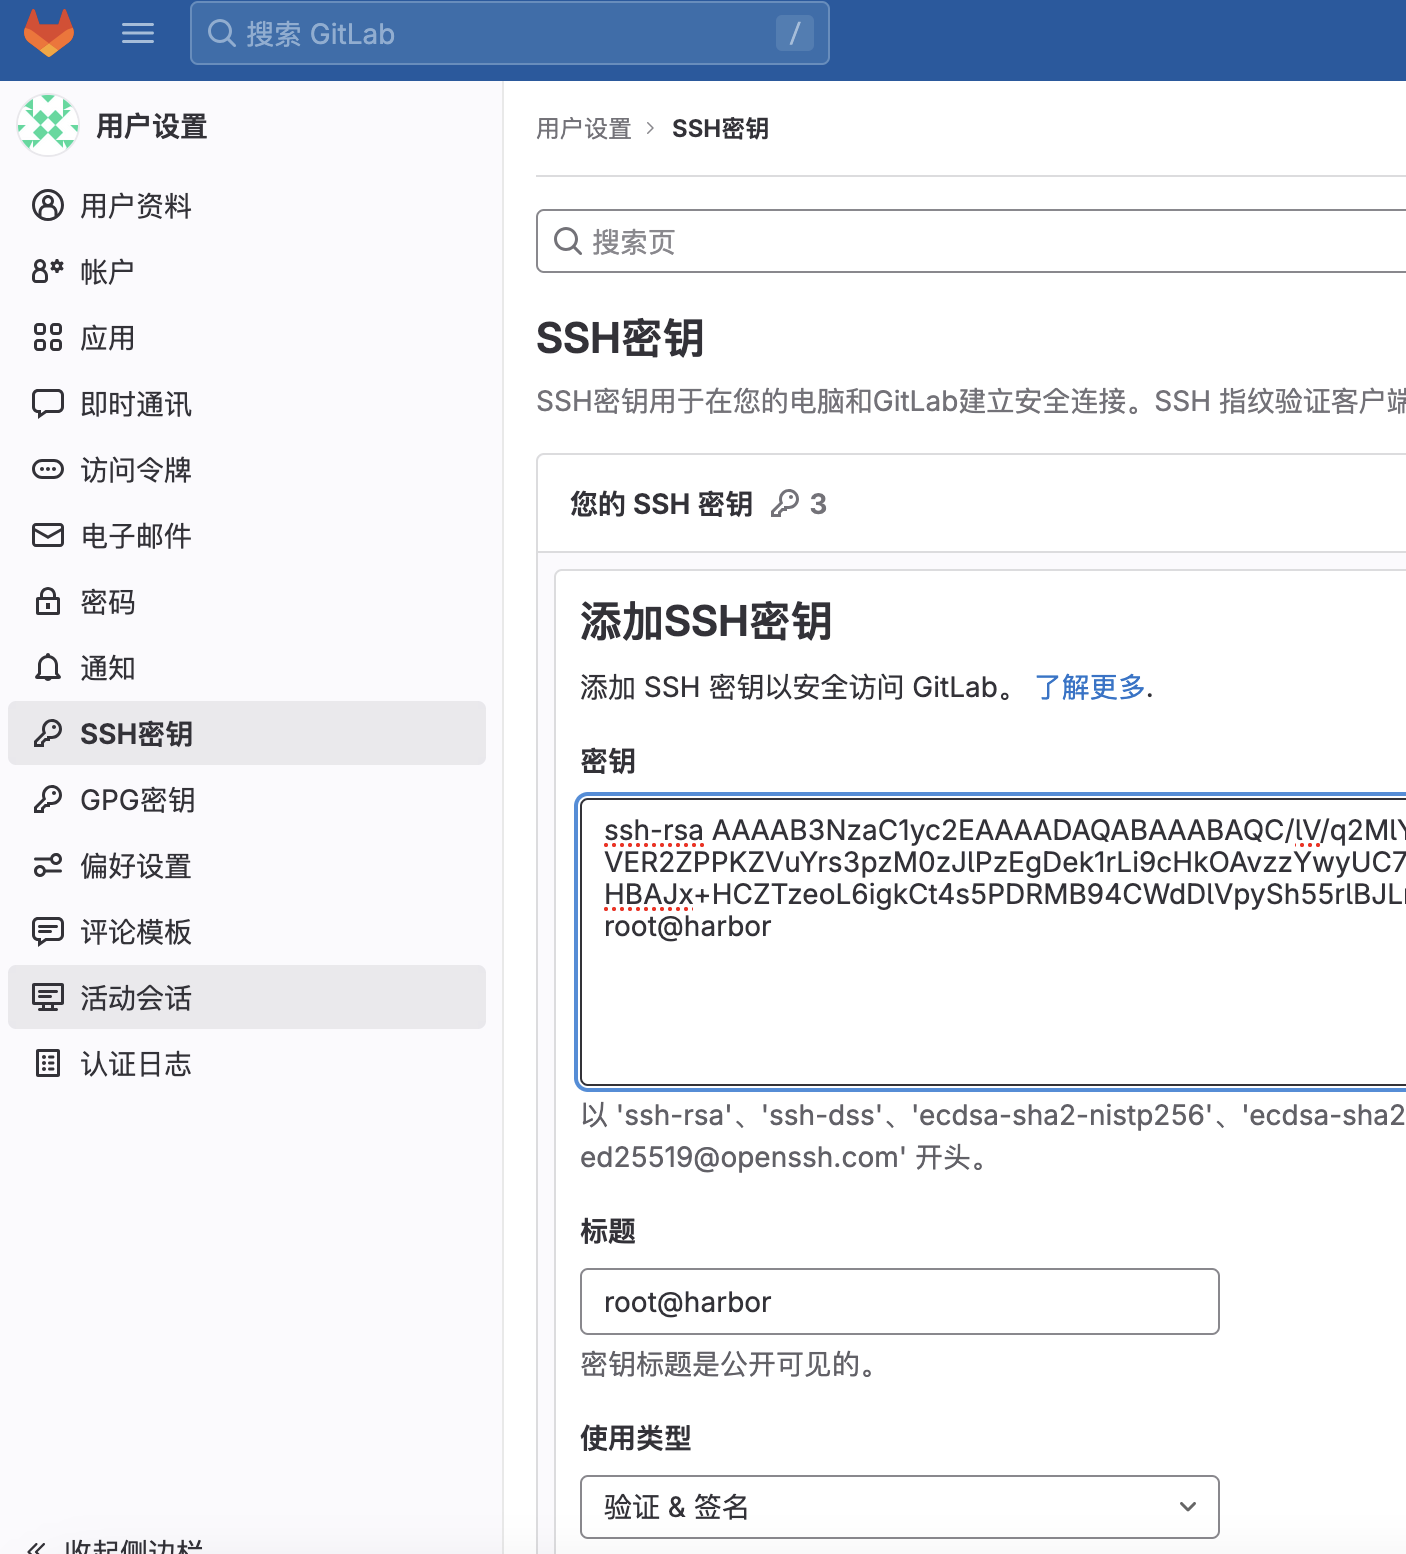
对于开发者,需要将自己电脑的公钥配置在 github 中,实现免密登录推送代码。具体配置如下:
 # 生成 ssh 密钥对(如果无)
 ssh-keygen
 # 获取公钥
 cat ~/.ssh/id_rsa.pub
在 Gitlab 下列位置进行配置:
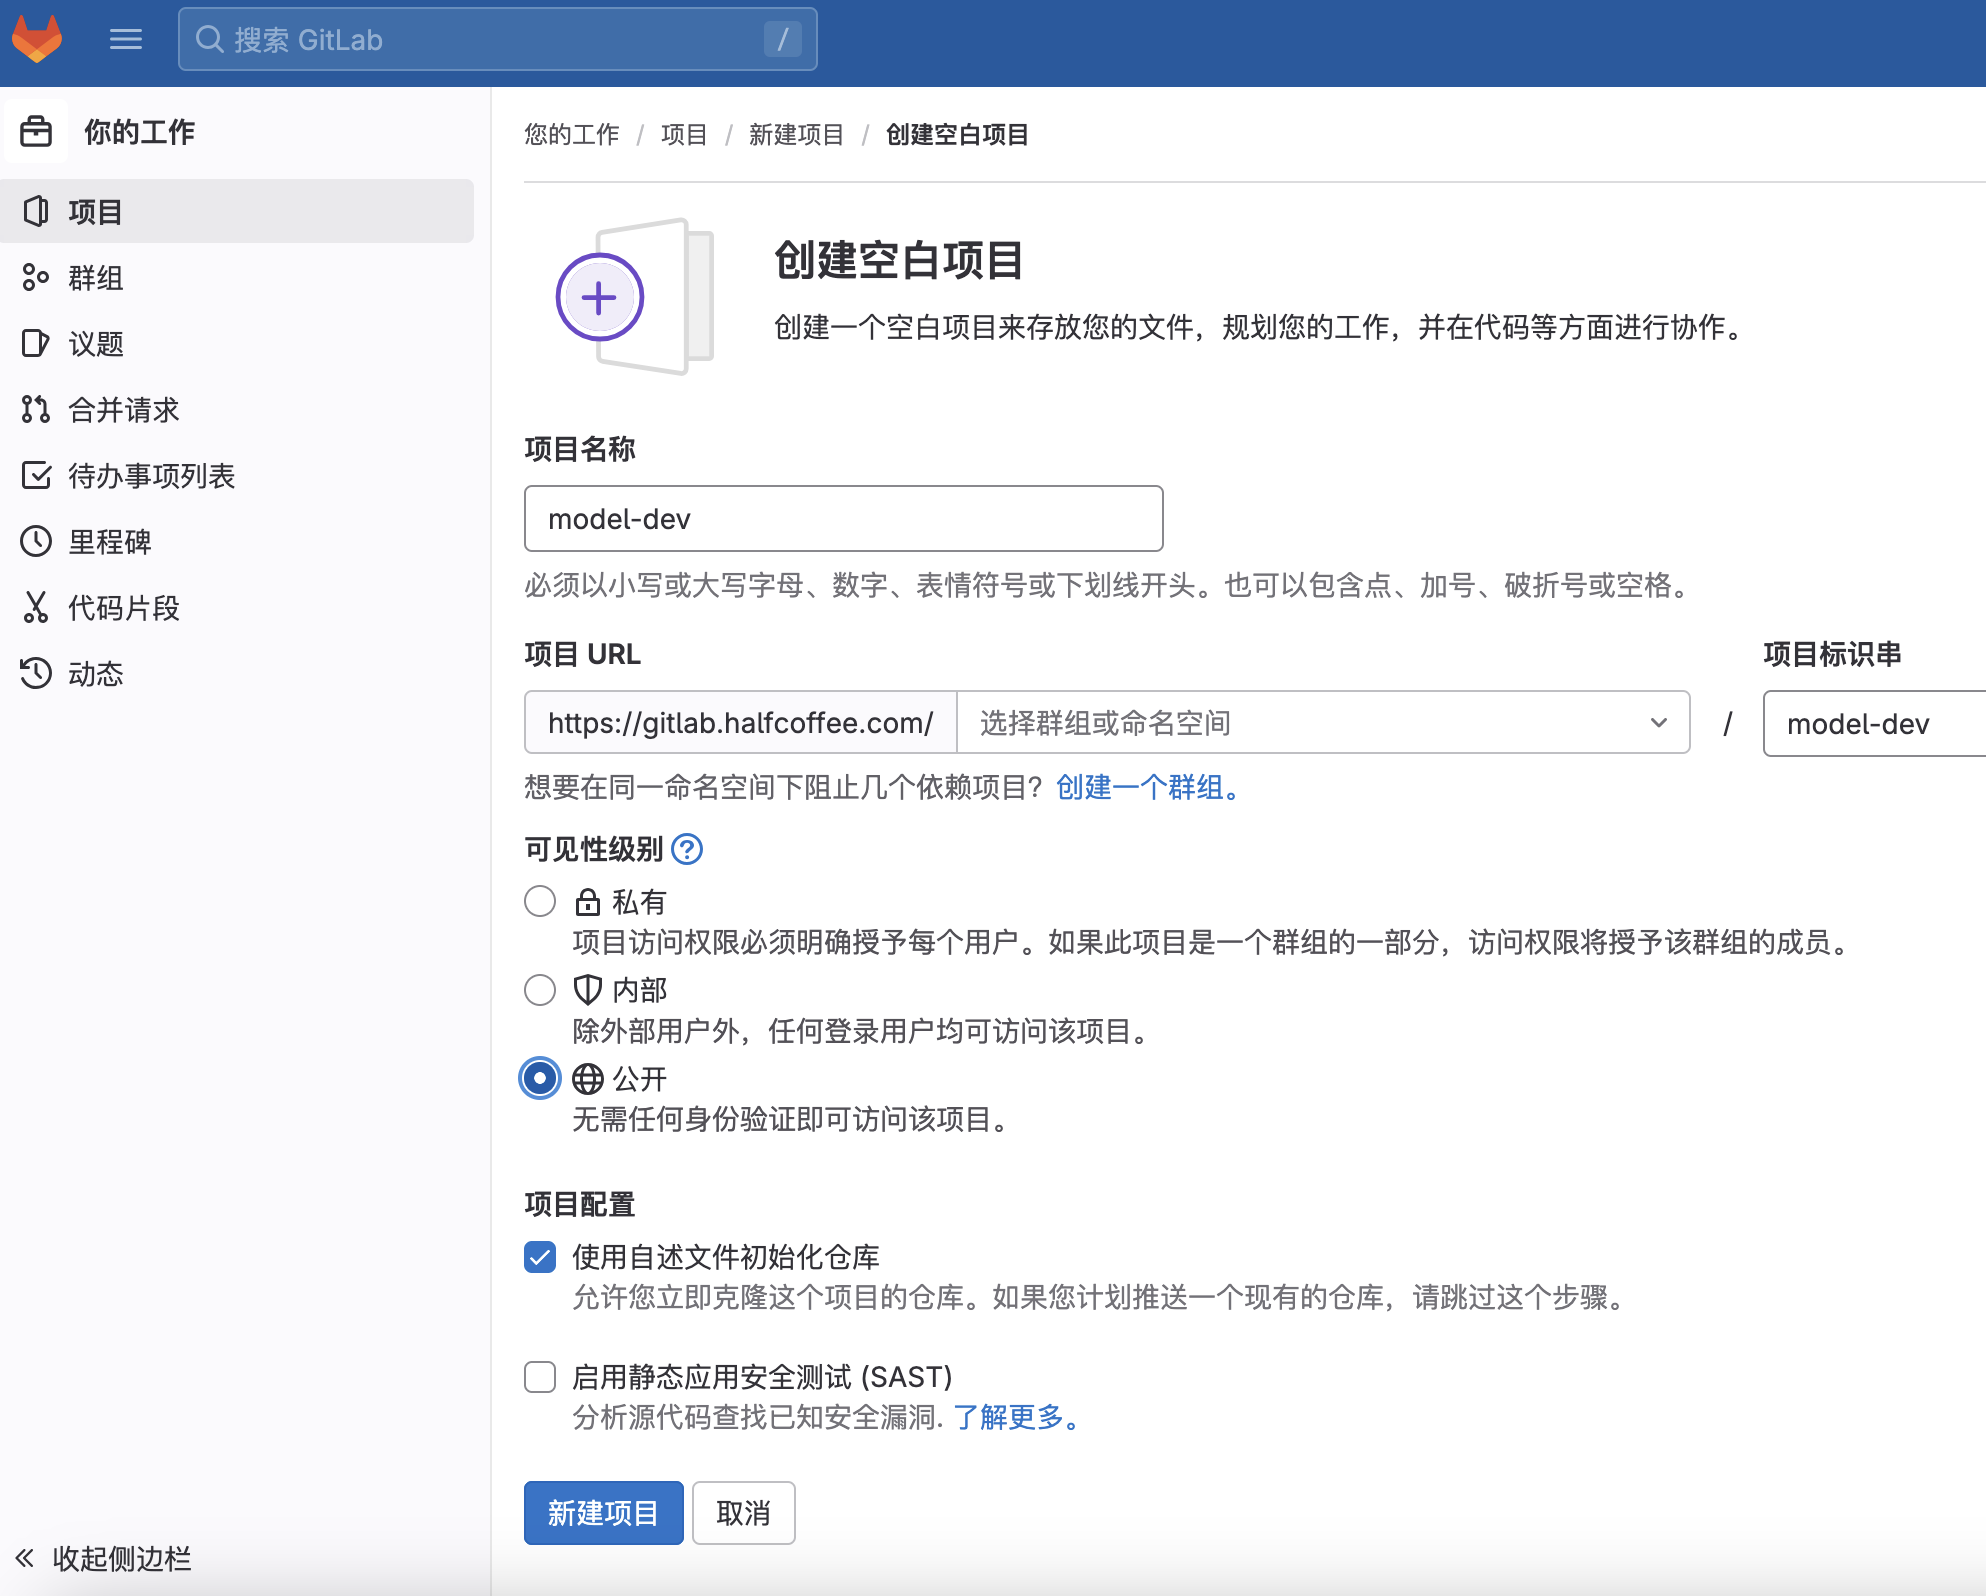
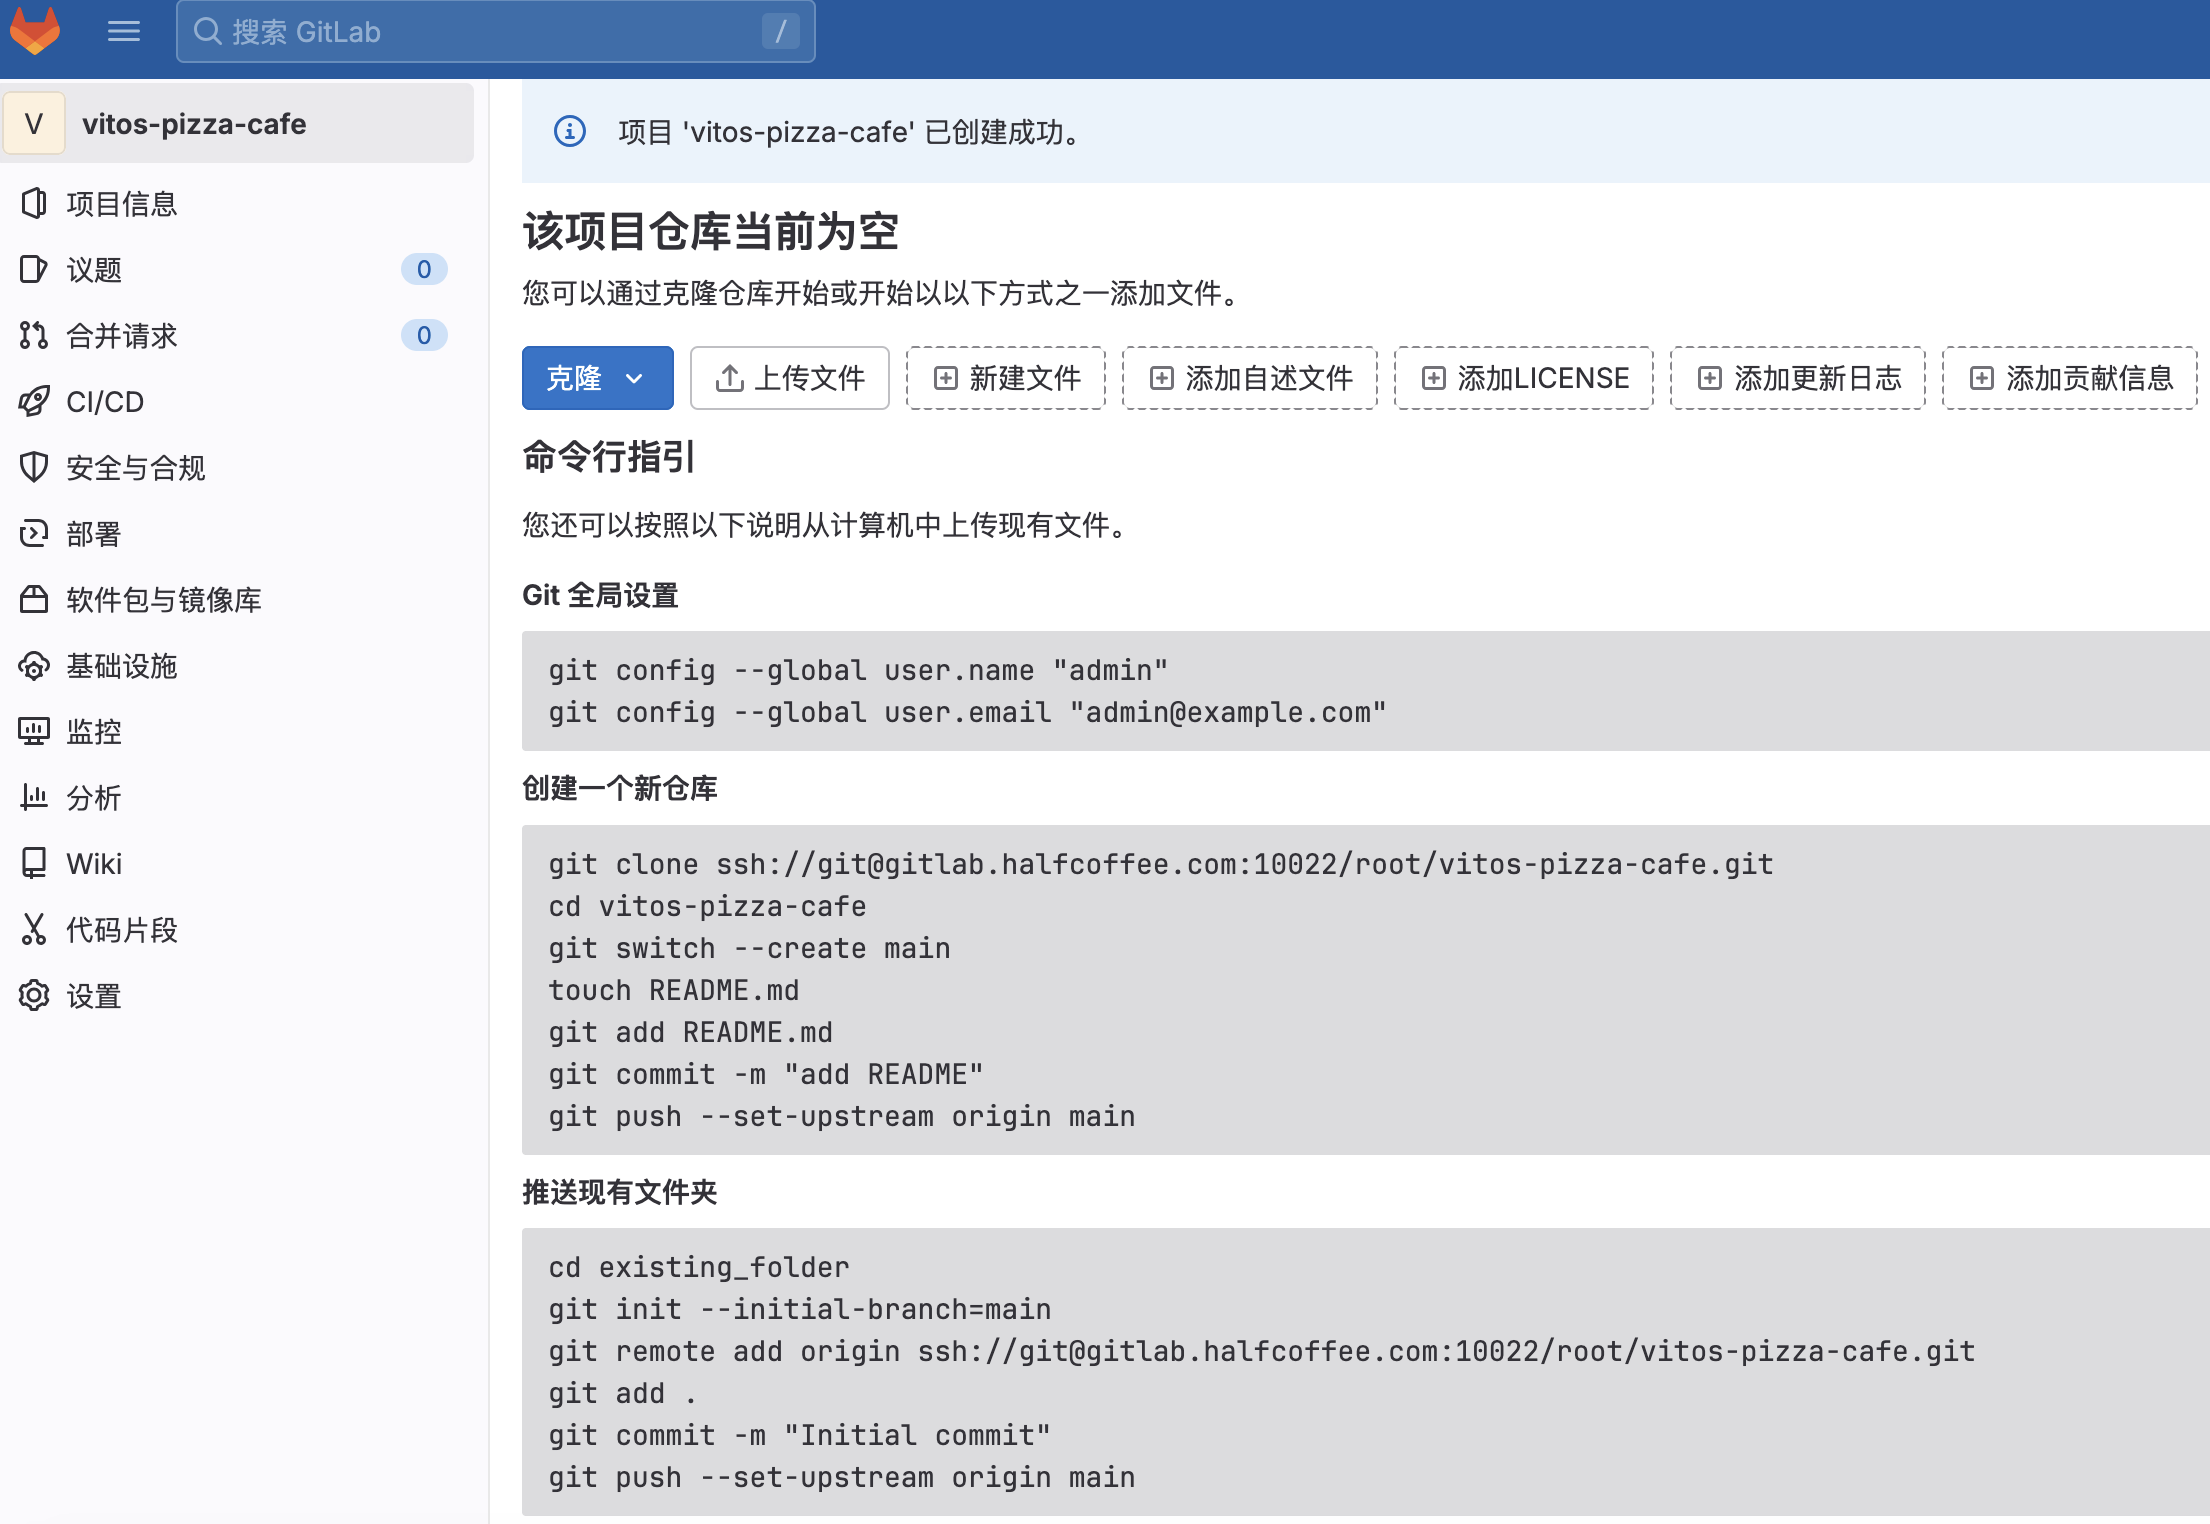
项目创建
创建新的项目,创建完毕后会看到使用指引,可以在 git client 侧进行配置
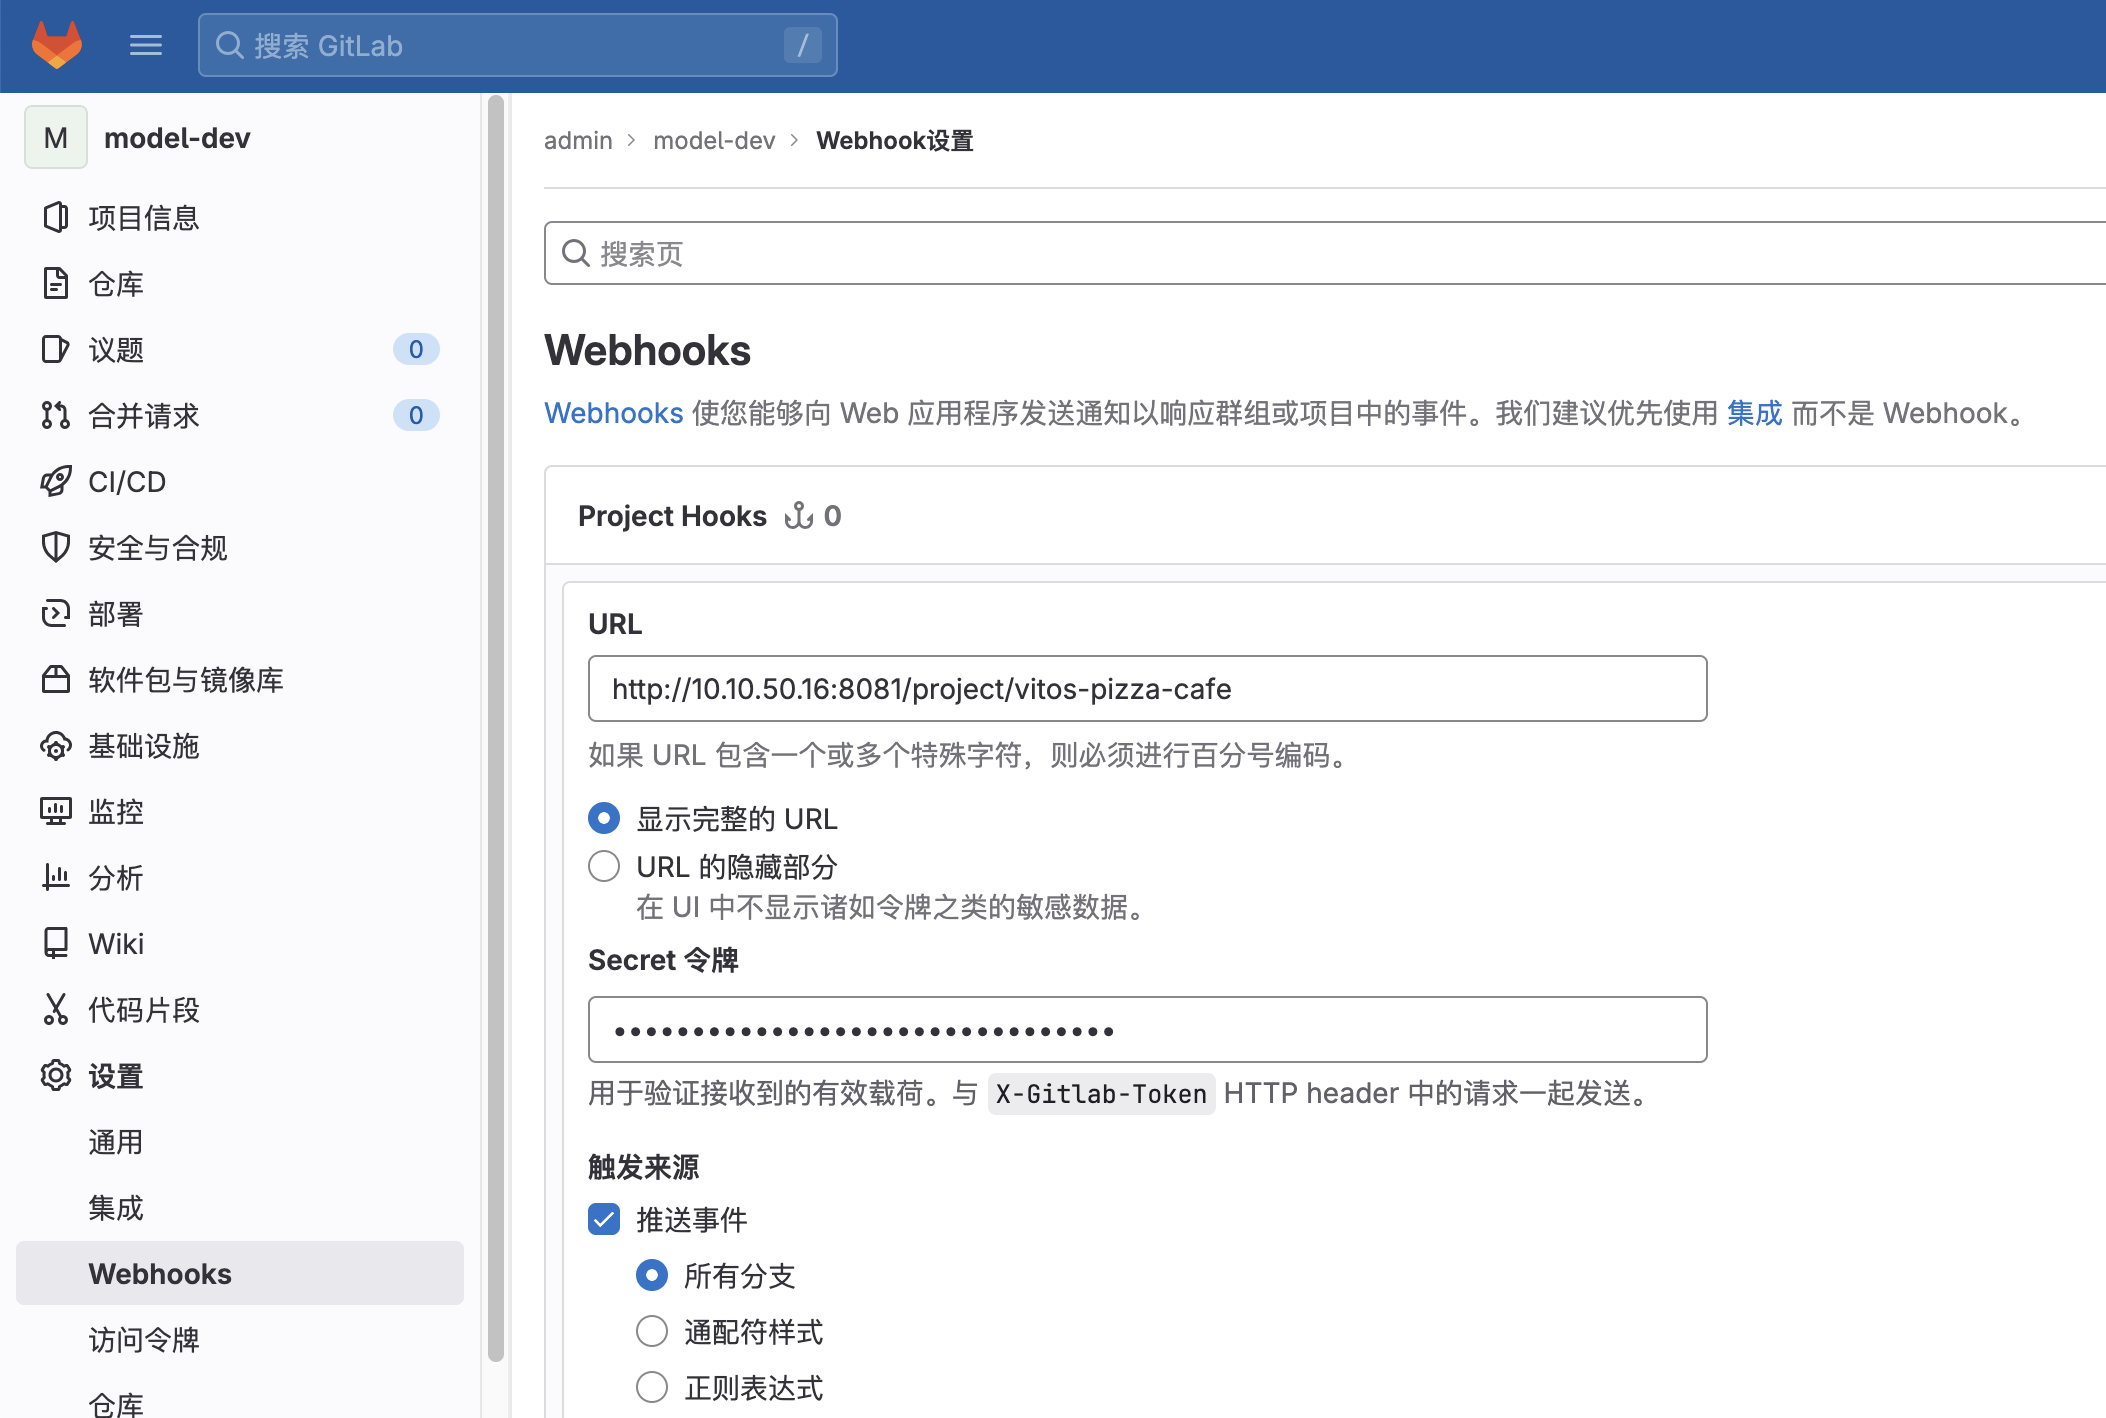
Webhook 配置
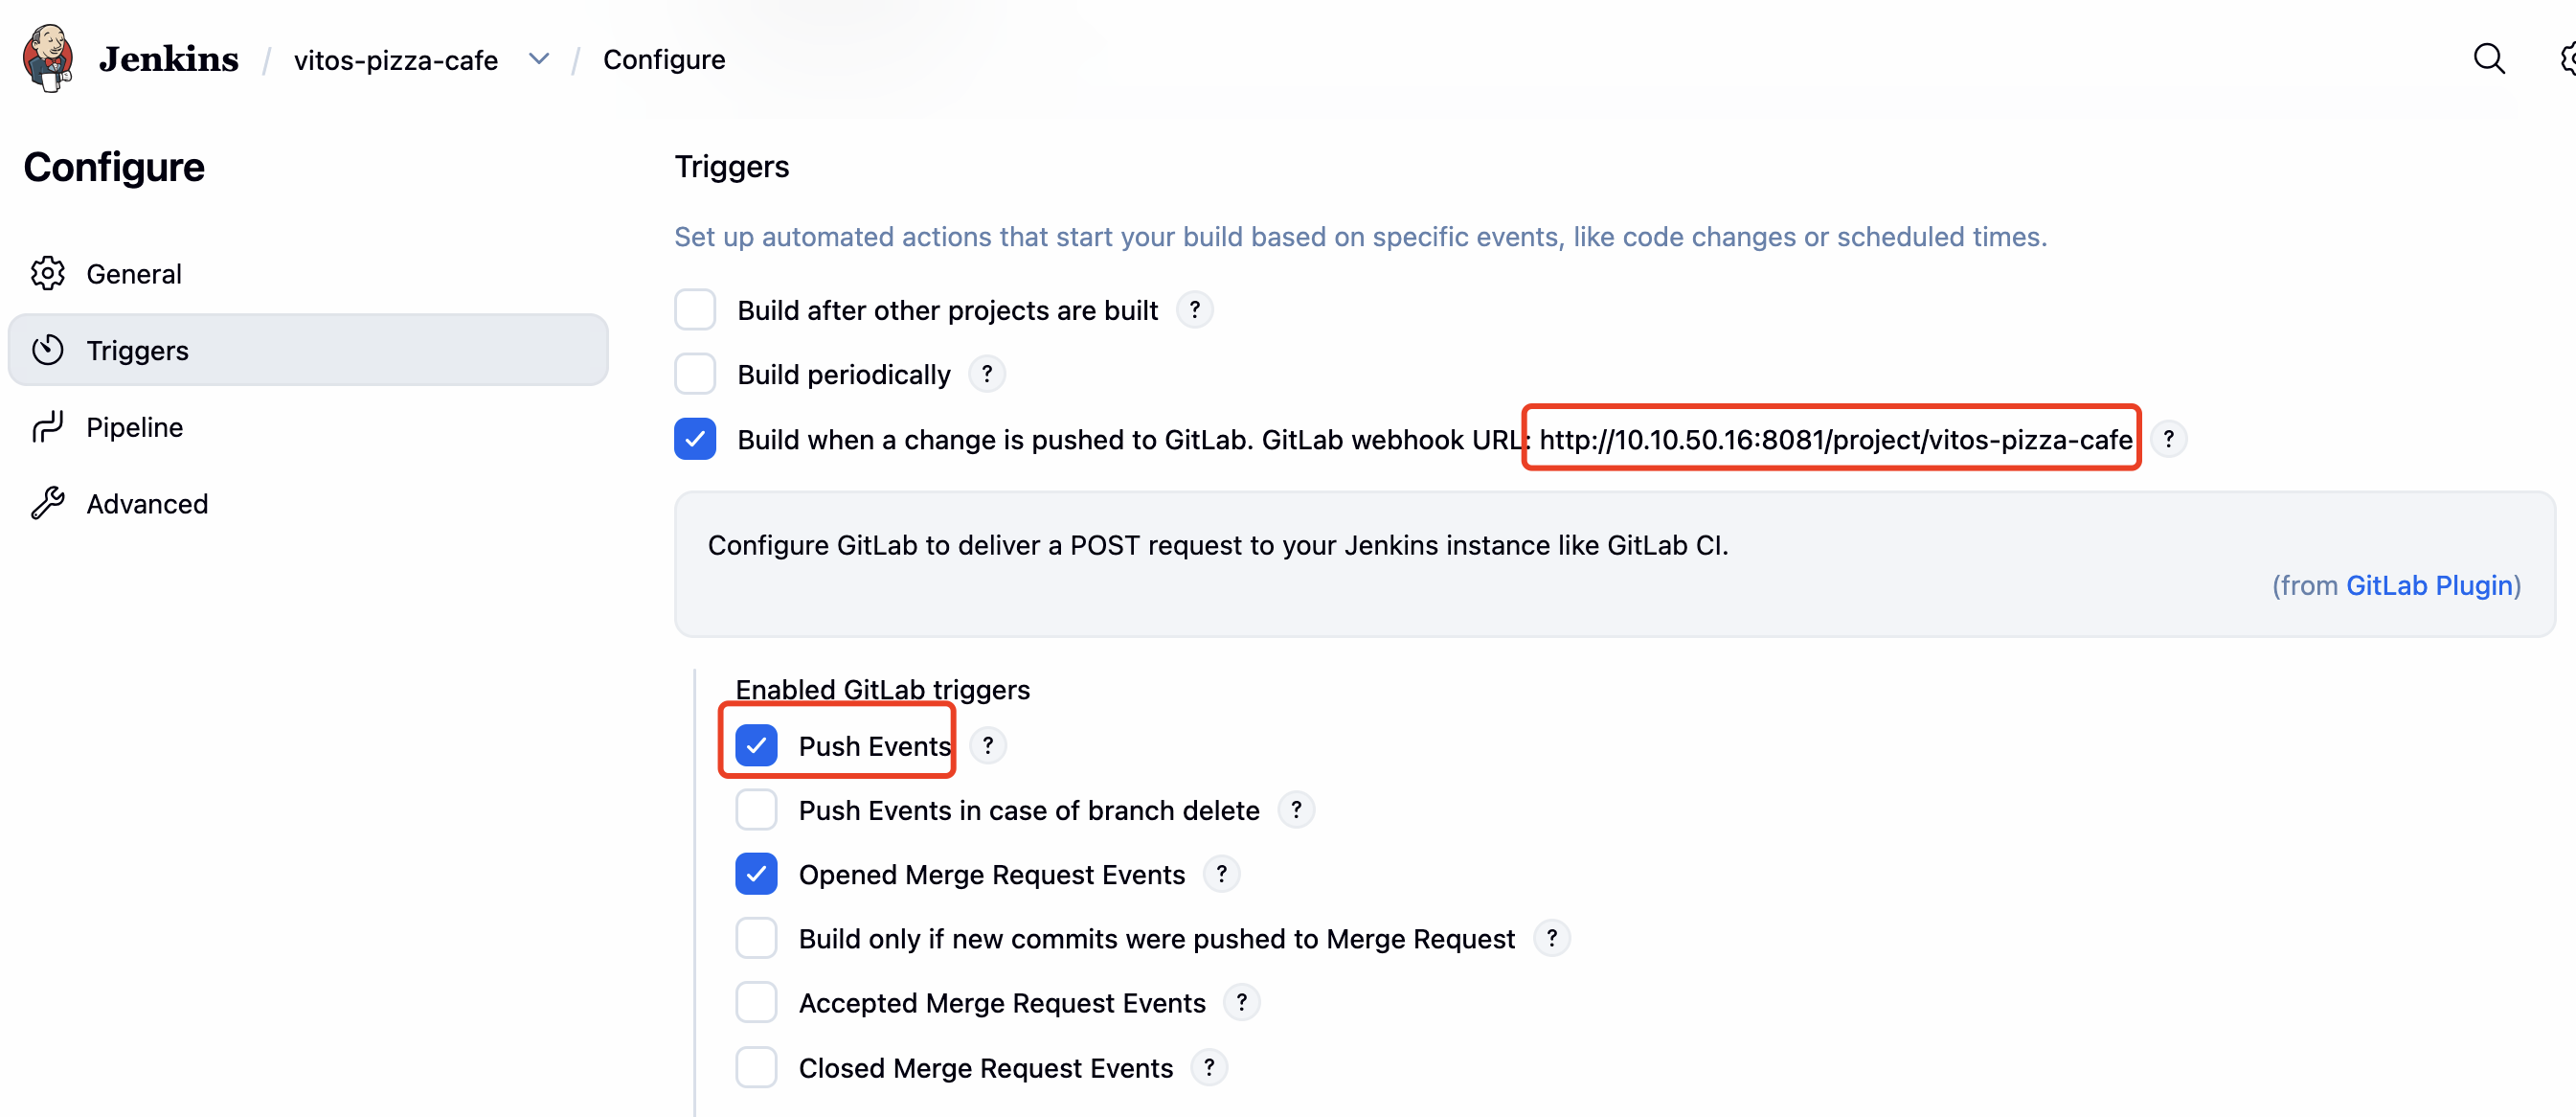
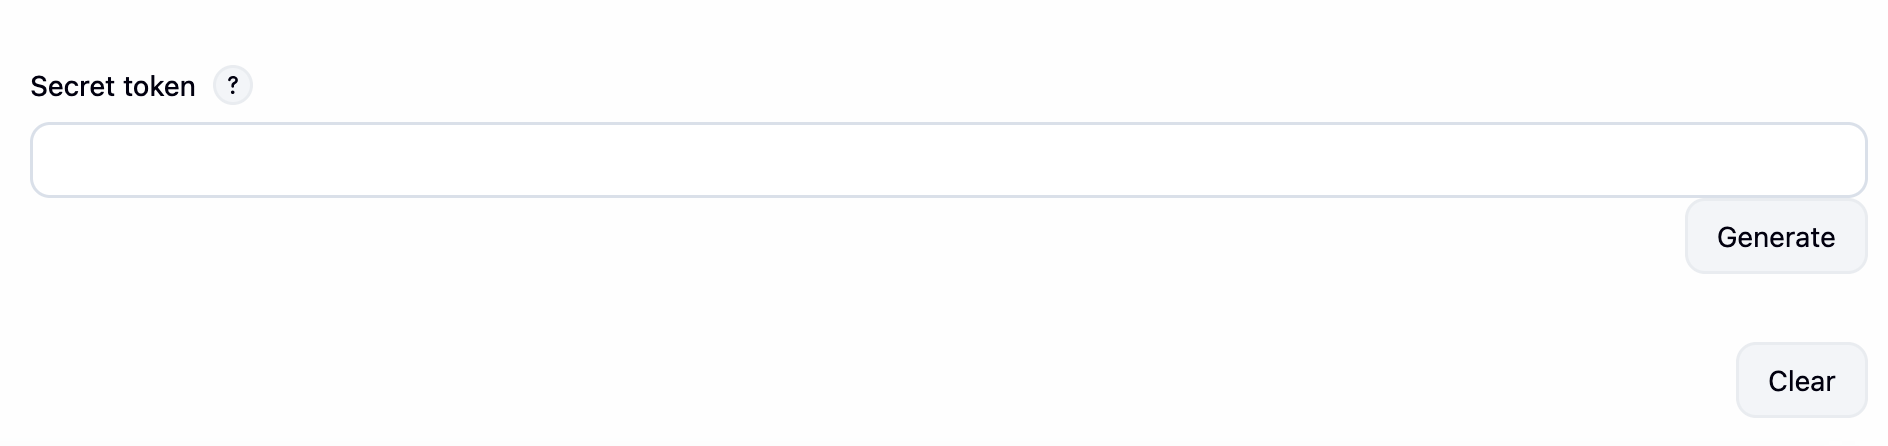
Jenkins 中项目创建 trigger,在 Advanced 中生成 secret:
Gitlab 侧创建 webhook
测试
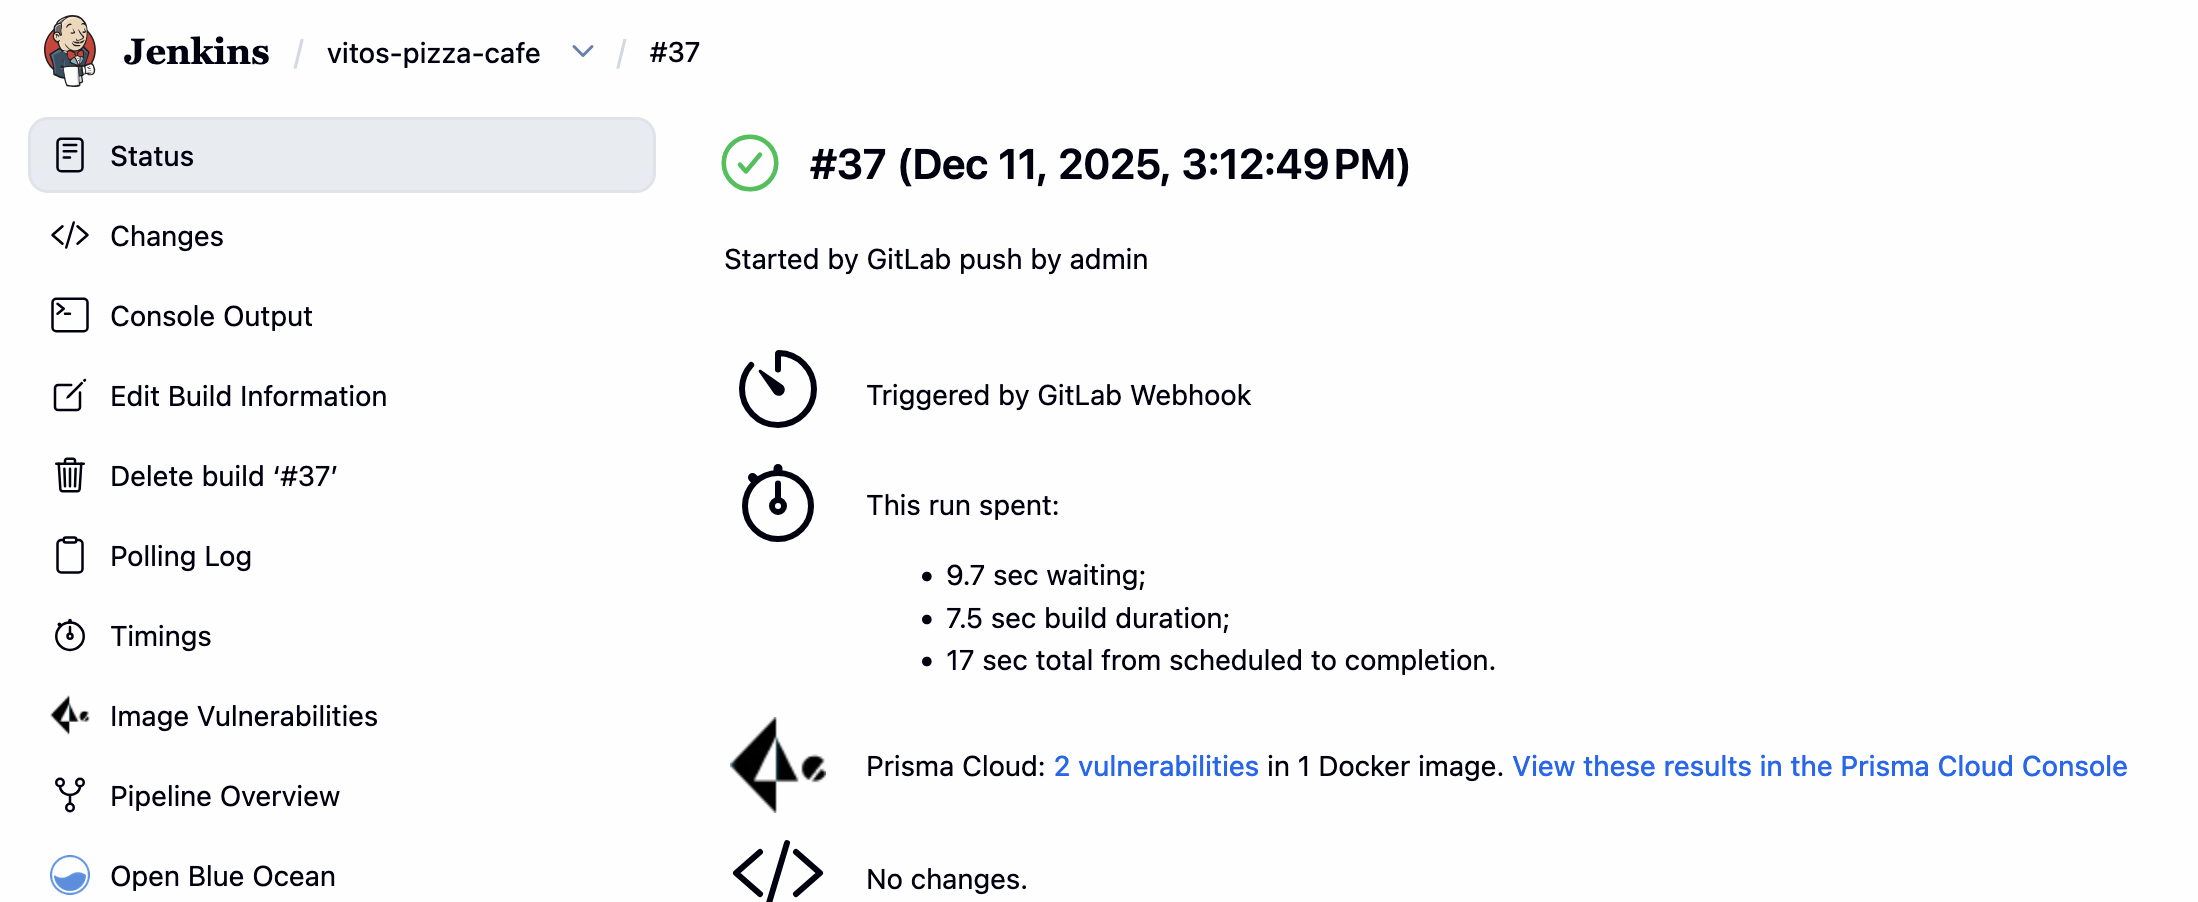
在 Gitlab 中进行测试:

对应在 Jenkins 中可以看到流水线被触发:
最终版本
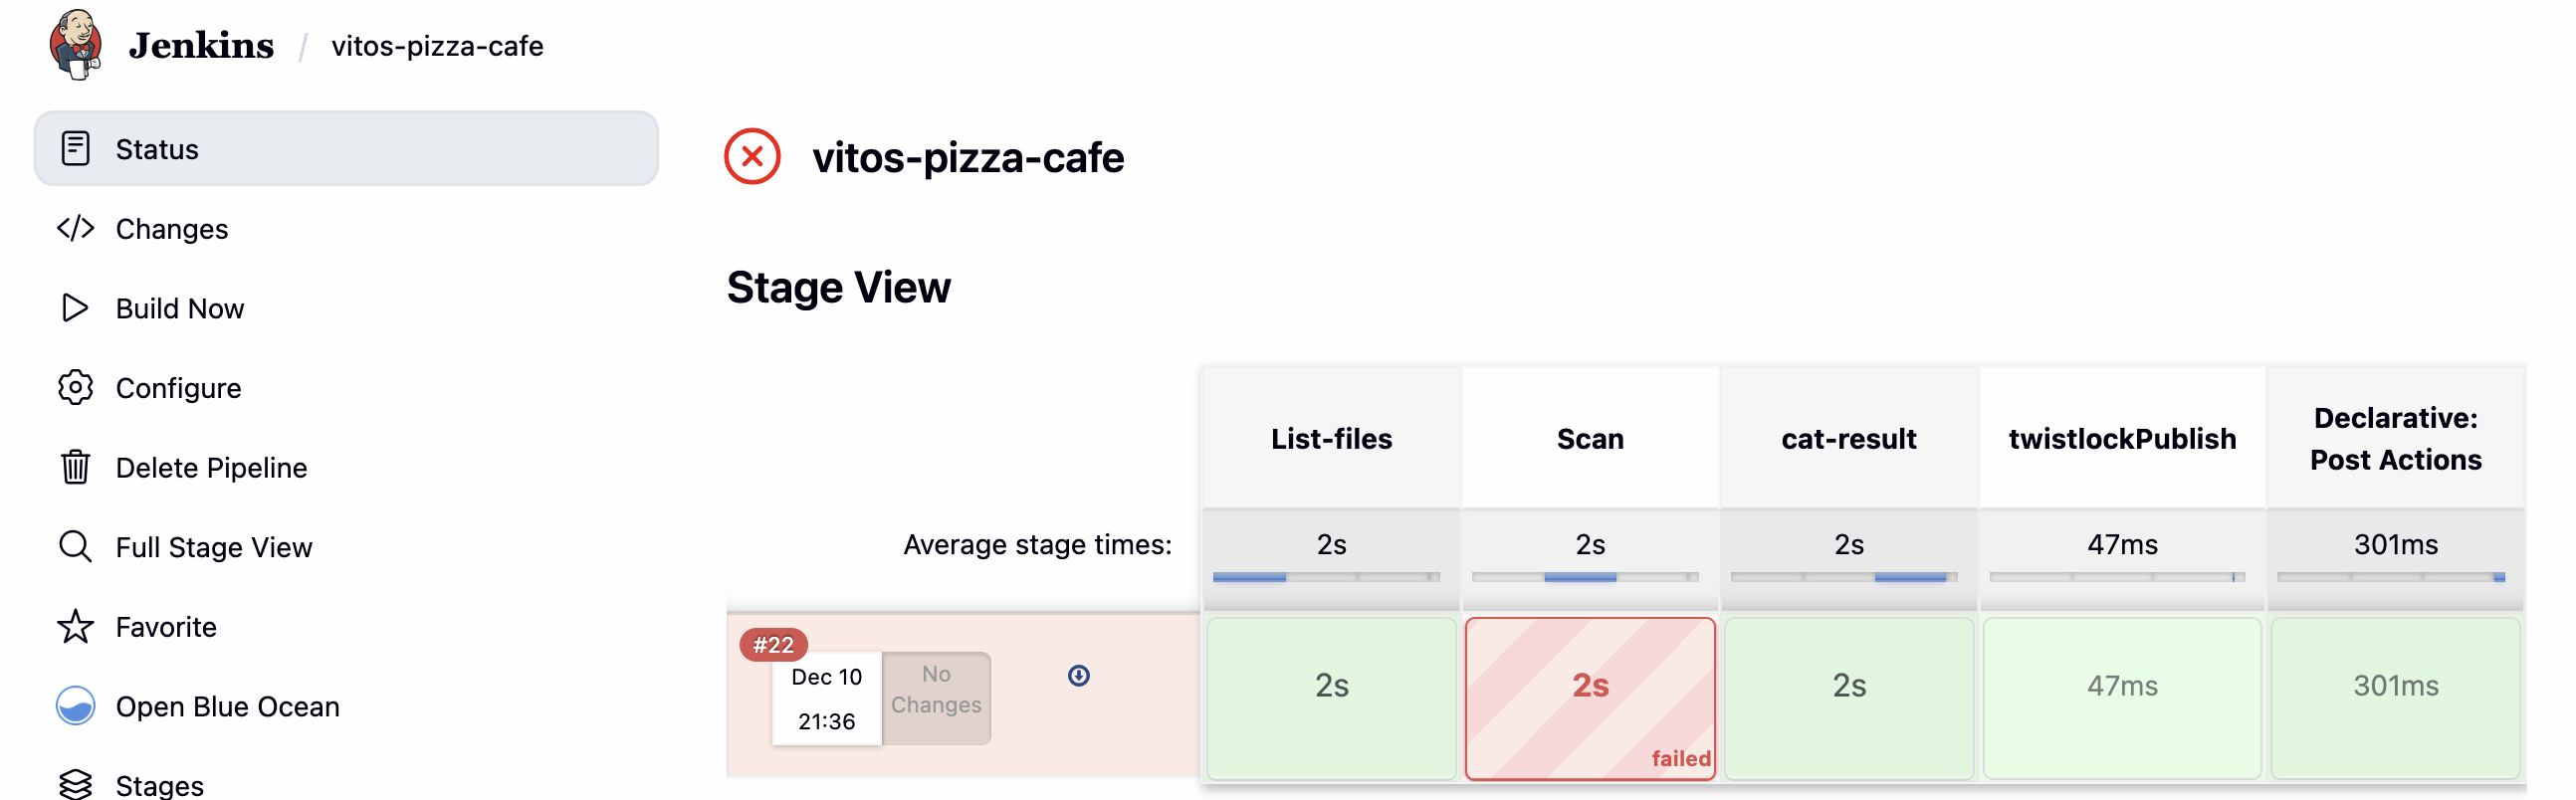
全生命周期的流水线:
- Checkout:获取源代码,并 list 文件
- Build Image:构建容器镜像(此处 base 镜像放在私有镜像仓库中)
- Scan Image:通过 Prisma Cloud 扫描镜像,并记录结果
- Publish Result:将结果推送到 Jenkins UI,方便查看
- Verify:检查检测结果是否满足基线,如不满足则停止流水线
- Push Image:如果检查满足基线,则将 Image 推送到 Harbor
- Deploy:将应用通过 Docker Compose 部署到测试环境
- cleanup:清理临时文件
pipeline {
    agent none
    environment {
        REGISTRY_HOST = 'harbor.halfcoffee.com'
        IMAGE_NAME = "vitos-pizza-cafe"
        IMAGE_TAG = "${BUILD_NUMBER}"
        FULL_IMAGE = "${REGISTRY_HOST}/modelscan/${IMAGE_NAME}:${IMAGE_TAG}"
        BACKEND_API_URL = "http://10.10.50.16:8000"
        DEPLOY_HOST = "10.10.50.16"
        DEPLOY_PATH = "/root/vitos-pizza-cafe-deploy"
        OPENAI_BASE_URL = "https://dashscope.aliyuncs.com/compatible-mode/v1"
        LLM_MODEL = "qwen2.5-14b-instruct"
        OPENAI_EMBEDDING_BASE_URL = "https://api.siliconflow.cn/v1"
        EMBEDDING_MODEL = "BAAI/bge-large-zh-v1.5"
        AIRS_ENABLED = "true"
        OPENAI_API_KEY = credentials('openai-key')
        OPENAI_EMBEDDING_API_KEY = credentials('openai-embedding-key')
        X_PAN_TOKEN = credentials('panw-airs-token')
        X_PAN_INPUT_CHECK_PROFILE_NAME = "matt"
        X_PAN_OUTPUT_CHECK_PROFILE_NAME = "matt"

    }

    stages {
        stage('Checkout') {
            agent any
            steps {
                // gitlab username/password credentials stored in Jenkins credentials with ID 'gitlab'
                git branch: 'master',
                    credentialsId: 'gitlab',
                    url: 'https://gitlab.halfcoffee.com/root/vitos-pizza-cafe.git'
                script {
                    sh 'ls -l'
                }
            }
        }
        stage('Build Image') {
            agent any
            environment {
                // create tmp docker config to avoid permission issues
                DOCKER_CONFIG = "${WORKSPACE}/.docker_tmp"
            }
            steps {
                script {
                    // create docker config dir
                    sh "mkdir -p ${DOCKER_CONFIG}"

                    withCredentials([usernamePassword(credentialsId: 'harbor-credentials', usernameVariable: 'HARBOR_USER', passwordVariable: 'HARBOR_PWD')]) {

                        // 1. login
                        sh 'echo $HARBOR_PWD | docker login ${REGISTRY_HOST} -u $HARBOR_USER --password-stdin'

                        // 2. build image
                        echo "Building image: ${FULL_IMAGE}"
                        sh "docker build -t ${FULL_IMAGE} ."
                    }
                }
            }
        }
        stage('Scan Image') {
            agent any
            steps {
            catchError(buildResult: 'FAILURE', stageResult: 'FAILURE'){
                // Scan the image
                prismaCloudScanImage ca: '/certs/client/ca.pem',
                cert: '/certs/client/cert.pem',
                dockerAddress: 'https://docker:2376',
                image: "${FULL_IMAGE}",
                key: '/certs/client/key.pem',
                logLevel: 'debug',
                podmanPath: '',
                // The project field below is only applicable if you are using Prisma Cloud Compute Edition and have set up projects (multiple consoles) on Prisma Cloud.
                project: '',
                resultsFile: 'prisma-cloud-scan-results.json',
                ignoreImageBuildTime:true
            }
            }
        }
        stage('Publish Result') {
        agent any
        steps {
            script {
                sh 'cat prisma-cloud-scan-results.json'
                }
            prismaCloudPublish resultsFilePattern: 'prisma-cloud-scan-results.json'
            }
        }
    stage('Verify'){
        agent any
        steps {
            script {
            if (currentBuild.currentResult == 'FAILURE') {
                error "Scan result is failed!"
            } else {
                echo "Scan finished and success!"
                }
            }
        }
    }
        stage('Push Image') {
            agent any
            environment {
                DOCKER_CONFIG = "${WORKSPACE}/.docker_tmp"
            }
            steps {
                script {
                    sh "mkdir -p ${DOCKER_CONFIG}"

                    withCredentials([usernamePassword(credentialsId: 'harbor-credentials', usernameVariable: 'HARBOR_USER', passwordVariable: 'HARBOR_PWD')]) {
                        // 1. login
                        sh 'echo $HARBOR_PWD | docker login ${REGISTRY_HOST} -u $HARBOR_USER --password-stdin'

                        // 2. push image
                        echo "Pushing image to Harbor..."
                        sh "docker push ${FULL_IMAGE}"
                    }
                }
            }
        }

        stage('Deploy') {
            agent any
            steps {
                script {
                    // SSH credentials stored in Jenkins with ID 'deploy-server-ssh'
                    withCredentials([
                        sshUserPrivateKey(credentialsId: 'deploy-server-ssh', keyFileVariable: 'SSH_KEY', usernameVariable: 'SSH_USER'),
                        usernamePassword(credentialsId: 'harbor-credentials', usernameVariable: 'HARBOR_USER', passwordVariable: 'HARBOR_PWD'),
                        ]) {
                        def DEPLOY_HOST = "${DEPLOY_HOST}"
                        def DEPLOY_PATH = "${DEPLOY_PATH}"

                        // 1. copy docker-compose.yaml to remote server
                        sh """
                            scp -i ${SSH_KEY} -o StrictHostKeyChecking=no \
                                docker-compose.yml ${SSH_USER}@${DEPLOY_HOST}:${DEPLOY_PATH}/
                        """

                        // 2. SSH to remote server and execute deployment
                        sh """
                            ssh -i ${SSH_KEY} -o StrictHostKeyChecking=no \
                                ${SSH_USER}@${DEPLOY_HOST} \
                                'cd ${DEPLOY_PATH} && \
                                echo ${HARBOR_PWD} | docker login ${REGISTRY_HOST} -u ${HARBOR_USER} --password-stdin && \
                                export IMAGE_TAG=${IMAGE_TAG} && \
                                export APP_VERSION=${IMAGE_TAG} && \
                                export BACKEND_API_URL=${BACKEND_API_URL} && \
                                export OPENAI_API_KEY=${OPENAI_API_KEY} && \
                                export OPENAI_BASE_URL=${OPENAI_BASE_URL} && \
                                export LLM_MODEL=${LLM_MODEL} && \
                                export OPENAI_EMBEDDING_API_KEY=${OPENAI_EMBEDDING_API_KEY} && \
                                export OPENAI_EMBEDDING_BASE_URL=${OPENAI_EMBEDDING_BASE_URL} && \
                                export EMBEDDING_MODEL=${EMBEDDING_MODEL} && \
                                export AIRS_ENABLED=${AIRS_ENABLED} && \
                                export X_PAN_TOKEN=${X_PAN_TOKEN} && \
                                export X_PAN_INPUT_CHECK_PROFILE_NAME=${X_PAN_INPUT_CHECK_PROFILE_NAME} &&
                                export X_PAN_OUTPUT_CHECK_PROFILE_NAME=${X_PAN_OUTPUT_CHECK_PROFILE_NAME} && \
                                docker compose pull && \
                                docker compose down && \
                                docker compose up -d && \
                                docker compose ps'
                        """

                        echo "Deployment completed successfully!"
                    }
                }
            }
        }

    }

    post {
        cleanup {
            node('') {
                sh 'rm -rf *.json || true'
            }
        }
    }
}